Create Word Template for Employment Terms
Objective
This tutorial will show you how to create an Employment Term Template in Word for your employees. Similar to a form letter, you can create a Word template and pull the previously defined data from the system using your current standard contract document.
Click-Through: Create Word Template for Employment Term
- Start in HR HUB
- Under Administration, click on Employment Terms
- Create a new entry, then mark it by checking the checkbox in the overview, or mark an already existing entry
- After checking the checkbox, the top bar will show the option Word Templates. Click on Word Templates and then on Download Template.
- After clicking on Download Template, a dialog opens
- As Entity, Employment Terms is already selected
- Additionally, you can define entities in 1:n, n:1, or n:n relations. In this case, 1:n and n:1 relations will be needed.
- For 1:n relations, select:
- Wage (xrm1_employment_contract_wage_referring)
- Leave Entitlement (xrm1_employment_contract_time_slice_referring)
- Start typing to directly show the desired entry in the list, and click on it to add it.
- For n:1 relations, select:
- Applicant (xrm1_applicant_employment_contract_referring)
- Employee (xrm1_employee_contract_referring)
- Start typing to directly show the desired entry in the list, and click on it to add it.
- Click the Download button and save the document as a template in a fitting place
- A seemingly "empty" Word document is downloaded. It's important to download the template first for the system to be able to connect this template to the relevant data.
- Open the downloaded document with Microsoft Word
- Since the downloaded Word document is seemingly empty, we recommend you first enter your standard contract text into this document.
- Next, activate the Developer Tools in the Navigation tab
- In standard, the tab Developer is not shown. If it's not yet shown in your Word, follow those steps:
- Go to the tab File, then Options (bottom left)
- In the dialog which opens, click on Customize Ribbon
- Here, as well as under Main Tabs, activate the checkbox for Developer
- Confirm by closing the dialog with OK
- After configuring this setting once, the tab Developer will remain visible in your Microsoft Word. If you don't need it anymore, you can deactivate the checkbox again, if you want.
- XML Mapping
- Once the tab Developer is visible in the ribbon, click on it, then select XML Mapping Pane
- On the right side, the XML Mapping Pane opens. Here, select from the drop-down 'Custom XML Part' urn:microsoft-crm/document-template/xrm1_employment_contract/<number>. The five-digit number is unique for every system.
- For this reason, please keep in mind it's not possible to create a Word Template for a Test environment, then use it in a Procuction environment later on.
- Under DocumentTemplate, open xrm1_employment_contract by clicking on the arrow.
- All content controls are now displayed. If you scroll down in the XML mapping window, you will see that there are more content controls that can be opened here:
- xrm1_employment_contract_time_slice_referring: Here you will find all content controls for fields on the Absence entity.
- xrm1_employment_contract_wage_referring: Here you will find all content controls associated with fields on the Wage entity.
- xrm1_applicant_employment_contract_referring: Here you will find all content control elements associated with fields on the Employment Term entity to which an Applicant is assigned.
- xrm1_employee_contract_referring: Here you will find all content control elements associated with fields on the Employment Term entity to which an Employee is assigned.
- You can add the content controls to the document by first clicking on the text passage in the document where you want to insert the element. Then right-click on the element and select Rich text under "Insert content control".
- Depending on the size of your screen, it may be advisable to make the XML mapping list wider so that you can read the names of the content controls in full.
- A list of the available elements and assigned field names can be found below.
- Now add the content controls you need to the document and format them accordingly.
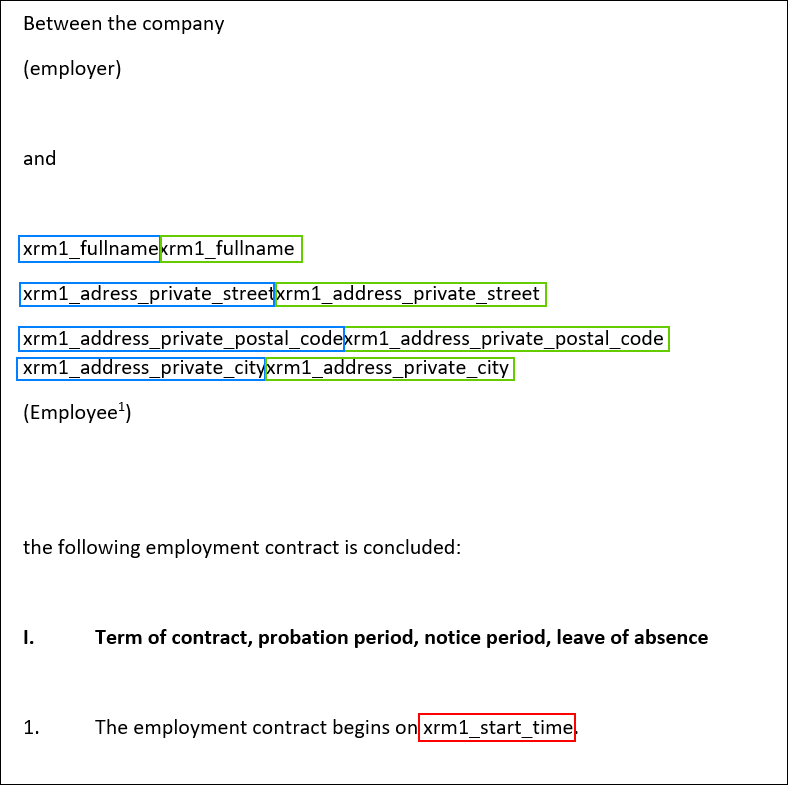
- In the following example, the name and address of the (future) employee are added. If the employee is still stored in the system as an applicant, it makes sense to add the content control for the name and address for both applicants and employees in the Word template.
- First add the applicant's name and address, for example. You can find the content controls for this under xrm1_applicant_employment_contract_referring. The following content controls are required for name and address:
- xrm1_fullname OR xrm1_first_name and xrm1_last_name
- xrm1_address_private_street
- xrm1_address_private_postal_code
- xrm1_address_private_city
- Once you have added these content controls, add the same for employees. You can find these under xrm1_employee_contract_referring.
- This has the advantage that your employment term can be automatically created, regardless of whether it has been assigned to an employee or an applicant. - However, the fields are only ever filled in once, so there are no duplicate entries.
- If you have a representation in a table in your employment contract, for example for the salary, this can also be filled with content control elements. To do this, select the line to be filled in the table and right-click on the entity in the XML mapping window. For example, for wages this is xrm1_employment_contract_wage_referring. Use the mouse to navigate to Insert content control and click on Repeating. This ensures that as many data records are displayed in the table as are available.
- Then fill the table with the content controls as usual.
- Now add the appropriate content controls for your entire employment contract. An overview with the schema names of the most important content controls can be found on this page. We recommend opening the overview page and keeping it open while you work on the content controls.
- Once you have completed the Word template, the next step is to upload it so that it can be used. Save your Word document and navigate back to Dynamics 365.
- You can adapt the document at any time afterwards if you want to add something or make changes.
Click-Through: Upload Global Template
- Global templates can be used for any employee in the company who has the necessary security authorization.
- To upload your existing Word template as a global template for employment terms, click on the gear wheel icon in the top right corner of Dynamics 365 and navigate to Advanced settings
- A new window opens in your Browser
- Open the settings here by clicking on the arrow next to 'Settings'
- On the left under Business, navigate to Templates
- Click on Document Templates
- You are now seeing an overview of available templates
- In the top left, click on + NEW to add a new template
- Select Word Template and Filter by entity: Employment Terms from the drop-down.
- Click on Upload, then select your previously created Word document
- Make sure to upload the template, not an already generated document with employee data.
- Once the Word document has been successfully uploaded, the information for the document template is displayed. You can also change the name and add a description here.
- This global template is now available to you for all employees.
Click-Through: Create Employment Term as a Word document from the Template
- Start in HR HUB
- Click on Employment Terms
- Check the checkmark in front of the desired Employment Term
- In the top bar, click on Word Templates
- The global template is now displayed
- Click on your newly created global template and save the Word document
- The employment term is now automatically generated for your employee based on the entries you have made in the system and downloaded as a Word document.
Result
Here, you see an example for an employment term template in Word.