Update Guide
Objective
This page takes you through the process of updating your Hubdrive system to the newest Rollup Update.
Process
System Admin
Export Customizations (if you have any)
System Admin
Download and install Base Solution
System Admin
Download and install Flow Solution
System Admin
Download and install Addon: Time Account Activation
System Admin
Download and install Addon: Hierarchy Security
Prerequisites
- Make sure to update the system with the same System Admin user that was initially used to install the solution
- The System Admin user must have all necessary licenses assigned (including Microsoft licenses, e.g. Dynamics 365 Customer Service Enterprise, and a Microsoft Exchange License)
- Please note that during the update, functionalities for users may be limited. Therefore, we recommend updating outside of your usual business hours.
- Important: Before starting the installation, open the Power Platform Admin Center and make sure that Administration mode is disabled for the Environment where you want to install the HR solution (screenshot)
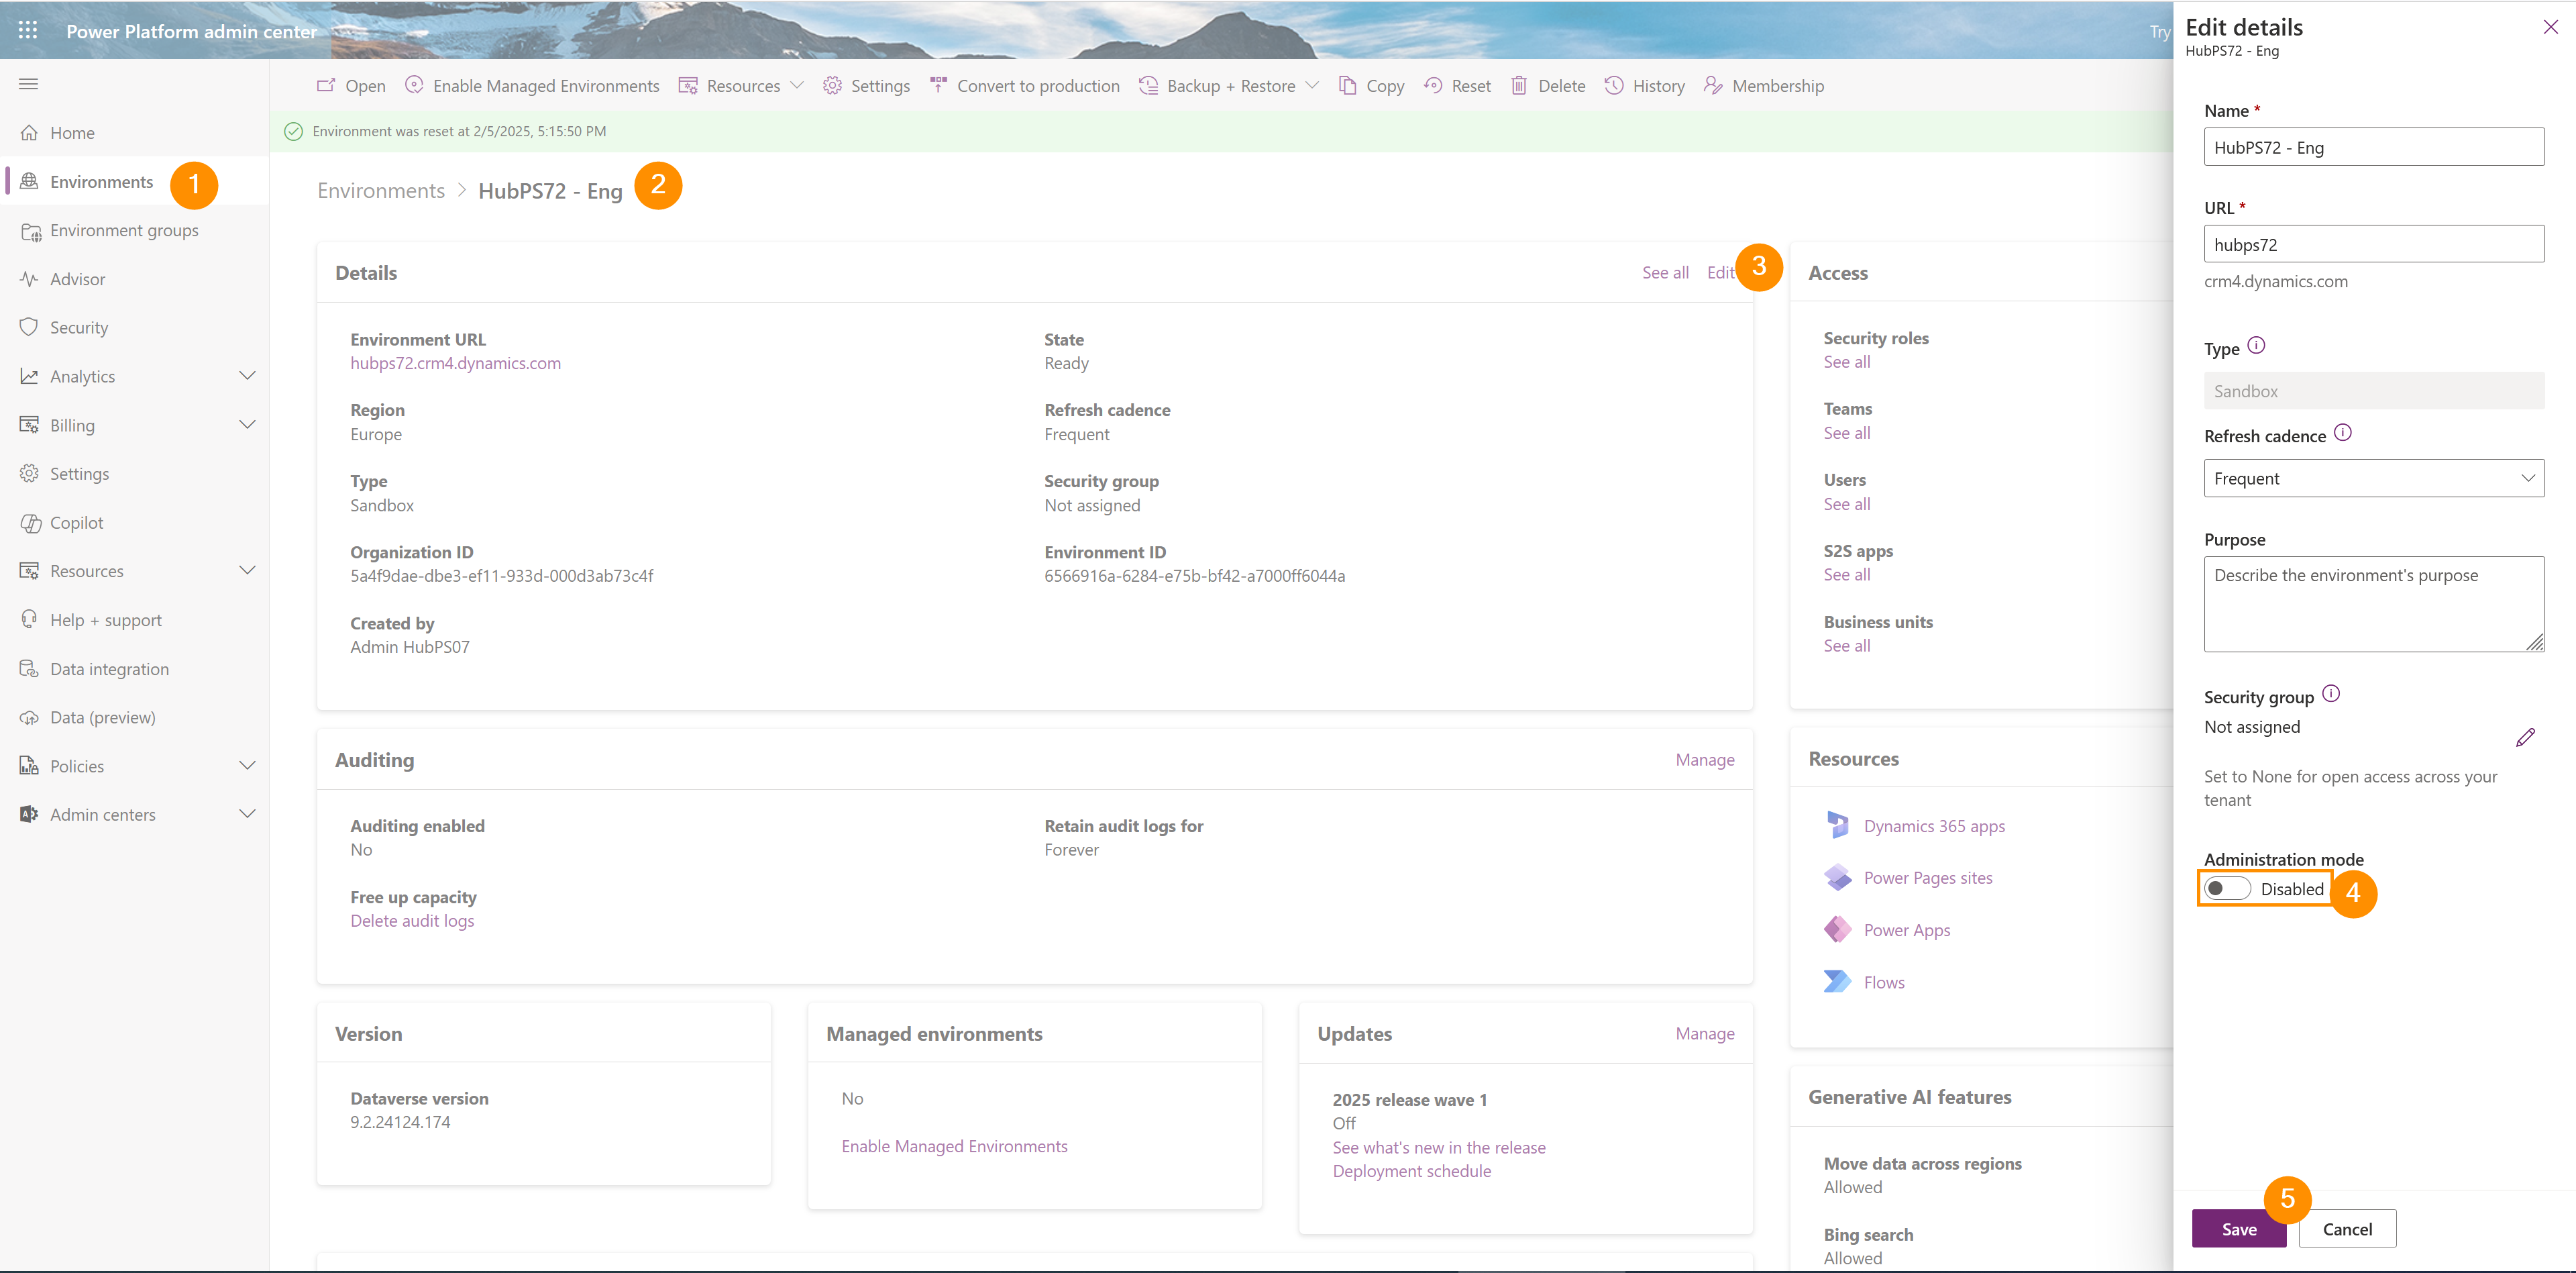
Click Through
Part 1: Export unmanaged Solutions (Customizations)
If you have customizations in your system, please make sure to save and export them before the Update, then re-import them after your Rollup Update is finished.
- To Export Solutions, log in to PowerApps
- Click on Solutions
- Ensure you have the correct Environment selected in the top-ribbon on the right
- Click on the Unmanaged tab
- Click the checkbox next to the solution you want to export and click on Export Solution in the ribbon bar
- Click on Next
- Select Unmanaged
- The platform will automatically increase the Current Version by 1 digit.
- Click on Export
- Save the unmanaged solution in your desired location. The file will be saved as ZIP file and will be needed later.
- Please also export the Time Account Feature Activation solution, if you have it installed
- Repeat these steps with all unmanaged solutions you want to export
Part 2: Download and install Base Solution
- In the Customer Portal, click on Downloads.
- Click on Download Solution Installer incl. Base Data to start the download
- Open the downloaded file (this may take a few seconds)
- In the pop-up window, choose a destination folder for the software on your computer
- Click Install
- After a few seconds, the Package Deployer opens. Click on Continue.
- Fill the necessary fields:
- Employment Type: Office 365
- Do not check the checkmark for "Sign in as current user"
- Check the checkmark for "Display list of available organizations"
- Check the checkmark for "Show Advanced"
- Online Region: Select whichever applies to you. If unsure, keep it on "Don't Know".
- Fill the User Name and Password of your generic admin account.
- Click on Login
- On the next page, select the Environment your Hubdrive solution is installed on
- Click on Login
- Select which version you want to install:
- HR for Dynamics Installer will install the complete Hubdrive solution. Most customers outside of Germany will want to choose this option.
- HR for Dynamics Installer with Base Data for German Labor office will install the complete Hubdrive solution plus the Base data needed if you plan to ever publish Job Advertisements via the German Labor Office.
- Click Next
- Check if the option shown really is the one you want to install
- Click Next.
- Check the organization's Unique Name shown to make sure the solution will be installed in the correct environment.
- You can check your organization's Unique Name in your Hubdrive system by following this guide
- Click Next
- After the validation process is complete, click Next
- The solution is now being installed. This may take a few hours, depending on the size of your system.
- When the installation process is finished, click on Next, then on Finish
Part 3: Download and install Additional Mandatory Download: HR for Dynamics Flows
- Once the solution is installed, click on Downloads in the Customer Portal again.
- Click on Additional Mandatory Download: HR for Dynamics Flows to start the download
- Navigate to PowerApps
- Login with your generic admin account.
- In the right half of the top bar, select the correct Environment.
- Click on Solutions on the left
- Click Import Solution in the grey top bar
- Select the file with the Flows you downloaded.
- Click Next.
- Make sure in the Advanced Settings, the checkmark for 'Enable Plugin steps and flows included in the solution' is checked.
- Click Next.
- If requested, select a connection/click on + new connection. If there is no request to add connections, you can skip this part.
- In the window that opens, click on Create.
- Login with your generic admin account.
- Go back to the previous browser window and click Refresh.
- If there are still connections missing, add another new connection and follow the same steps again.
- Once all connections are set or if there was no request, click on Import.
- Wait while the Flows are being installed. This may take up to 30 minutes.
- After the import has finished, open the flow solution named Dynamics HR Management Flows in the Managed Solutions list
- For Cloud Flows you customized: To use our standard for each Cloud Flow, make sure there are no outdated Solution Layers for the imported Flows. Learn more about this here.
- Make sure the flows are switched on. If not:
- Switch on the Flows in the correct order:
- Flows with the name "(Deprecated) …" need not be turned on
- Of all other Flows, switch on the ones with the name "Child flow: …" first
- Then switch on the Flows with other names
- To switch on flows, mark them one by one on the left side of the flow list, then click Turn on in the grey top bar
- After a few seconds, the button name changes to "Turn off", which tells you the flows are now running.
- Repeat this step until all flows you need have been turned on.
- Switch on the Flows in the correct order:
Part 4: Download and install Addon: Time Account Activation
If you are using the Addon: Time Account Activation, then, after a successful Rollup Version Update, you need to re-import the Solution you previously exported.
- Navigate to PowerApps
- Login with your generic admin account
- Click on Solutions on the left
- In the right half of the top bar, select the correct Environment
- Click Import Solution in the grey top bar
- Click Browse
- Select the file with the Addon: Time Account Activation you saved after exporting
- Click Next
- Make sure in the Advanced Settings, the checkmark for Enable Plugin steps and flows included in the solution is checked
- Click Import
- Done! The Time Account Activation model is now being imported and will be installed in your environment.
Part 5: Installation of Addon HR for Dynamics Hierarchy Security
If you are using the Addon HR for Dynamics Hierarchy Security, you need to download and install it again after the Rollup Version Update.
- Navigate to the Customer Portal
- Log in with your credentials
- Click on Downloads
- From the list, download the Addon: HR for Dynamics Hierarchy Security
- Navigate to PowerApps
- Log in with your generic admin account
- Click on Solutions on the left
- In the right half of the top bar, select the correct Environment
- Click Import Solution in the grey top bar
- Click Browse
- Select the file with the Addon: HR for Dynamics Hierarchy Security you downloaded
- Click Next
- Make sure in the Advanced Settings, the checkmark for Enable Plugin steps and flows included in the solution is checked
- Click Import
- Done! The hierarchy security model is now being imported and will be installed in your environment.
- If you use the Addon for the first time after this Update, you also need to configure it
Hint
- The Flows named "Copy Vacancy Portal…" need only be turned on if you want to use the Recruiting Portal.
- The Flows named "Dorma Kaba Integration …" need only be turned on if you want to use Dorma Kaba time clock terminals.
- The Flows named "OKR …" need only be turned on if you want to use the HR for Dynamics OKR/Leadership module.
Result
After finishing this process, your Hubdrive system is running on the newest Rollup Update.