
2. Recruiting
Recruiting Portal
Bundesagentur für Arbeit (German Labor Office) Integration
Xing Publishing
Setup of Broadbean Integration and Publishing of Vacancies
Setup of StepStone Integration and Publishing of Vacancies
Create Applicants and Applications automatically from received email
Autoresponse on Application
Activate CV Parsing
List of workflows that send emails or create tasks
Recruiting Portal
With the Recruiting Portal you get a complete platform which can be used as it is or fully integrated within your website.
You can create vacancies in Dynamics HR Management and publish them with one click to the Recruiting Portal. Every change you make will automatically be transferred, which keeps the vacancy always up to date.
When someone applies for a vacancy, his information is transferred to Dynamics HR Management and a record for the applicant and his application is created and ready for you to process the application.
It only takes three steps to enable this extension
- Enable Portals in Dynamics 365
- Installation of the extension
- Configuration of the extension
- Optional: Customize the application form
Activate Portals in Dynamics 365
Important: Note down your Dynamics 365 Portals URL
Install the Recruiting Portal extension
- Go to the Download Page in the Customer Portal
- Answer the questions to find out what solution you need
- Download the file Recruiting Portal Installer and open it
- Follow the instructions and a few moments later the Recruiting Portal is ready to use
Configure the extension
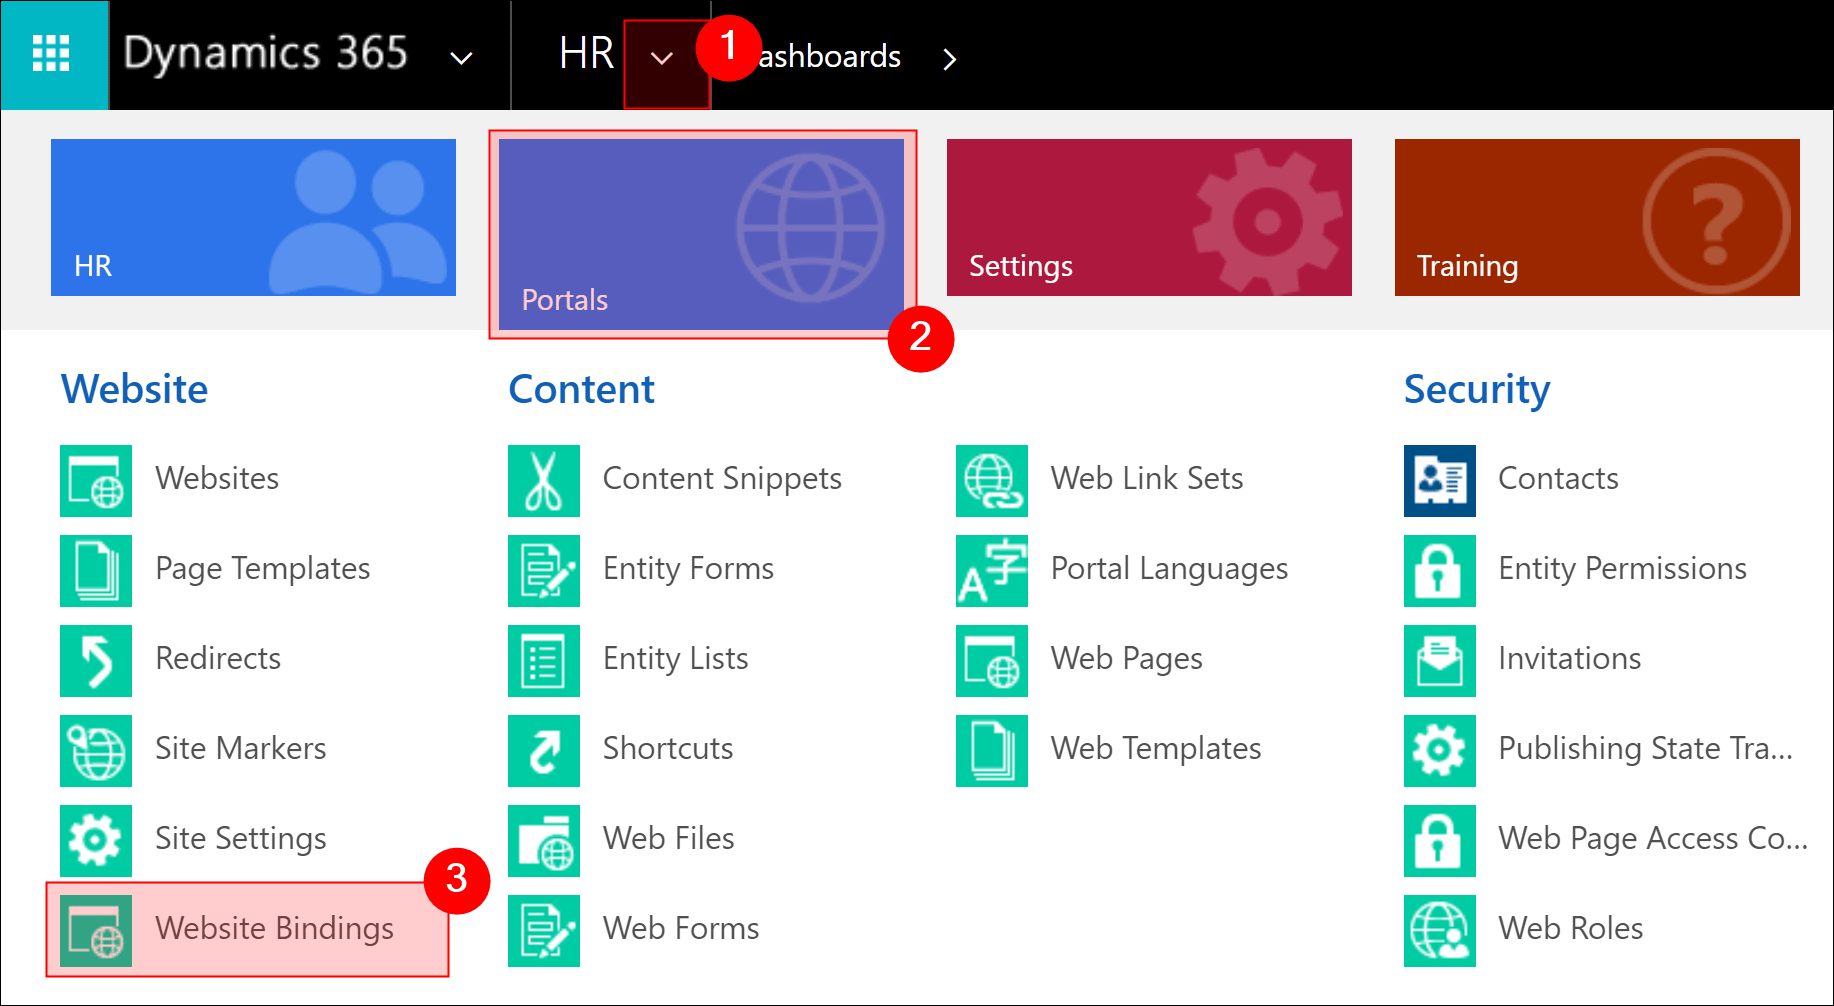
Go to Navigation Bar -> Portals -> Website Bindings
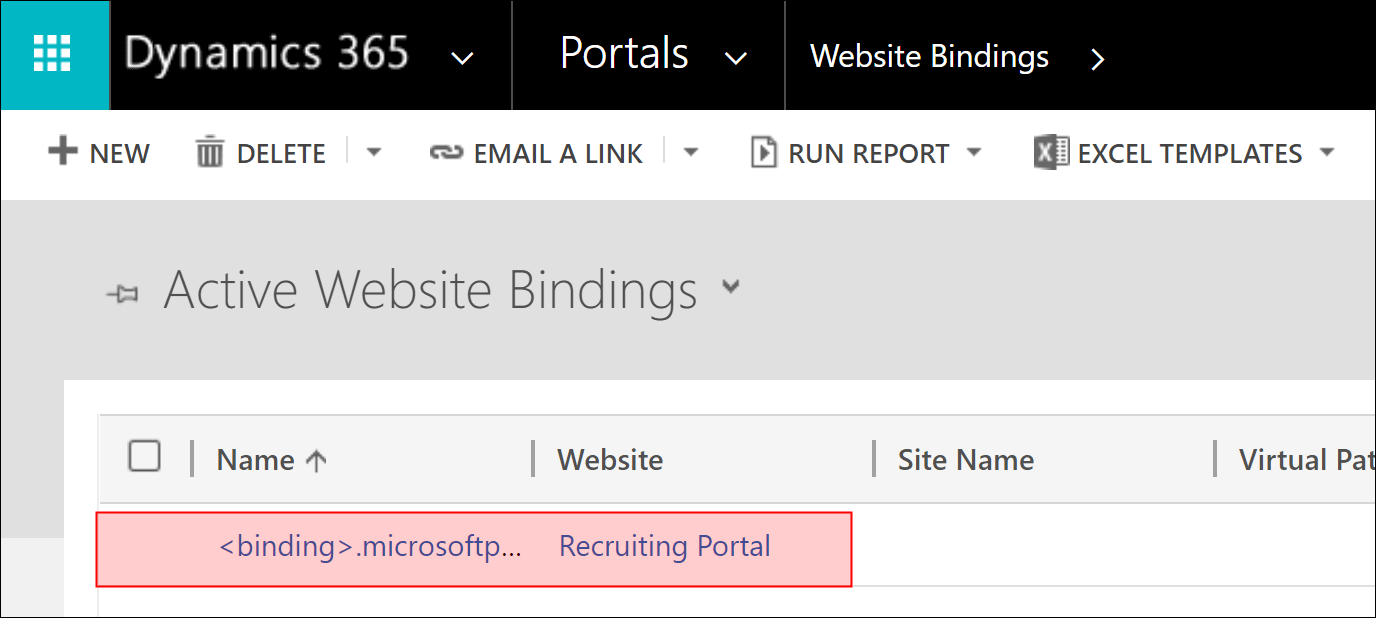
Open the Recruiting Portal record
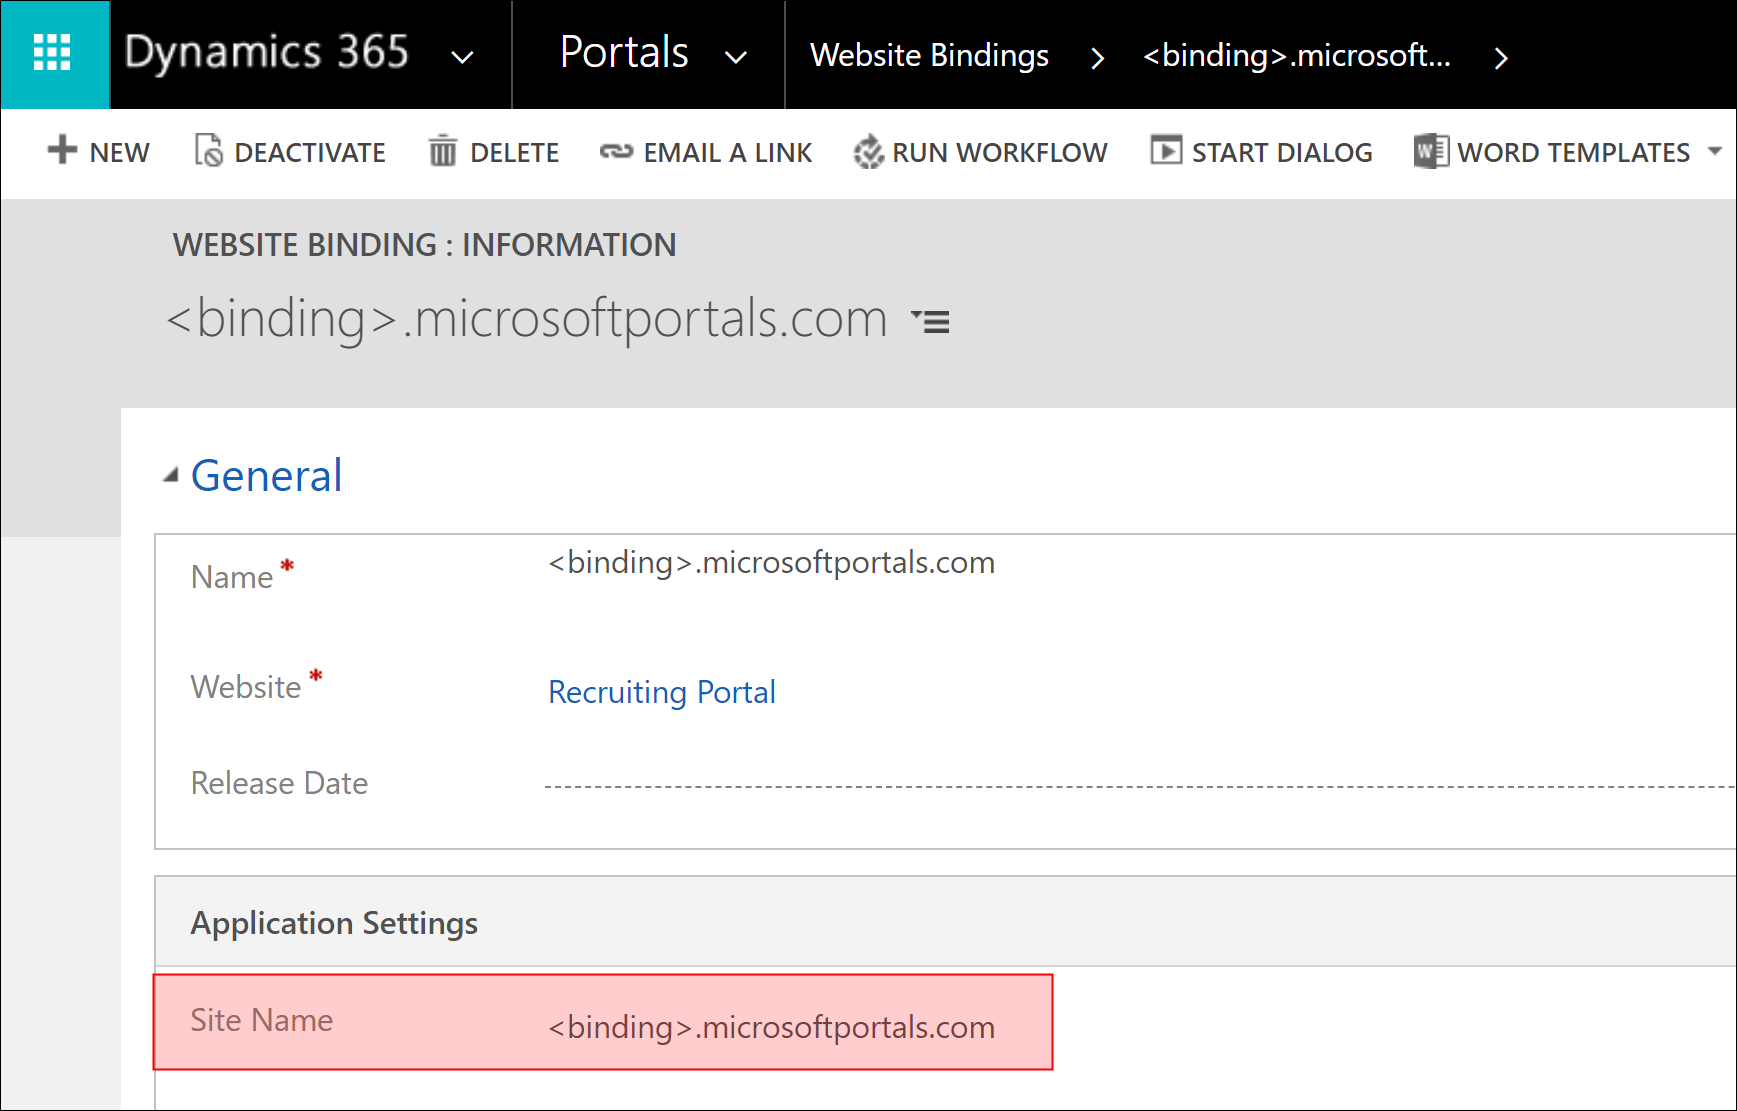
Change the Site Name to your Portal URL (You can find this in the Admin Center. It looks like this: XYZ.microsoftcrmportals.com) and Save & Close the record
Optional: Customize the application form
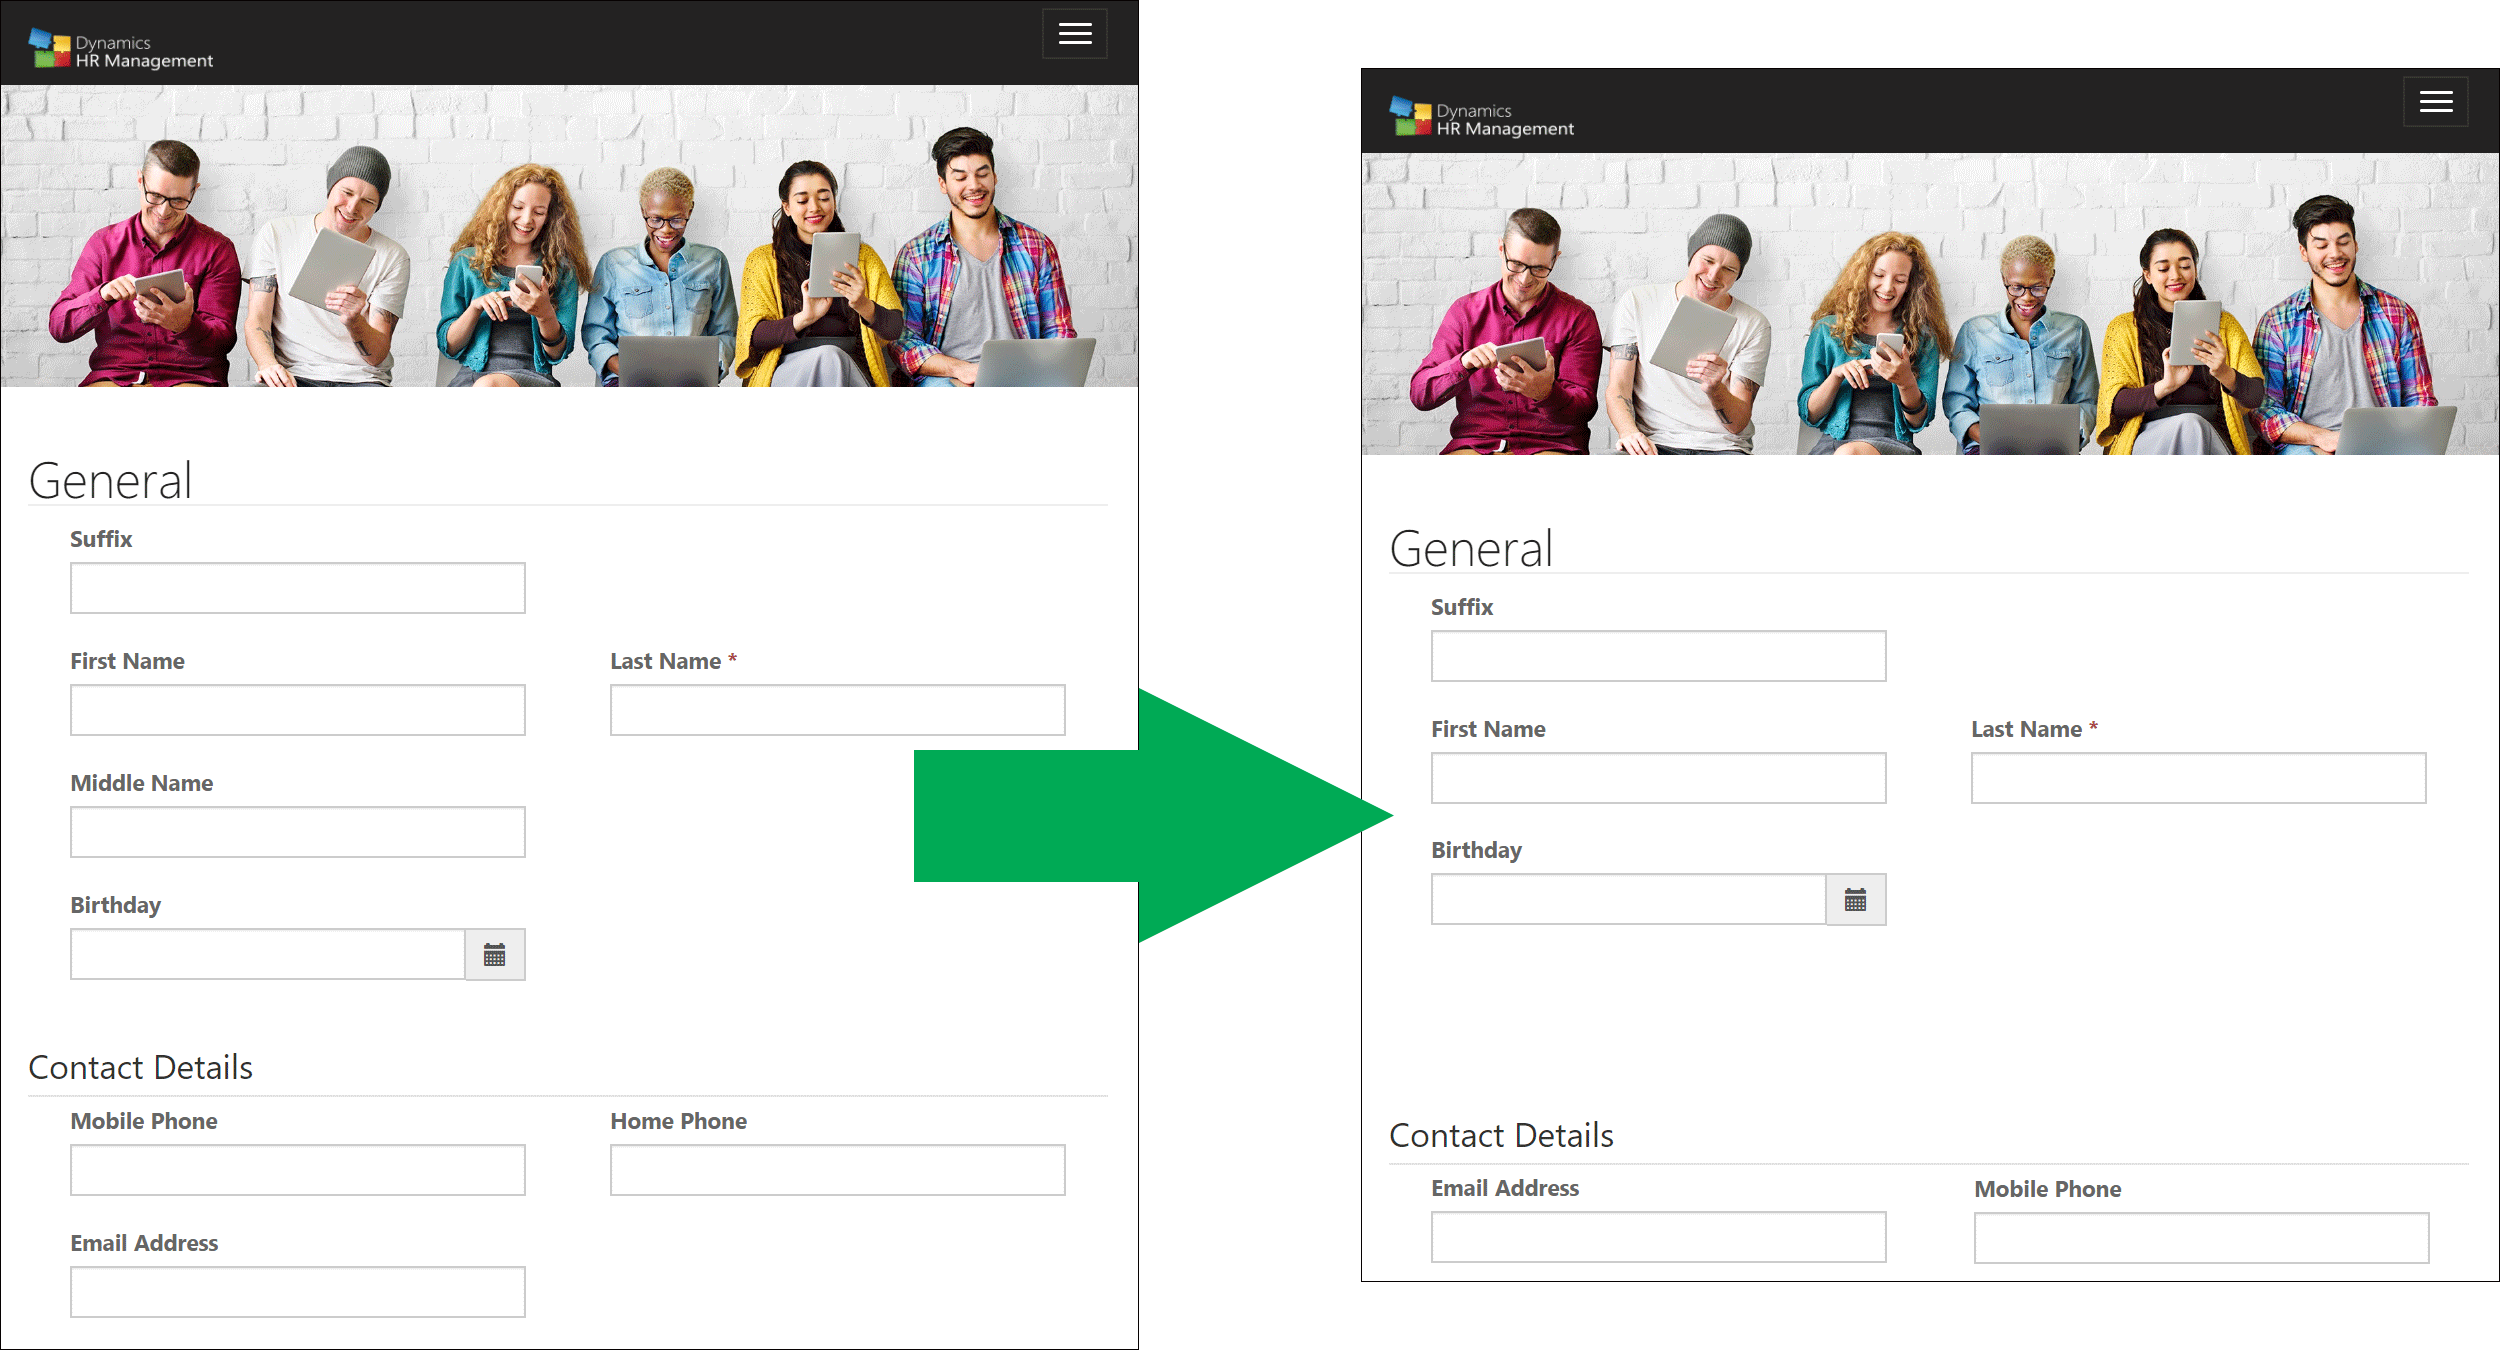
You can customize the application form of your Recruiting Portal and choose, which information you want from your applicants
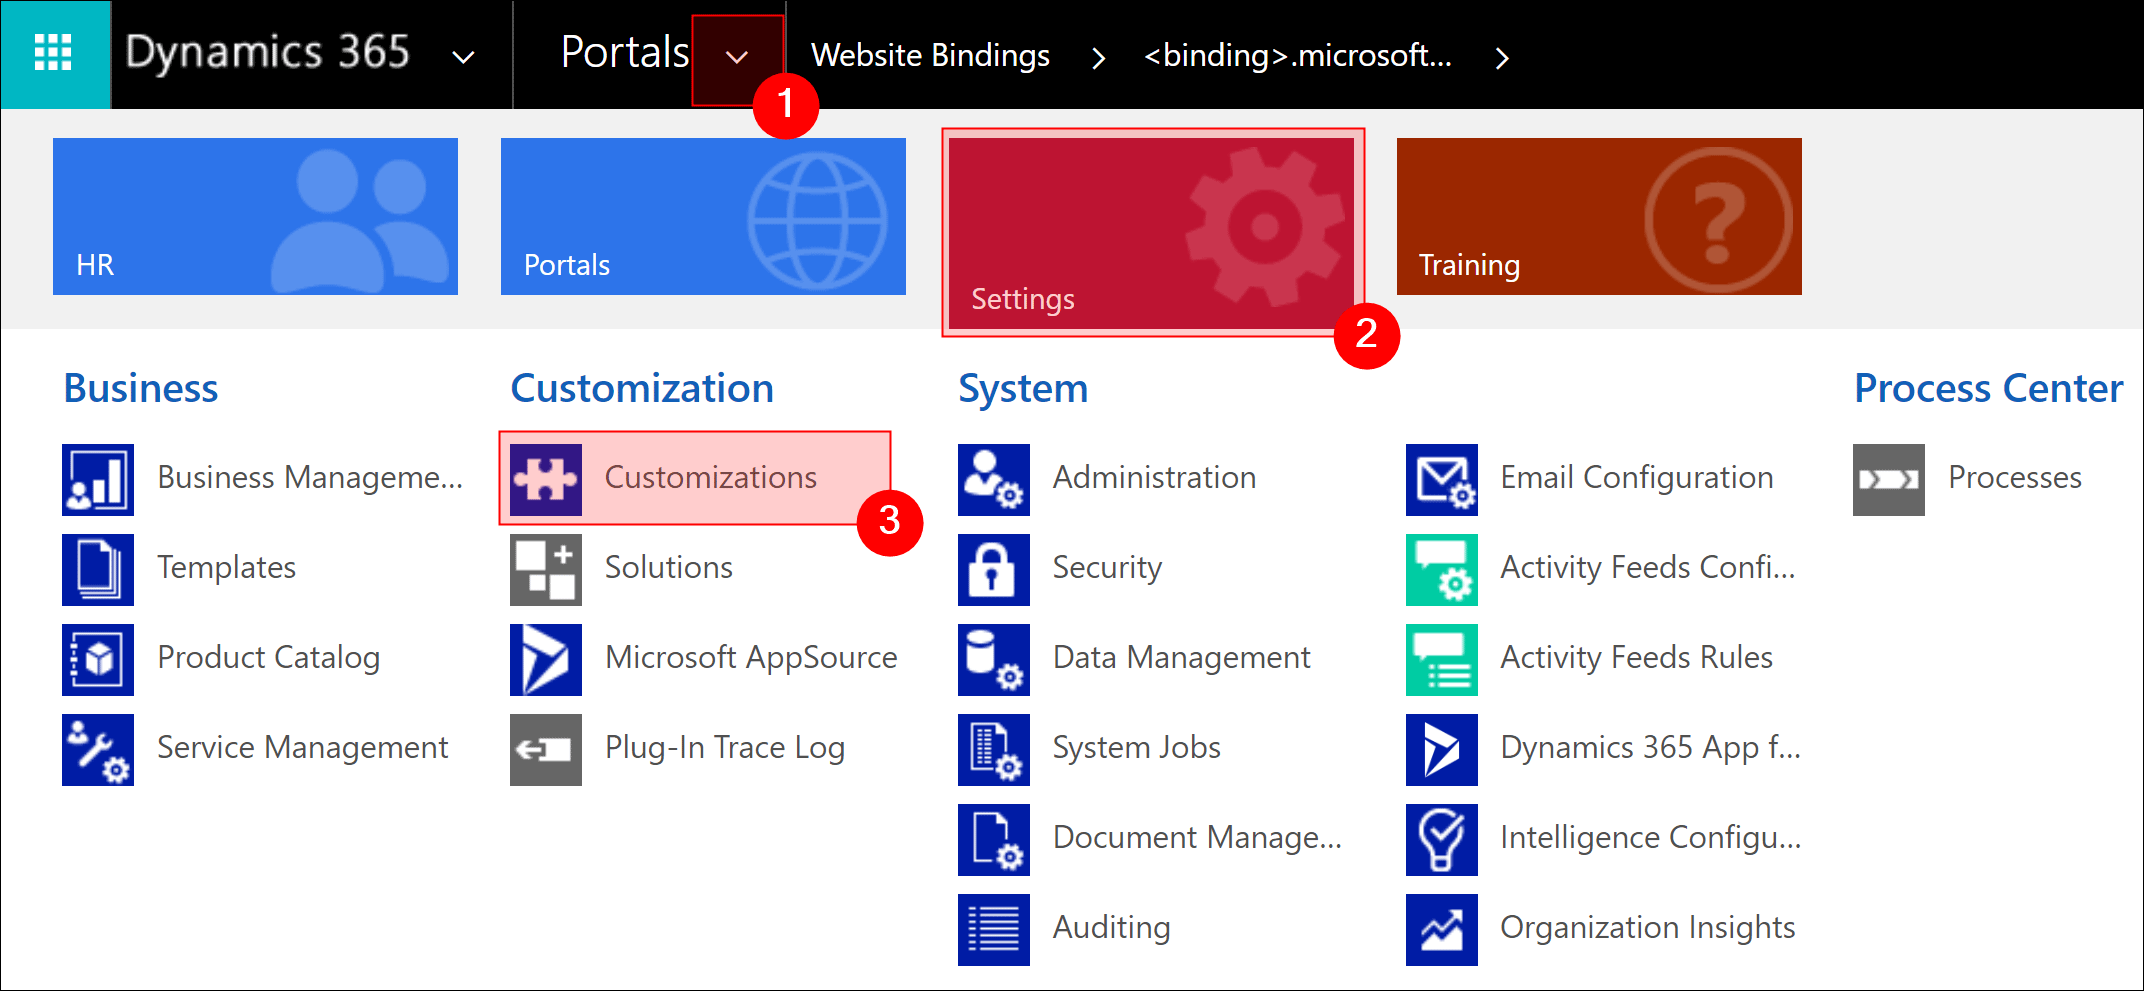
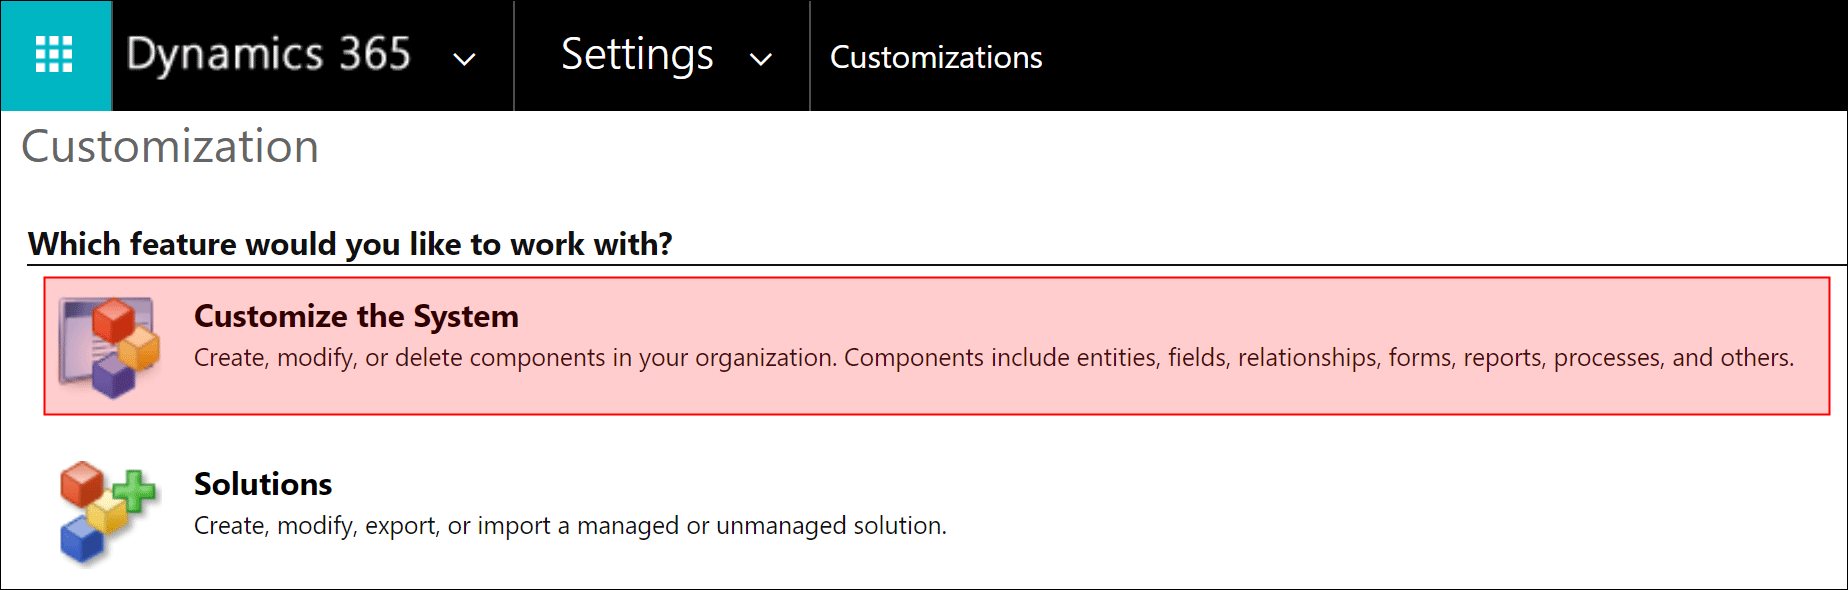
Go to Navigation Bar -> Settings -> Customizations and open Customize the System
Select Forms in the Entity Applicant and open the Applicant Portal Form
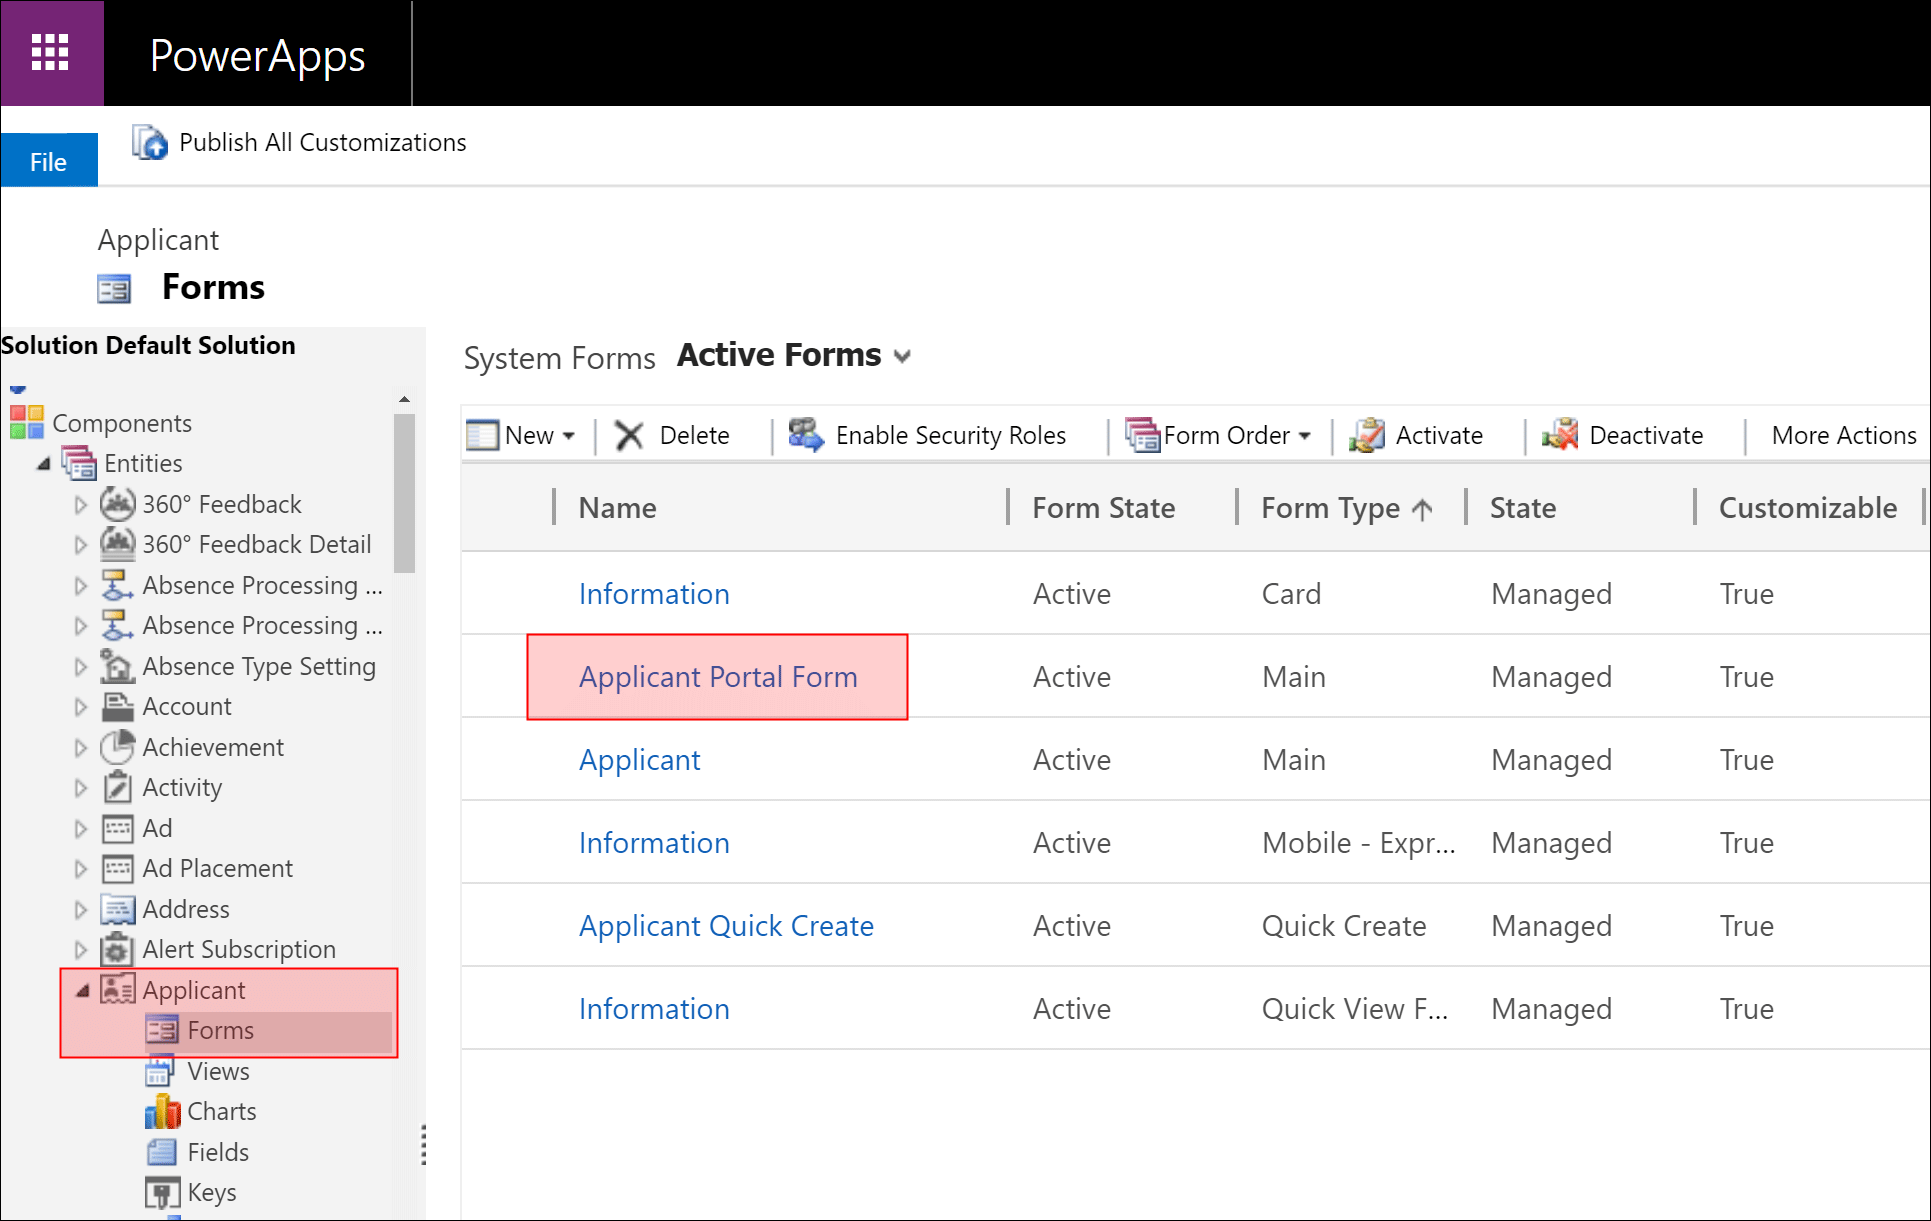
The Form Editor opens up, which allows you to customize the form via drag-and-drop.
When you are done with all customizations, press Save & Close.
Press Publish All Customizations to submit all your changes
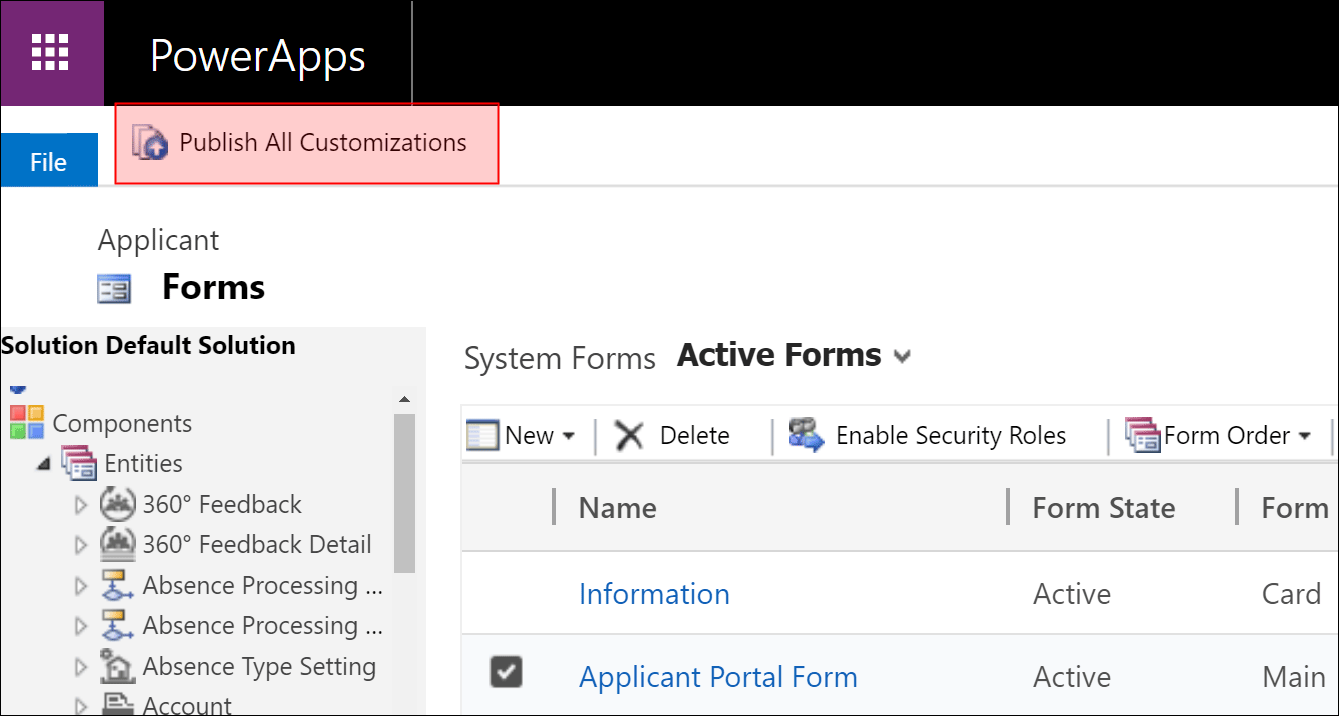
All these changes are submitted in realtime to the Recruiting Portal
Bundesagentur für Arbeit (German Labor Office) Integration
These instructions will guide you through the process of submitting your created vacancies to the employer portal for the German Labor Office (Bundesagentur für Arbeit).
Configuration of the Recruiting Channel
Note: You can only configure recruiting channels with HR security roles.
To publish a vacancy to the German Labor Office (Bundesagentur für Arbeit), please follow this instruction.
Publish Vacancy
Log in to Dynamics 365 and make sure you are in the "HR HUB" or "HR HUB Recruiting" app.

Switch to "HR Hub" at the bottom left, if it' s not already the case, and navigate to "Vacancies". Create a new vacancy.
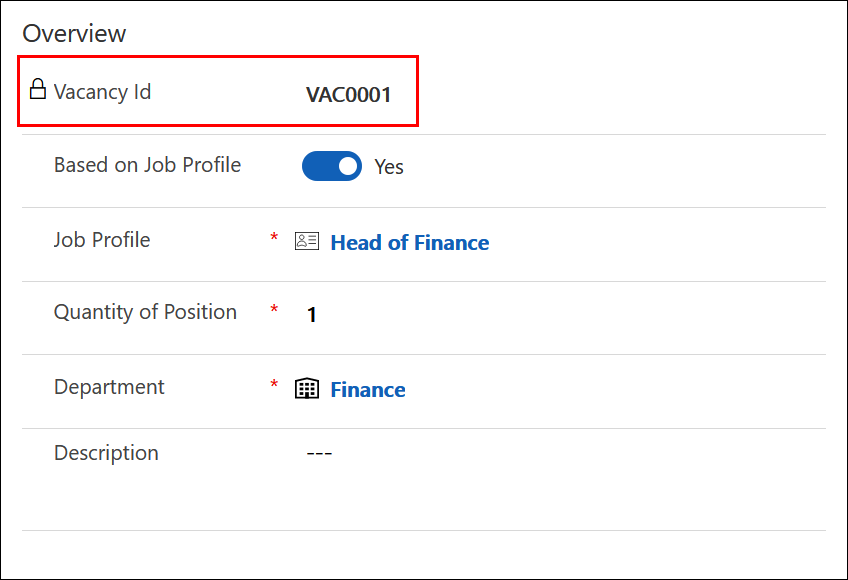
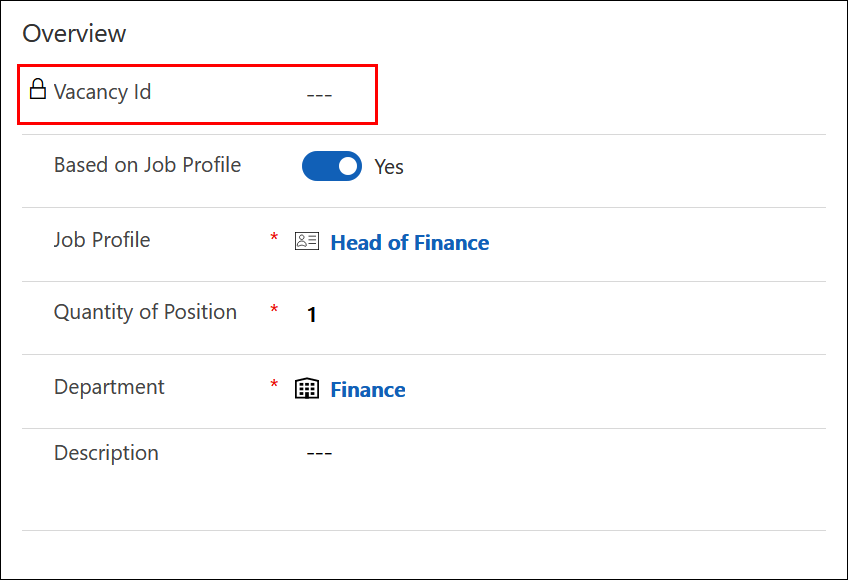
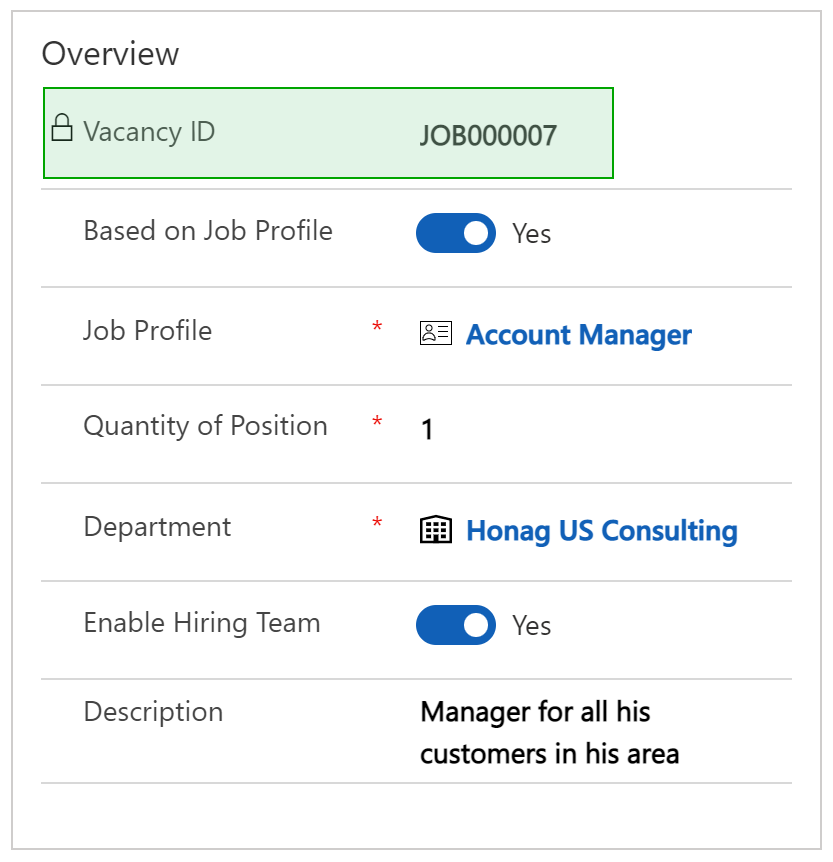
Select the Job Profile, Quantity of Position, as well as the Department and save your entries.
Please make sure that the "Vacancy Id" is automatically filled after saving. If this is not the case, you need to create the numbering first. Click here for more information.
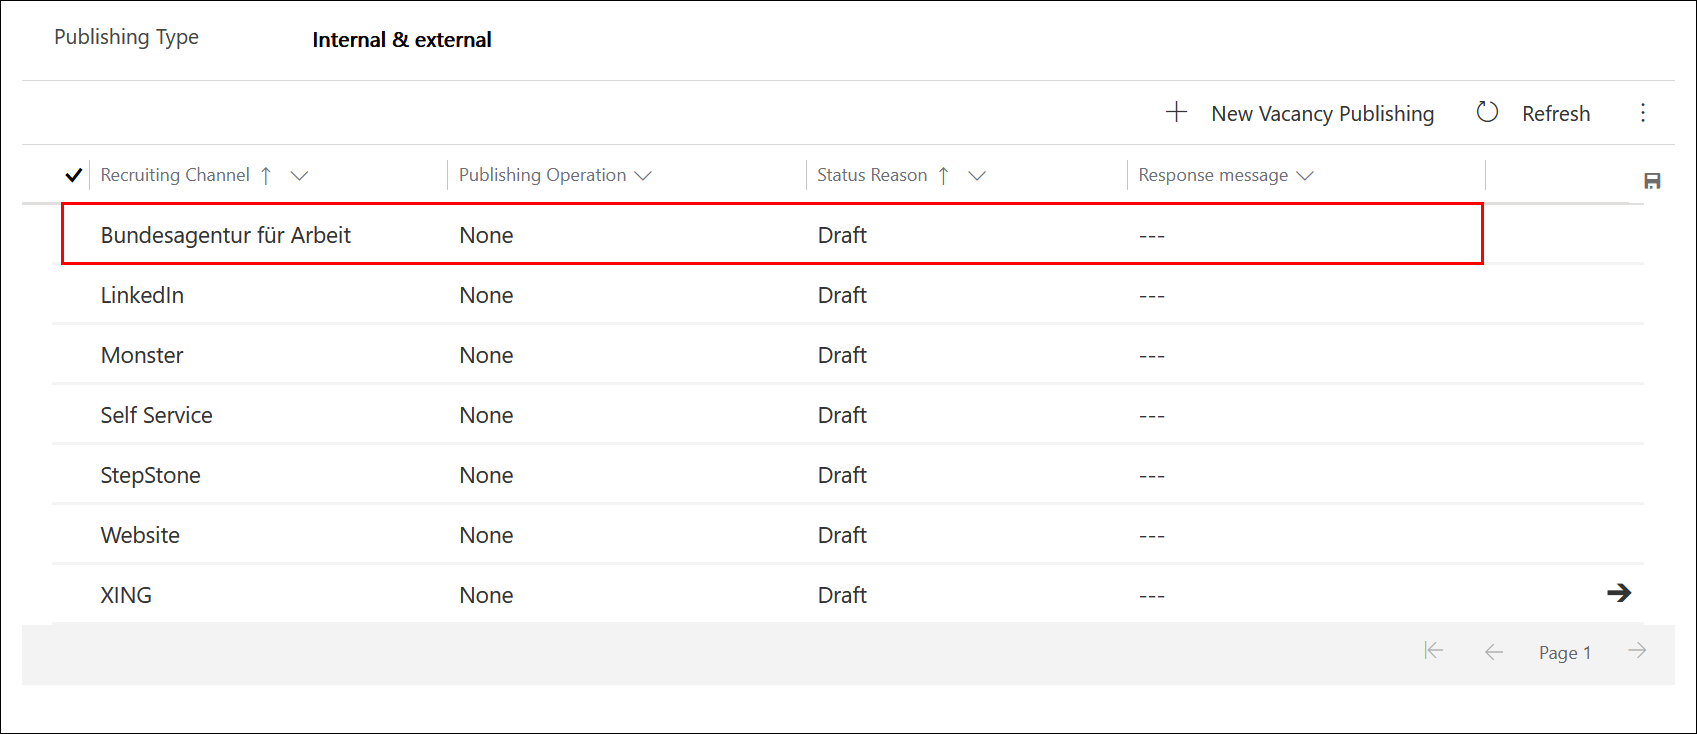
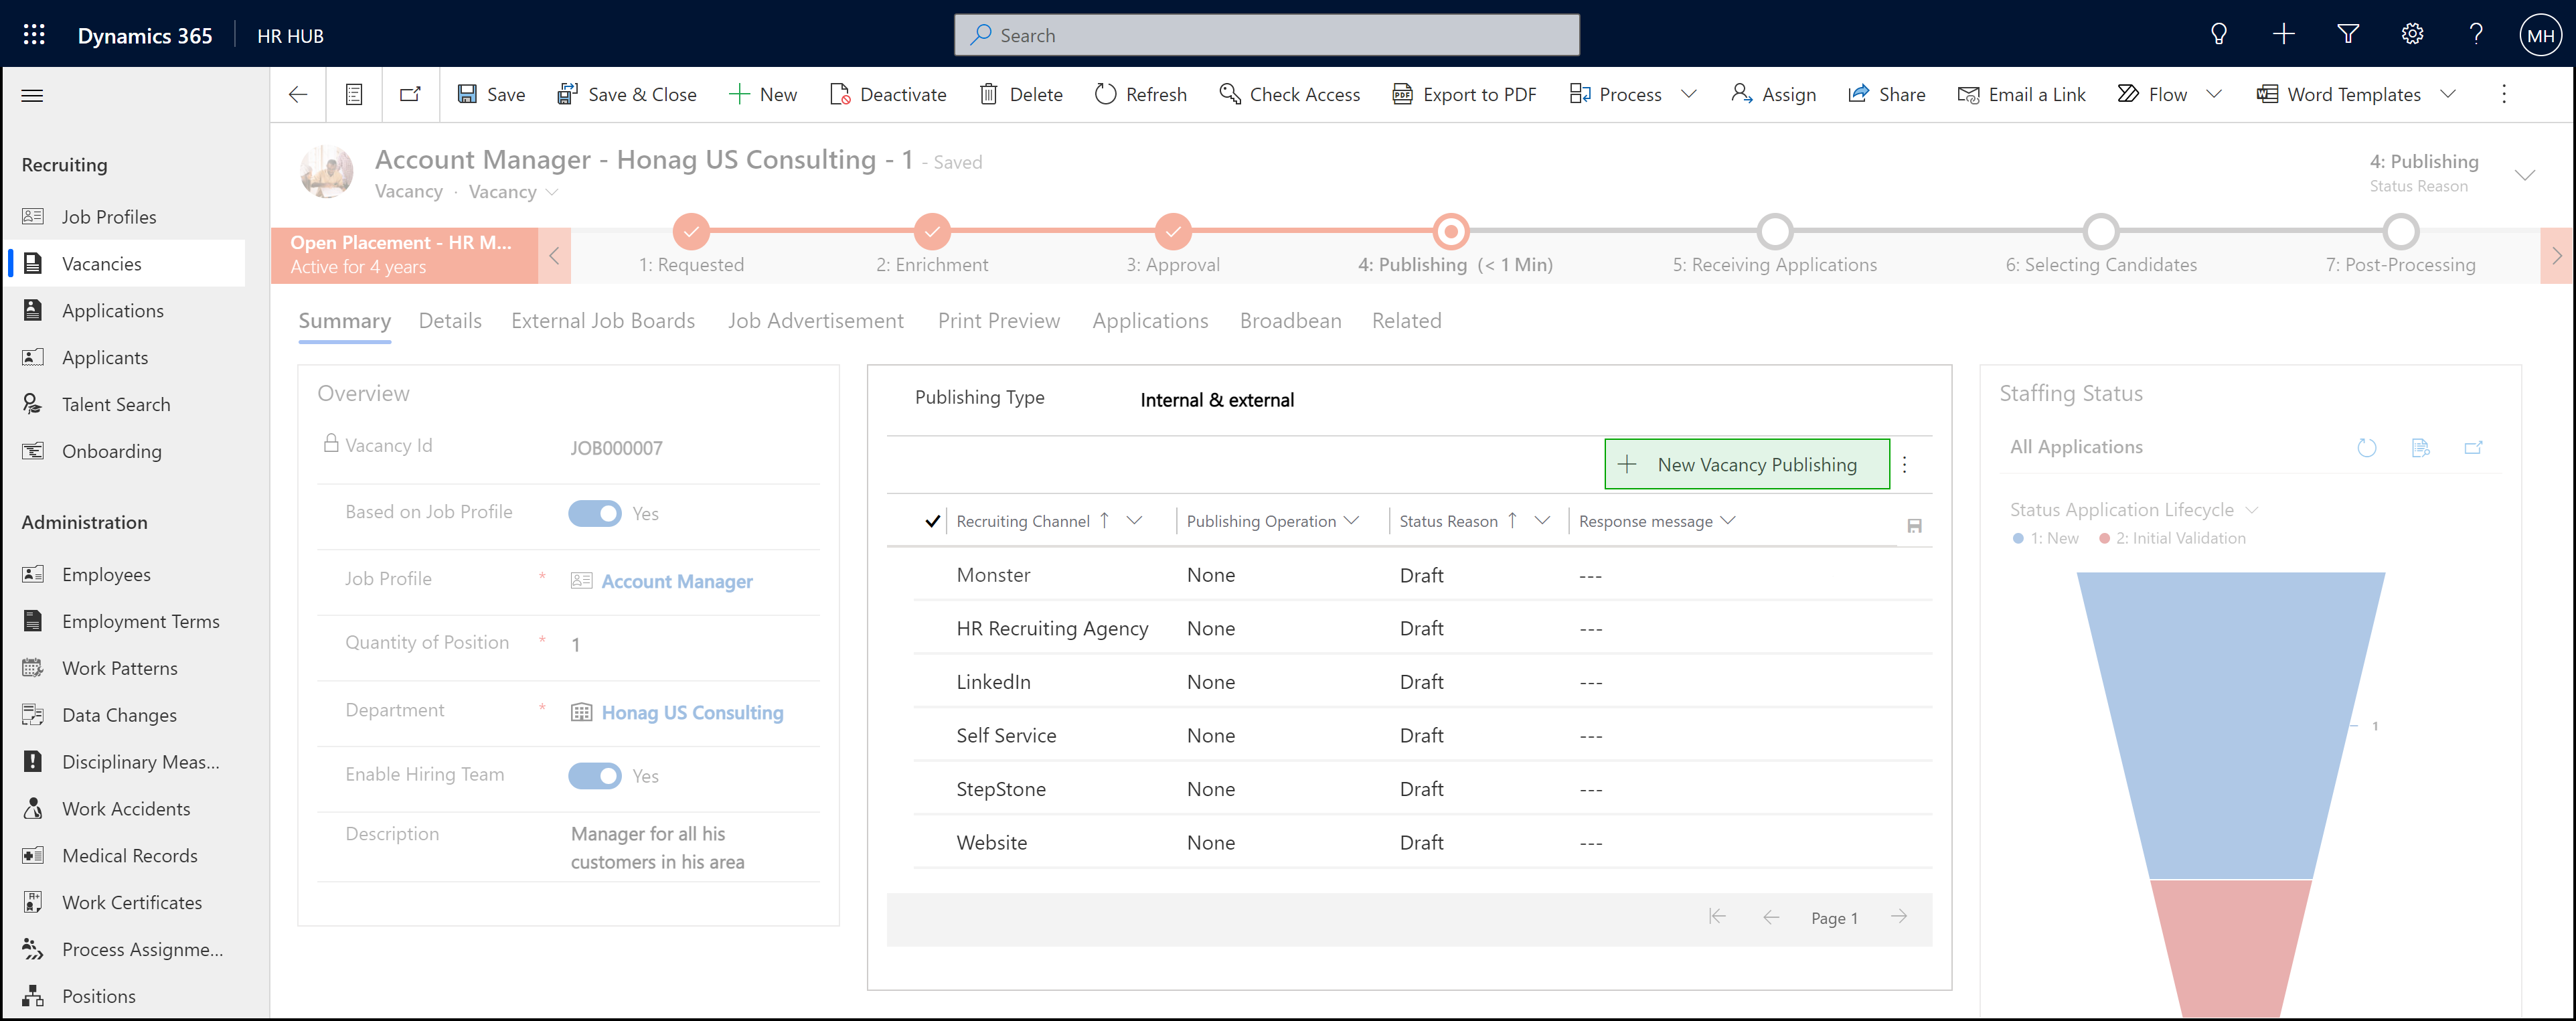
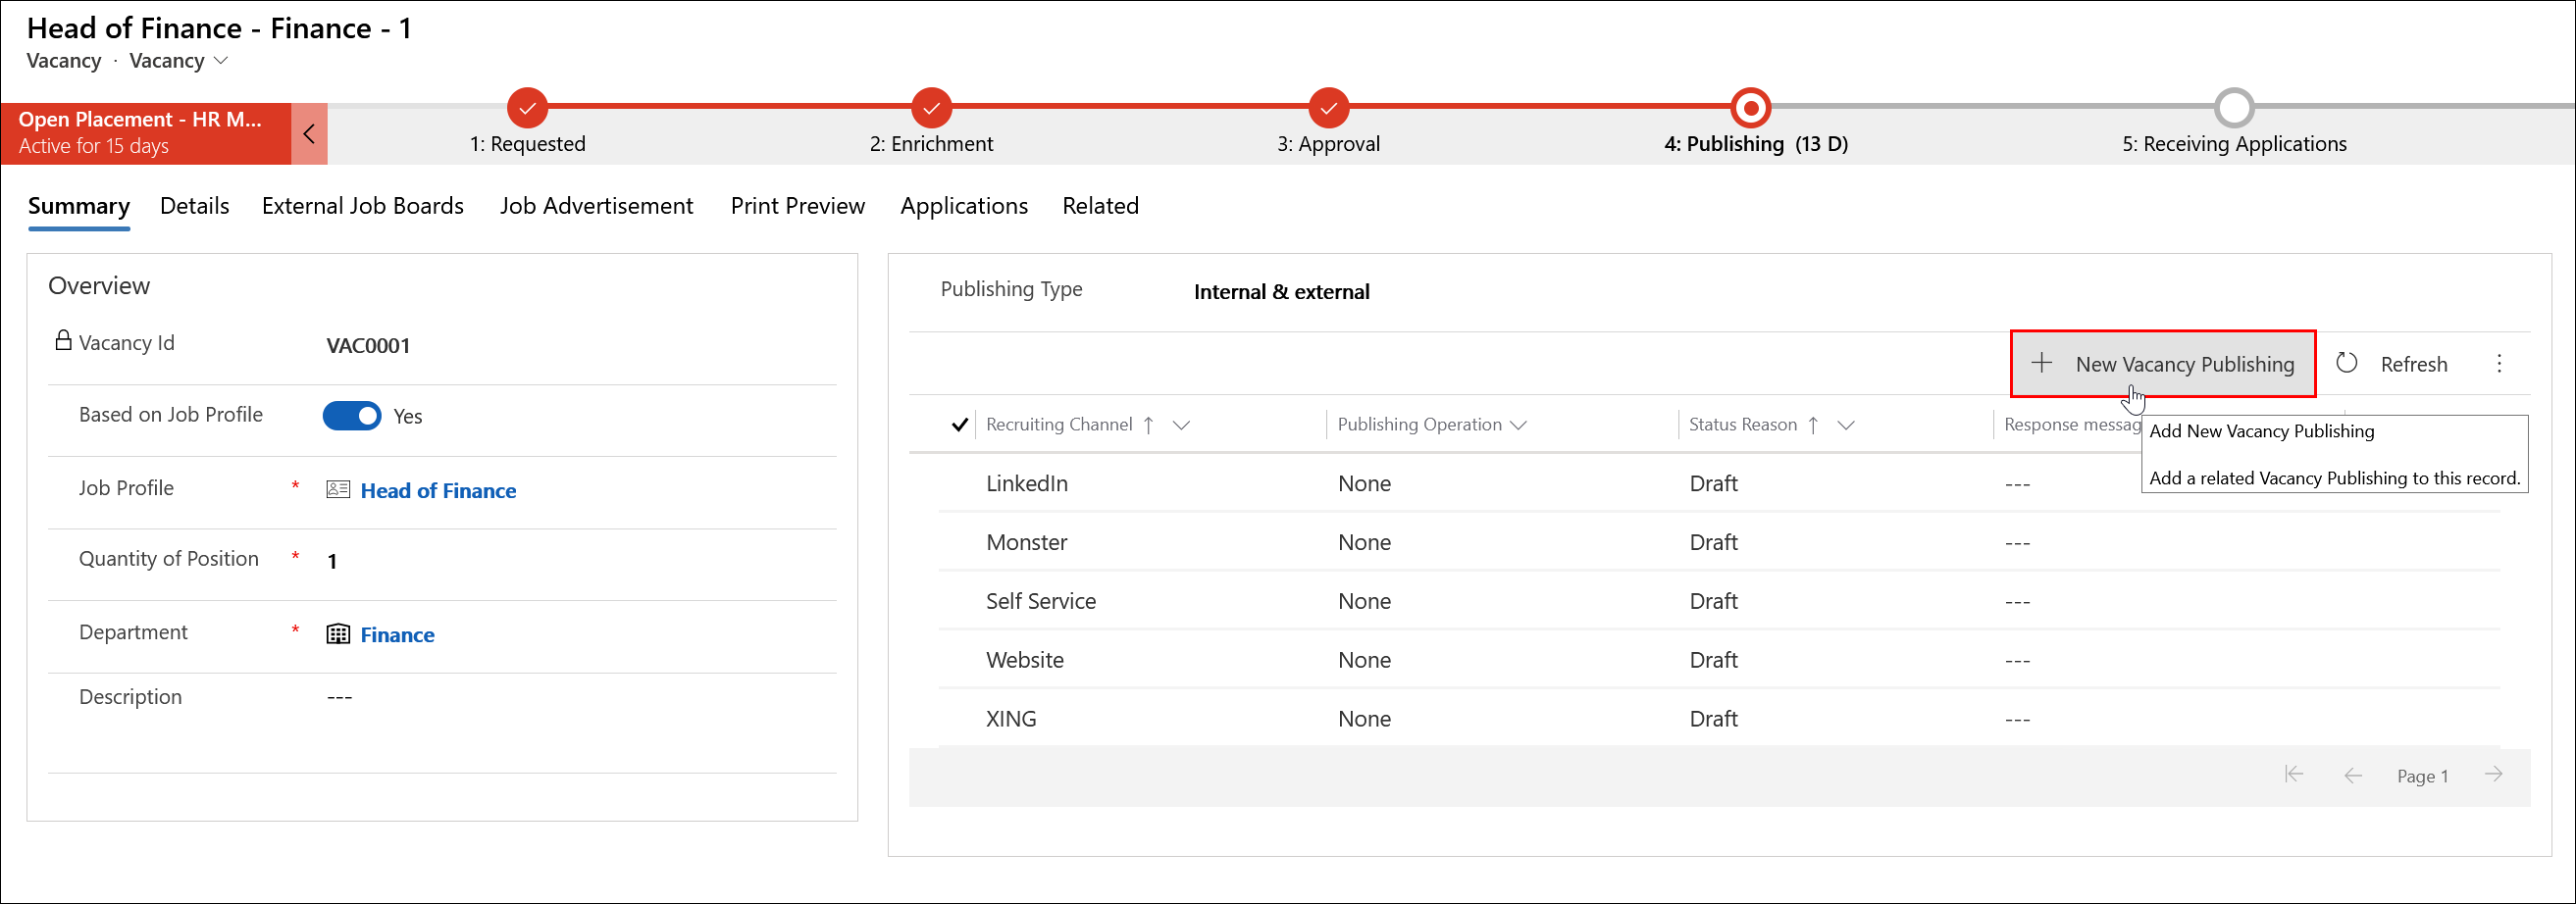
Now click on New Vacancy Publishing if no recruiting channel for the German Labor Office (Bundesagentur für Arbeit) is listed yet. If an recruiting channel for the German Labor Office (Bundesagentur für Arbeit) is already listed, you can skip this step.

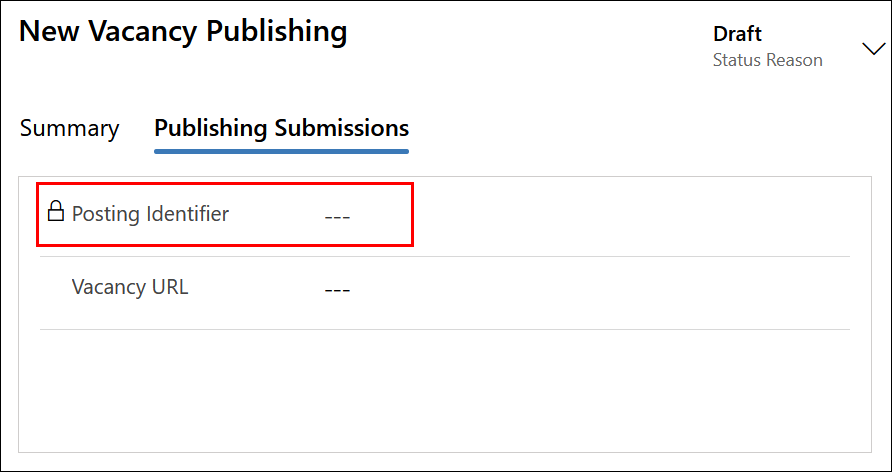
Now select "Bundesagentur für Arbeit" (German Labor Office) as the Recruiting Channel. Save your entry and switch to the "Publishing Submissions" tab.
Please make sure here that the "Posting Identifier" was automatically filled after saving. If this is not the case, please create a numbering for the Posting Identifier first. Further information can be found here.
The recruiting channel "Bundesagentur für Arbeit" is now in the list of recruiting channels.
Now, in the "Details" tab (next to the "Summary" tab you are currently in), enter all the required fields for "Recruiting Contact Details". Please also enter "Interview Location" under "Vacancy Details" and "Job Location" under "Job Details". These details are required by the German Labor Office.
Now switch to the "External Job Boards" tab and select "Labor Office (BfA)" under "Validation - Show Required Fields For".
Fill in the fields with the required information (Labor Office: Profession Details). Save your entries.
Then switch back to the "Summary" tab. To start the publishing operation, click None for "Bundesagentur für Arbeit" in the Publishing Operation and start it by clicking Start.

Save the operation. Your vacancy will now be transmitted to the Federal Employment Agency.
It may take a few minutes before you receive feedback that your vacancy has been successfully submitted to the Federal Employment Agency. If your vacancy has been successfully submitted, it will be listed on the Federal Employment Agency's employer portal.
Configuration of the Recruiting Channel
If the transmission of your vacancy to the German Labor Office (Bundesagentur für Arbeit) did not work, please check if the configuration of the recruiting channel for the German Labor Office (Bundesagentur für Arbeit) is correct.
1. Import the package "HR for Dynamics Installer with Base Data for German Labor Office"
Please make sure that you have imported the package "HR for Dynamics Installer with Base Data for German Labor Office".
To check if you have already imported the package, click on the Advanced Find in the upper right corner.
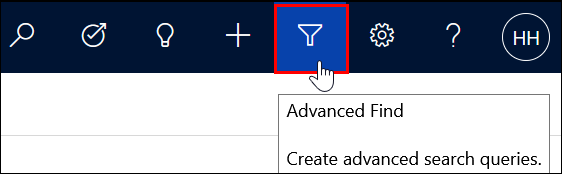
A new window opens. At "Look for" select Professions (BfA) and click on Results (red exclamation mark).
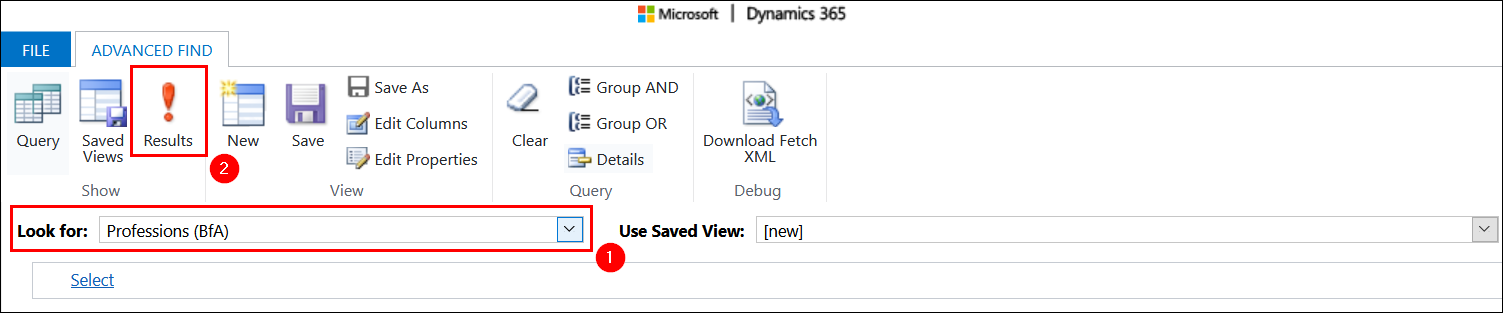
More than 5000 entries should be listed here. If this is not the case, you must first import the package "HR for Dynamics Installer with Base Data for German Labor Office". You can find more information about the import here.
Now select xRM1 Integration Settings in the advanced find at "Look for" and click on Results (red exclamation mark) and check if the entry "Bundesagentur für Arbeit" is created here.
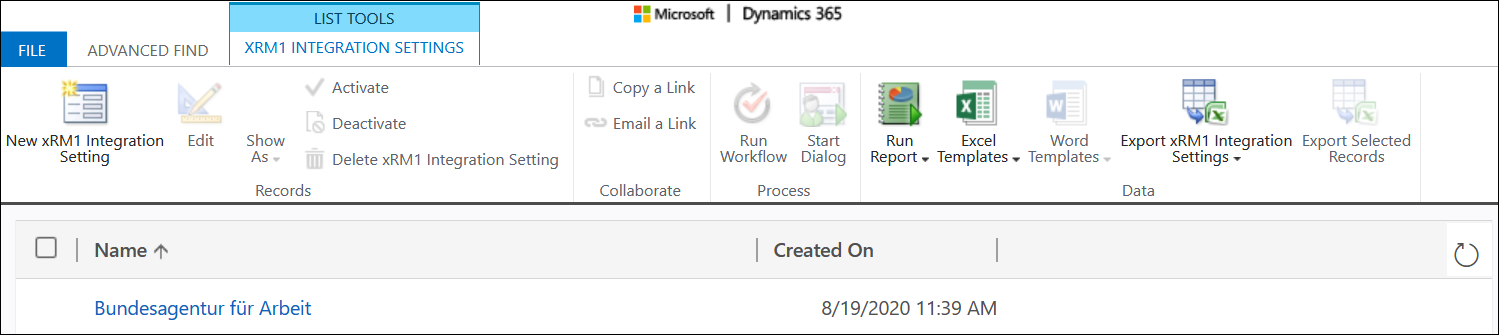
Click on the entry and check if the URLs at "EndPoint URL" (Api Keys) and "Request Token URL" (Token Information) are correct.
EndPoint URL: https://hrbaxml.arbeitsagentur.de/in/upload.php
Request Token URL: https://hrbaxml.arbeitsagentur.de
You can now close this window.
Now select xRM1 Integration Mappings in the advanced find at "Look for" and click on Results (red exclamation mark). Check whether you have the feature "BundesagenturArbeitPublishing" as an entry here.
Double click to open the entry. The integration setting you just checked should be linked here.
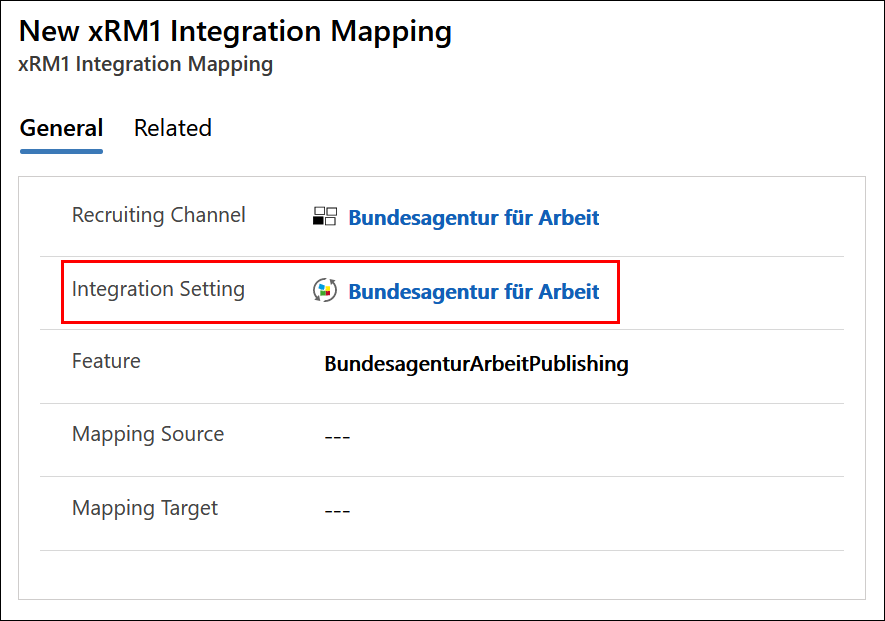
Please cross-check if this is correct and links to the correct setting. If everything is correct, you can close the window.
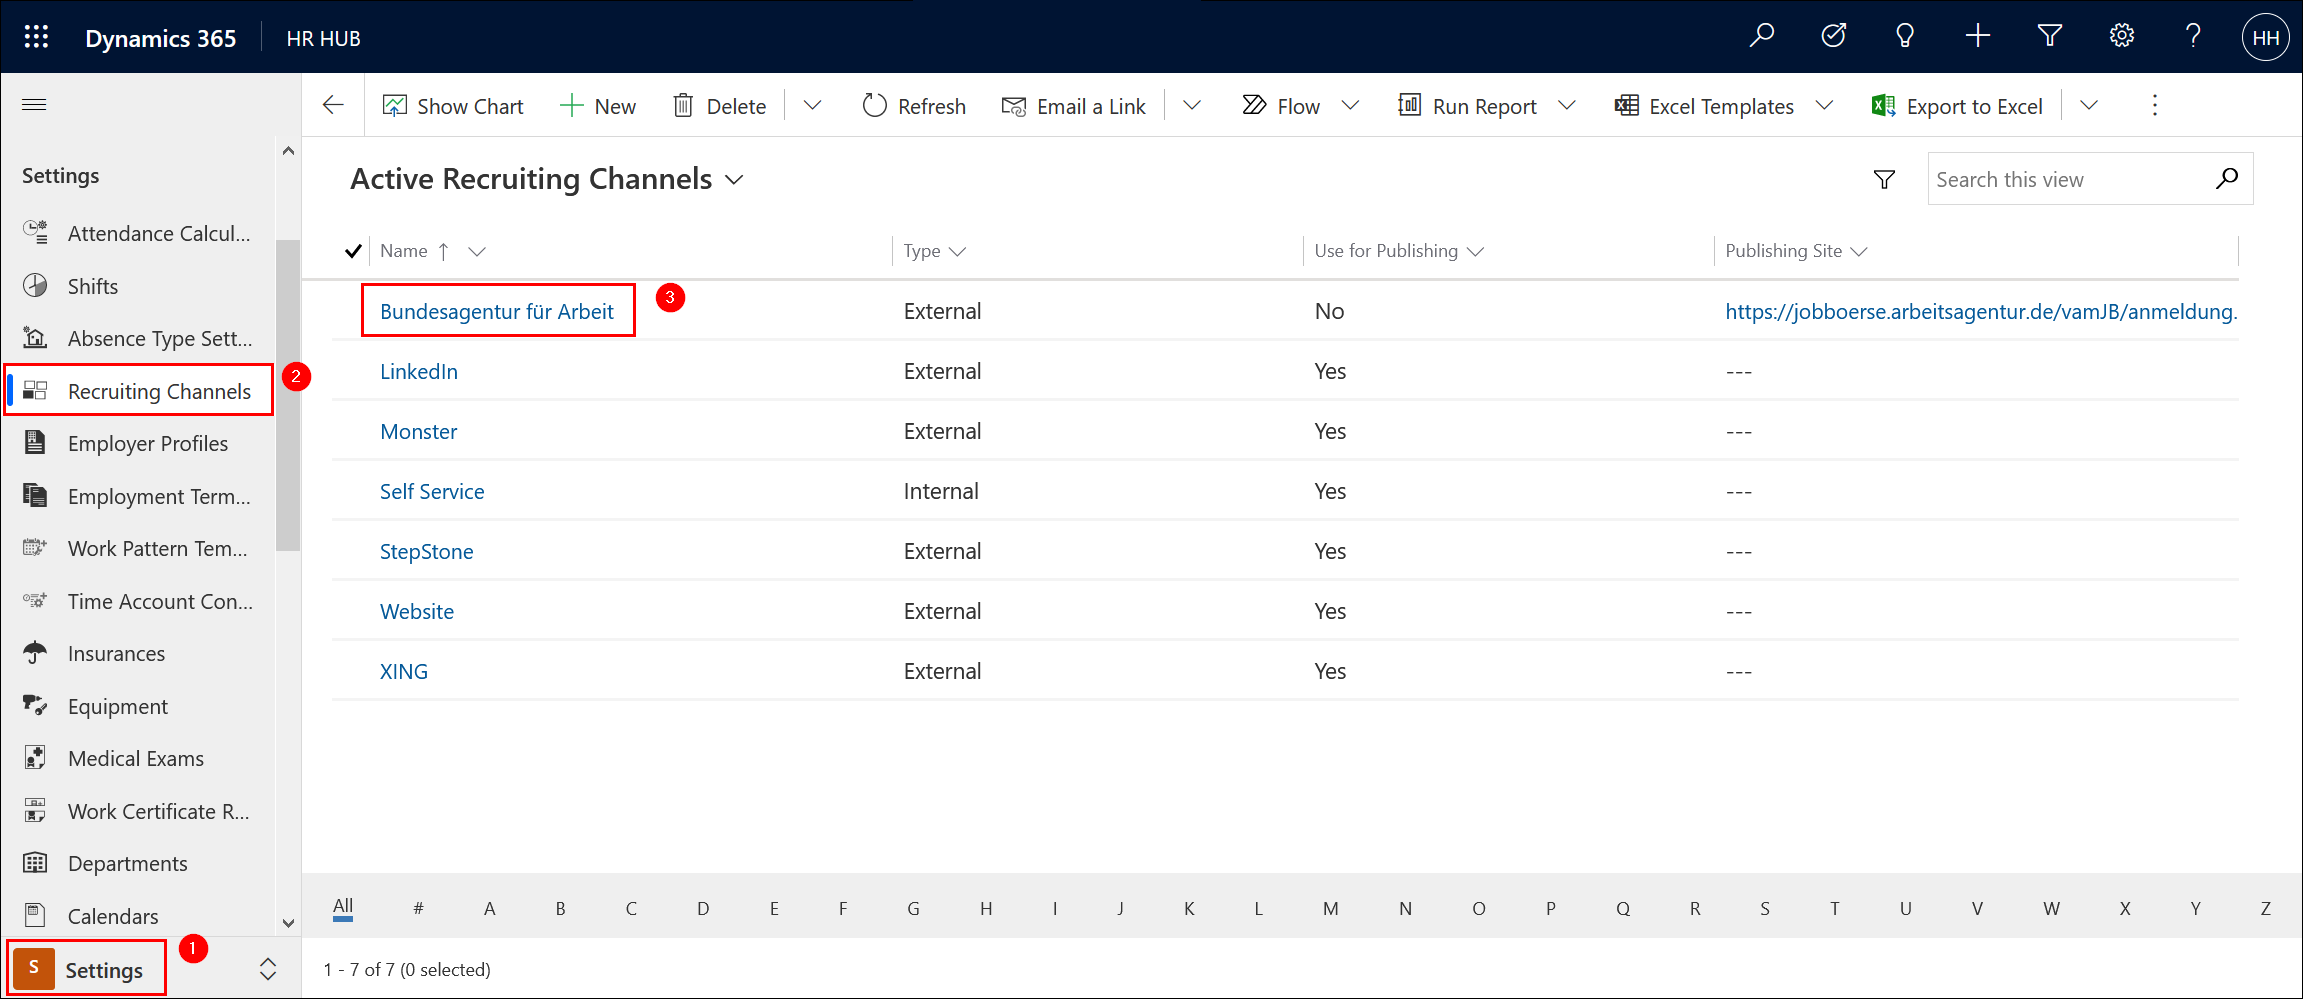
Now select Recruiting Channels in the advanced find under "Look for" and click on Results (red exclamation mark). There should be an entry for "Bundesagentur für Arbeit".
Please be careful not to deactivate this entry or create a new entry with the same name. There should be no entries with duplicate names.
After everything is checked and correct, you can close the advanced find.
2. Configuration of the Recruiting Channel the Bundesagentur für Arbeit (German Labor Office)
After you have ensured that the package "HR for Dynamics Installer with Base Data for German Labor Office" is imported, now check whether the configuration of the recruiting channel is correct.
In the Settings, switch to the "Recruiting Channels" and open the "Bundesagentur für Arbeit" entry.
The "Additional Information" is provided by the German Labor Office. Please contact the German Labor Office (Bundesagentur für Arbeit) for this information.
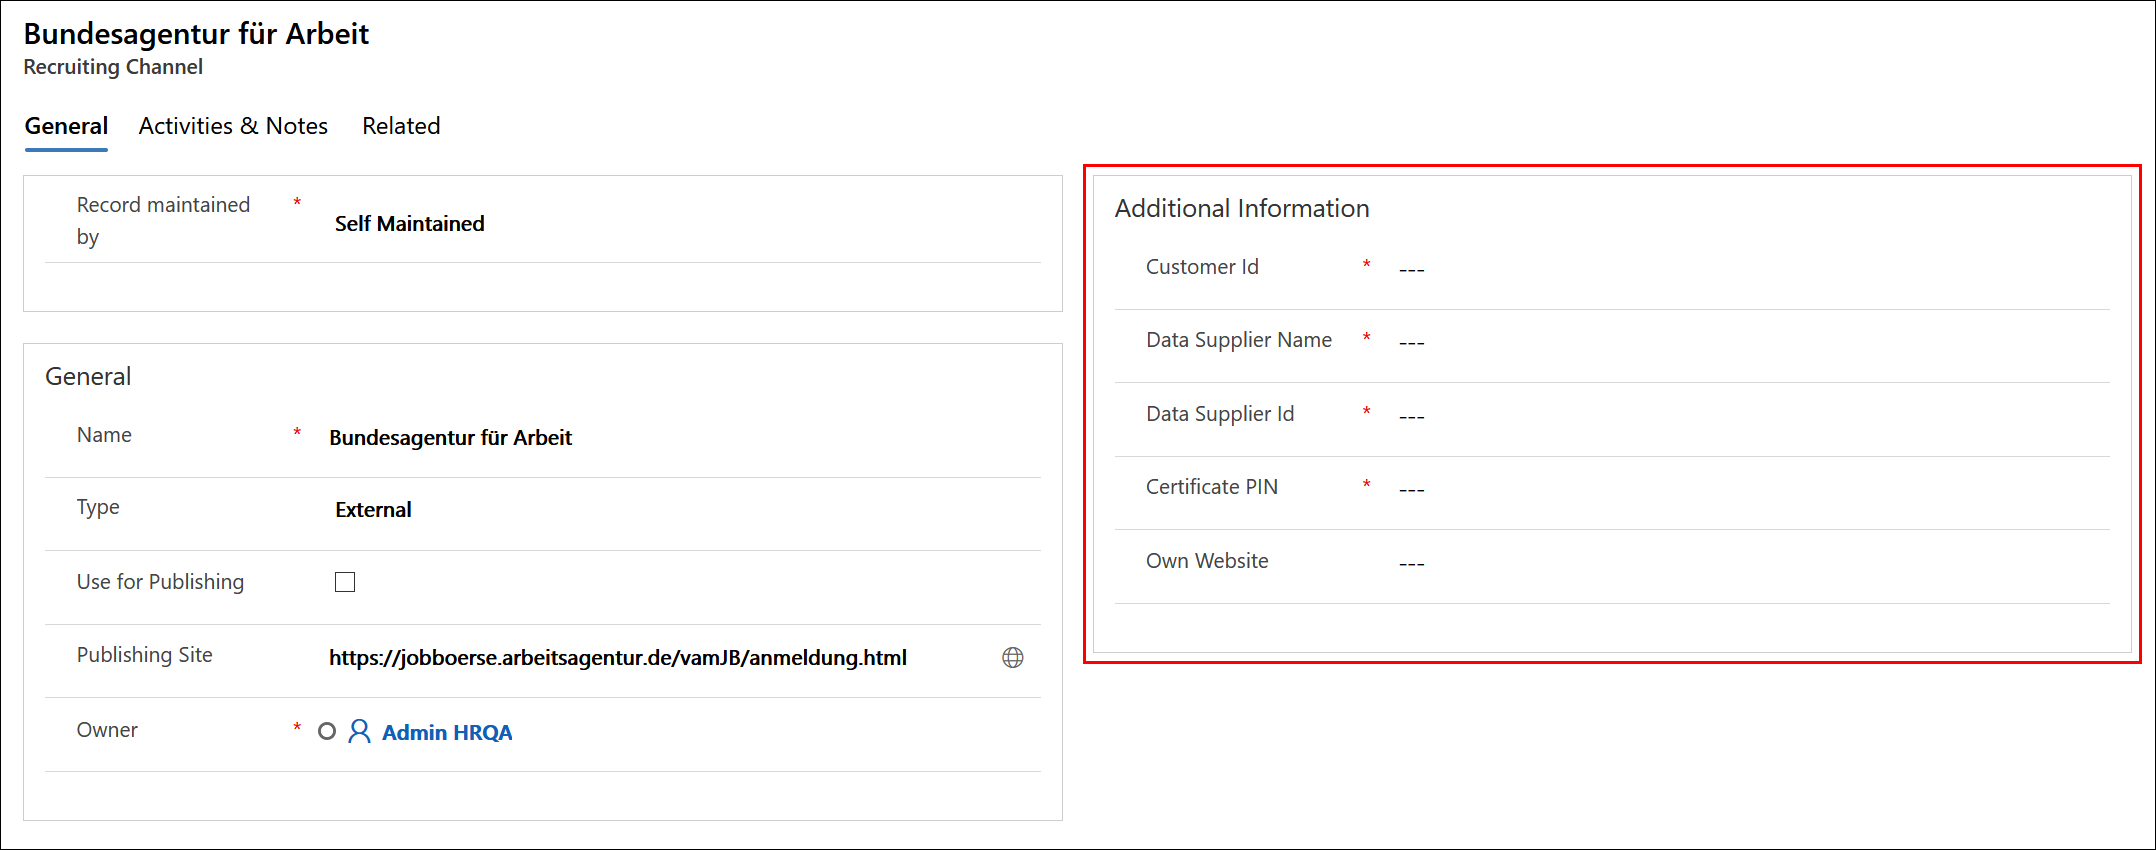
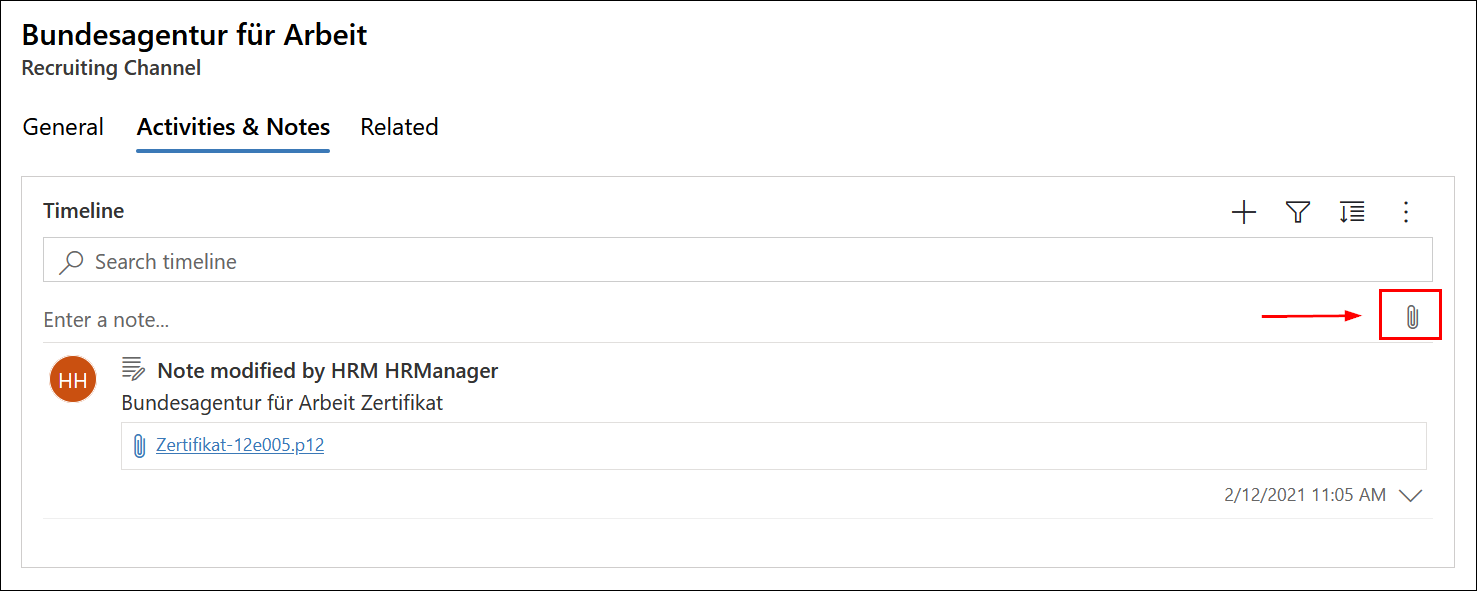
The German Labor Office will also provide you with a certificate that is required for authentication. Upload this file in the Timeline. To do this, switch to the tab "Activites & Notes" and click on the paper clip and add the file as an attachment.
Save your changes. Before the vacancy can be published, the Vacancy Id …
… and the Posting Identifier …
… must be configured.
To do this, navigate to "Numbering" (Settings) and create a new numbering.
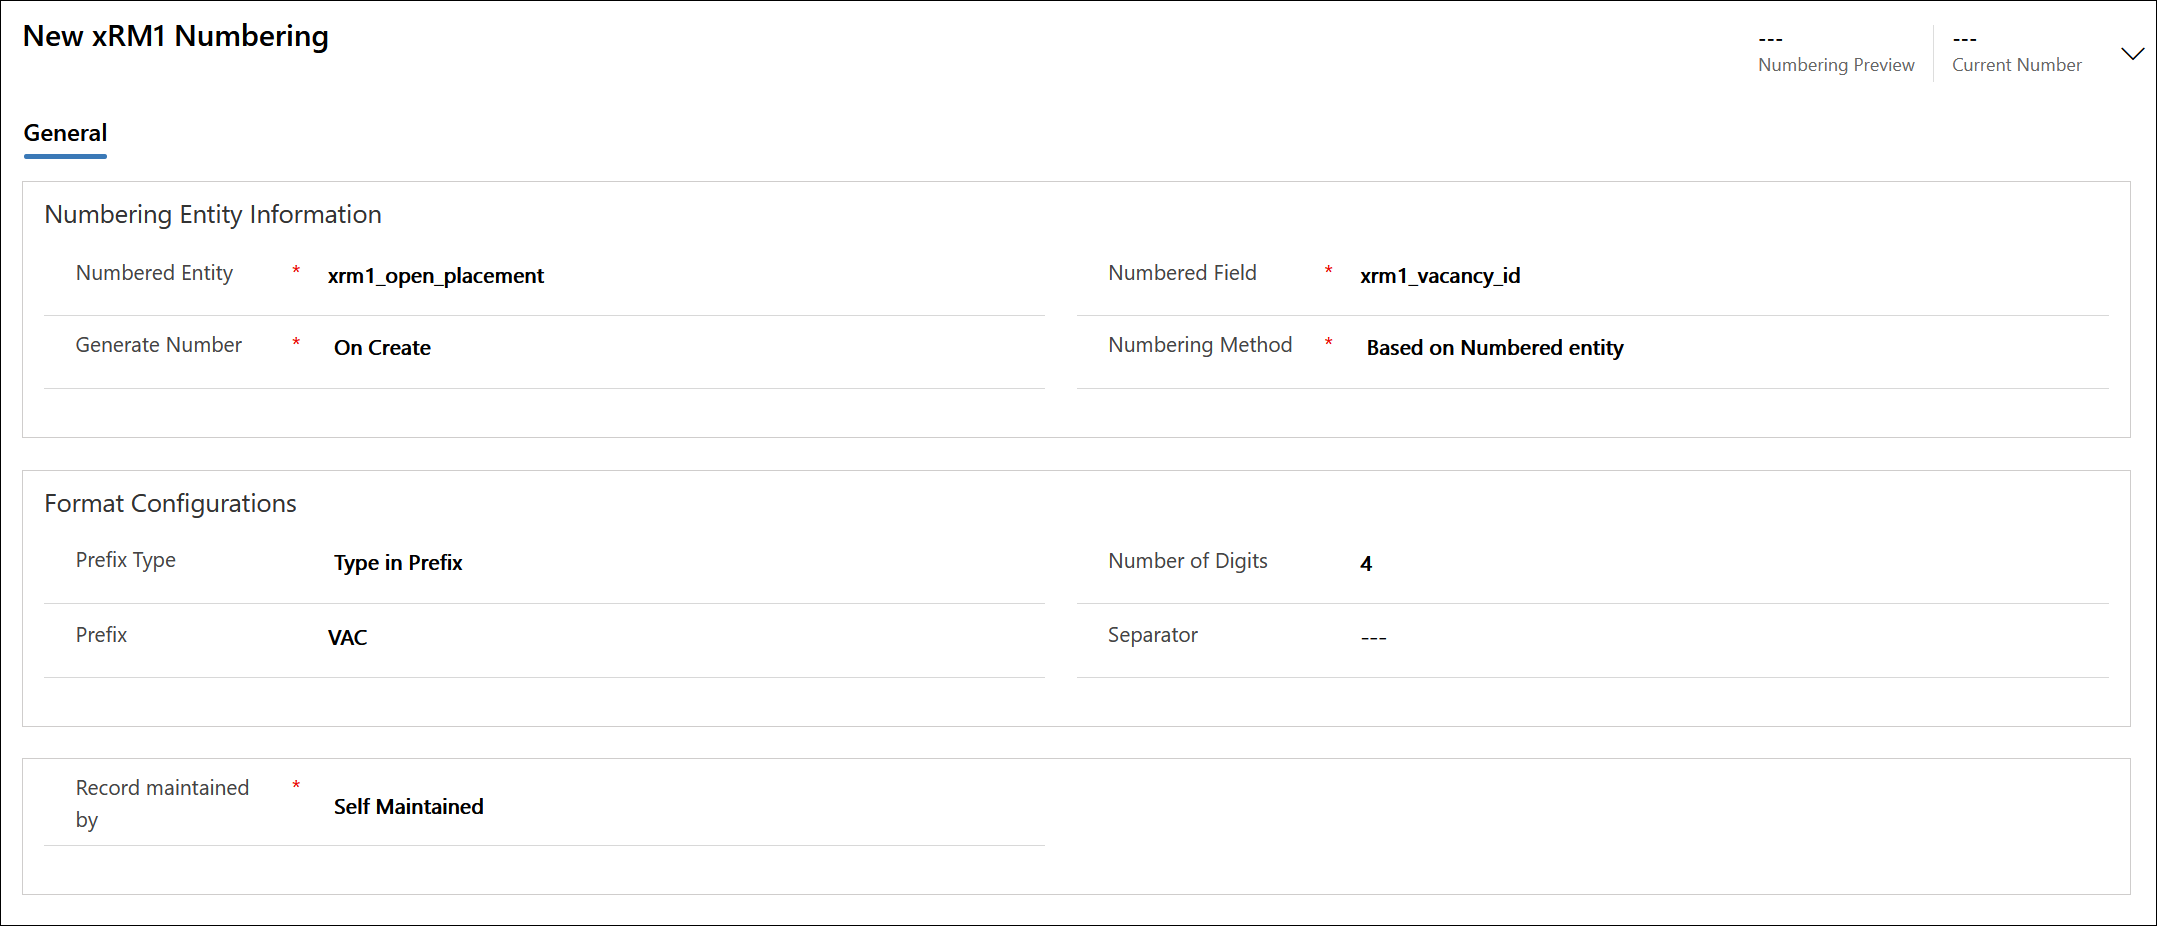
Make sure that the spelling of "Numbered Entity" and "Numbered Field" is correct.
Numbered Entity: xrm1_open_placement
Numbered Field: xrm1_vacancy_id
Select the desired Numbering Method. You can now also define a Prefix, Number of Digits, and Separator. For "Record maintained by" select "Self Maintained". The Vacancy Id will then be created automatically after saving a new vacancy, according to your previously defined settings.
Save your entries and create another numbering for the Posting Identifier.
Please make sure that the spelling of "Numbered Entity" and "Numbered Field" is correct here as well.
Numbered Entity: xrm1_channel_publishing
Numbered Field: xrm1_posting_identifier
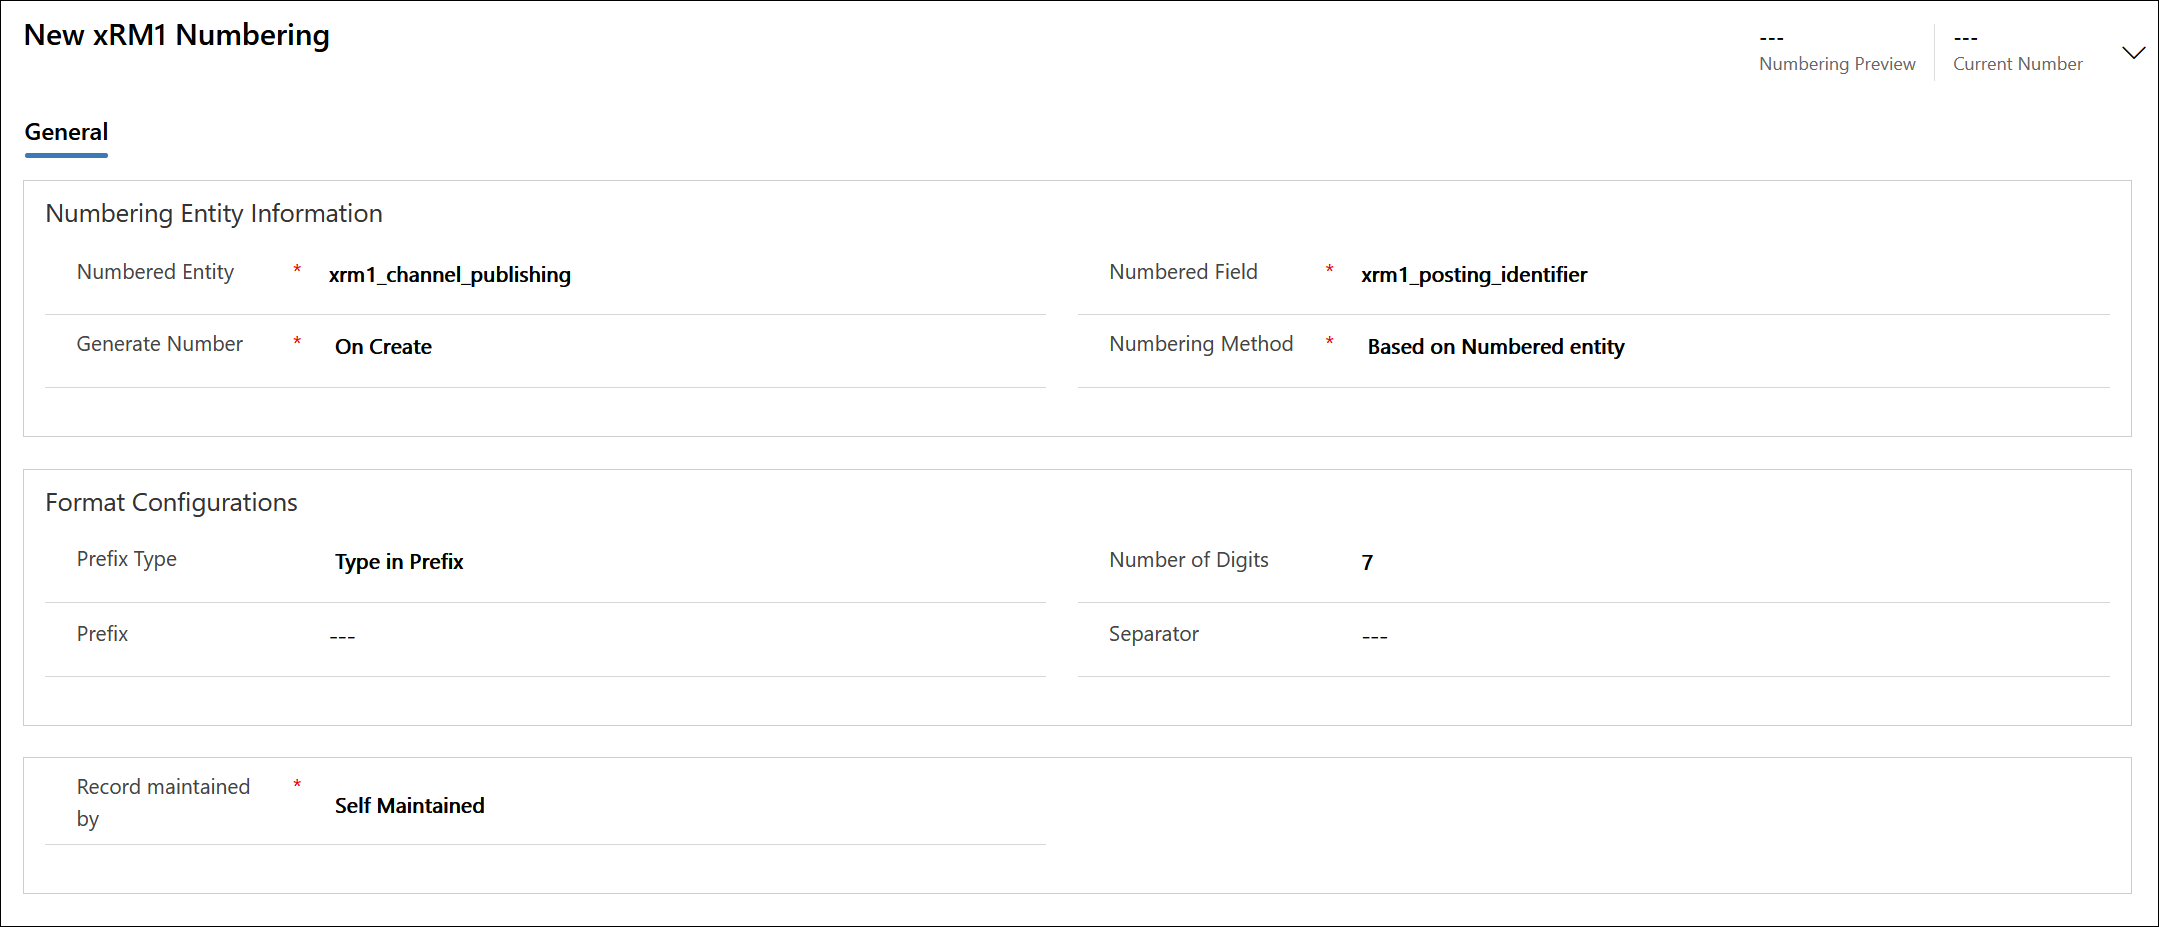
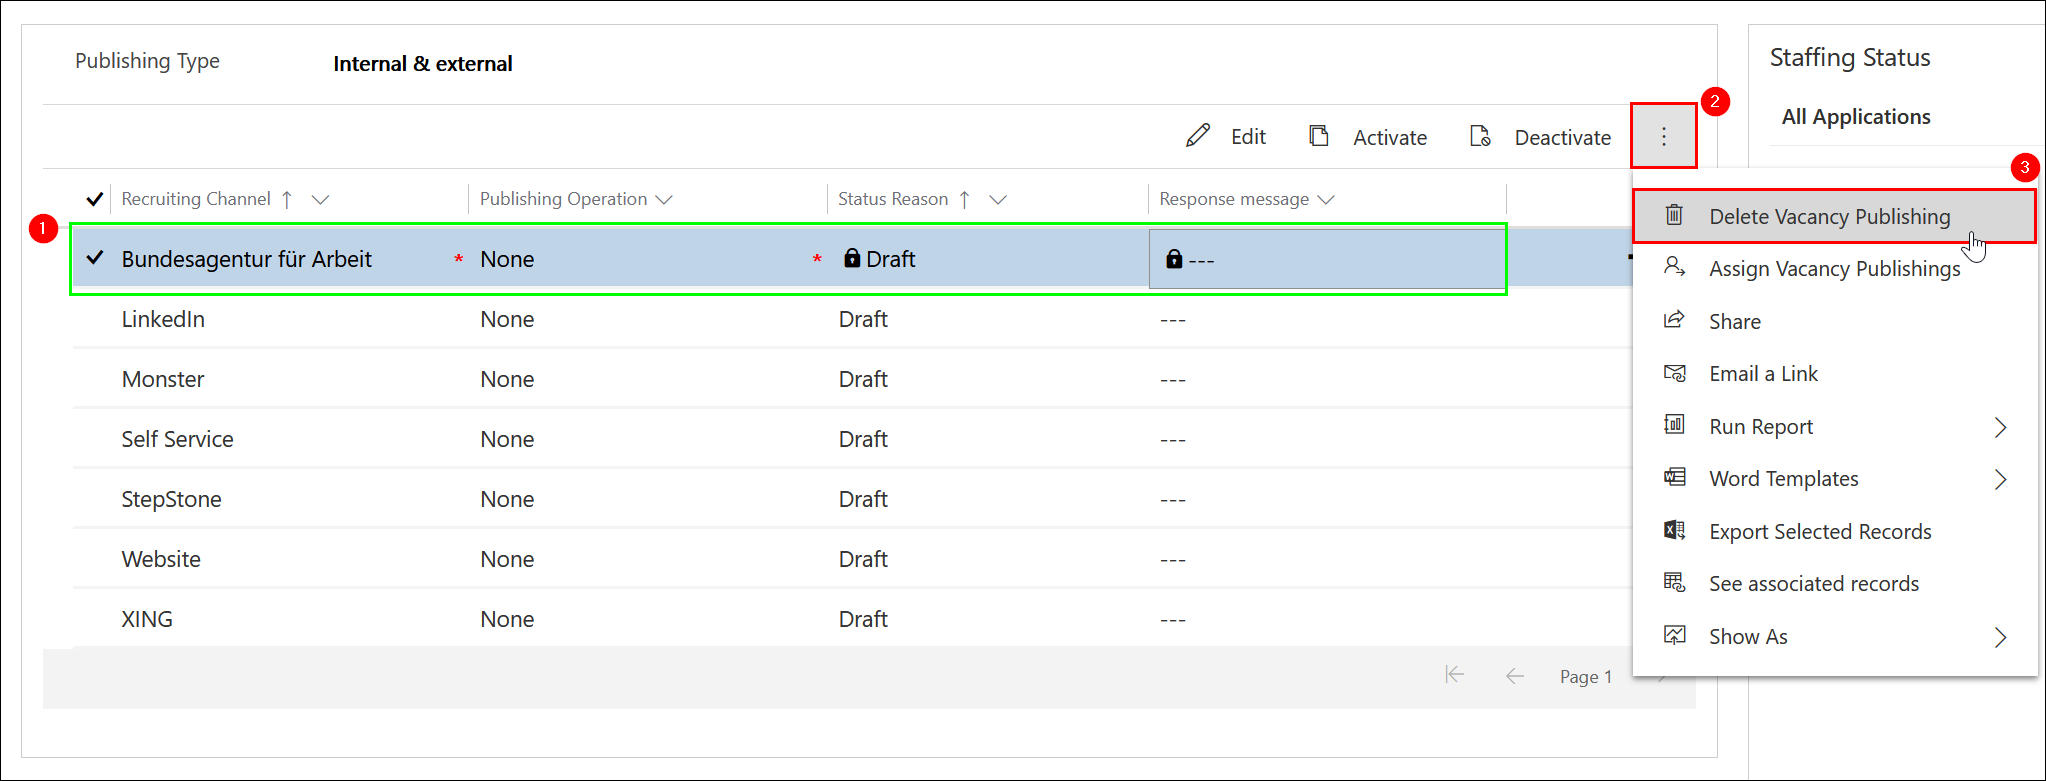
Save your entries. Now please delete the existing entry for the "Bundesagentur für Arbeit" in the list of Recruiting Channels and create it once again. The Posting Identifier will then be generated automatically based on your previously defined settings.
After you have checked and configured everything, please switch back to Publish Vacancy and try again.
If your vacancy still cannot be successfully submitted to the German Labor Office (Bundesagentur für Arbeit), please get in touch with your contact person.
An overview of all error messages from the German Labor Office (Bundesagentur für Arbeit) can be found here.
Xing Publishing
Dynamics HR Management has an out-of-the-box integration with Xing. With this you can publish vacancies on Xing with only a few clicks.
To publish vacancies on Xing, please follow the instructions here: DI Service Integration and here: Publishing vacancies
Note:
To publish vacancies on Xing, you need a premium account. More information by Xing: XING
Setup of Broadbean Integration and publishing of vacancies
Broadbean is the market leader among multiposter providers, allowing you to post your vacancies on thousands of job portals worldwide at the same time with just a few clicks.
This instruction will guide you through the process of submitting your created vacancies to the employer portal for Broadbean.
Note: You can only configure recruiting channels with HR security roles.
To publish a vacancy to Broadbean, please follow this instruction.
Publish Vacancy
Log in to Dynamics 365 and make sure you are in the "HR HUB" or "HR HUB Recruiting" app.

Switch to "HR Hub" at the bottom left, if it' s not already the case, and navigate to "Vacancies". Create a new vacancy.
Select the Job Profile, Quantity of Position, as well as the Department and save your entries.
Please make sure that the "Vacancy Id" is automatically filled after saving. If this is not the case, you need to create the numbering first.
Click here for more information.
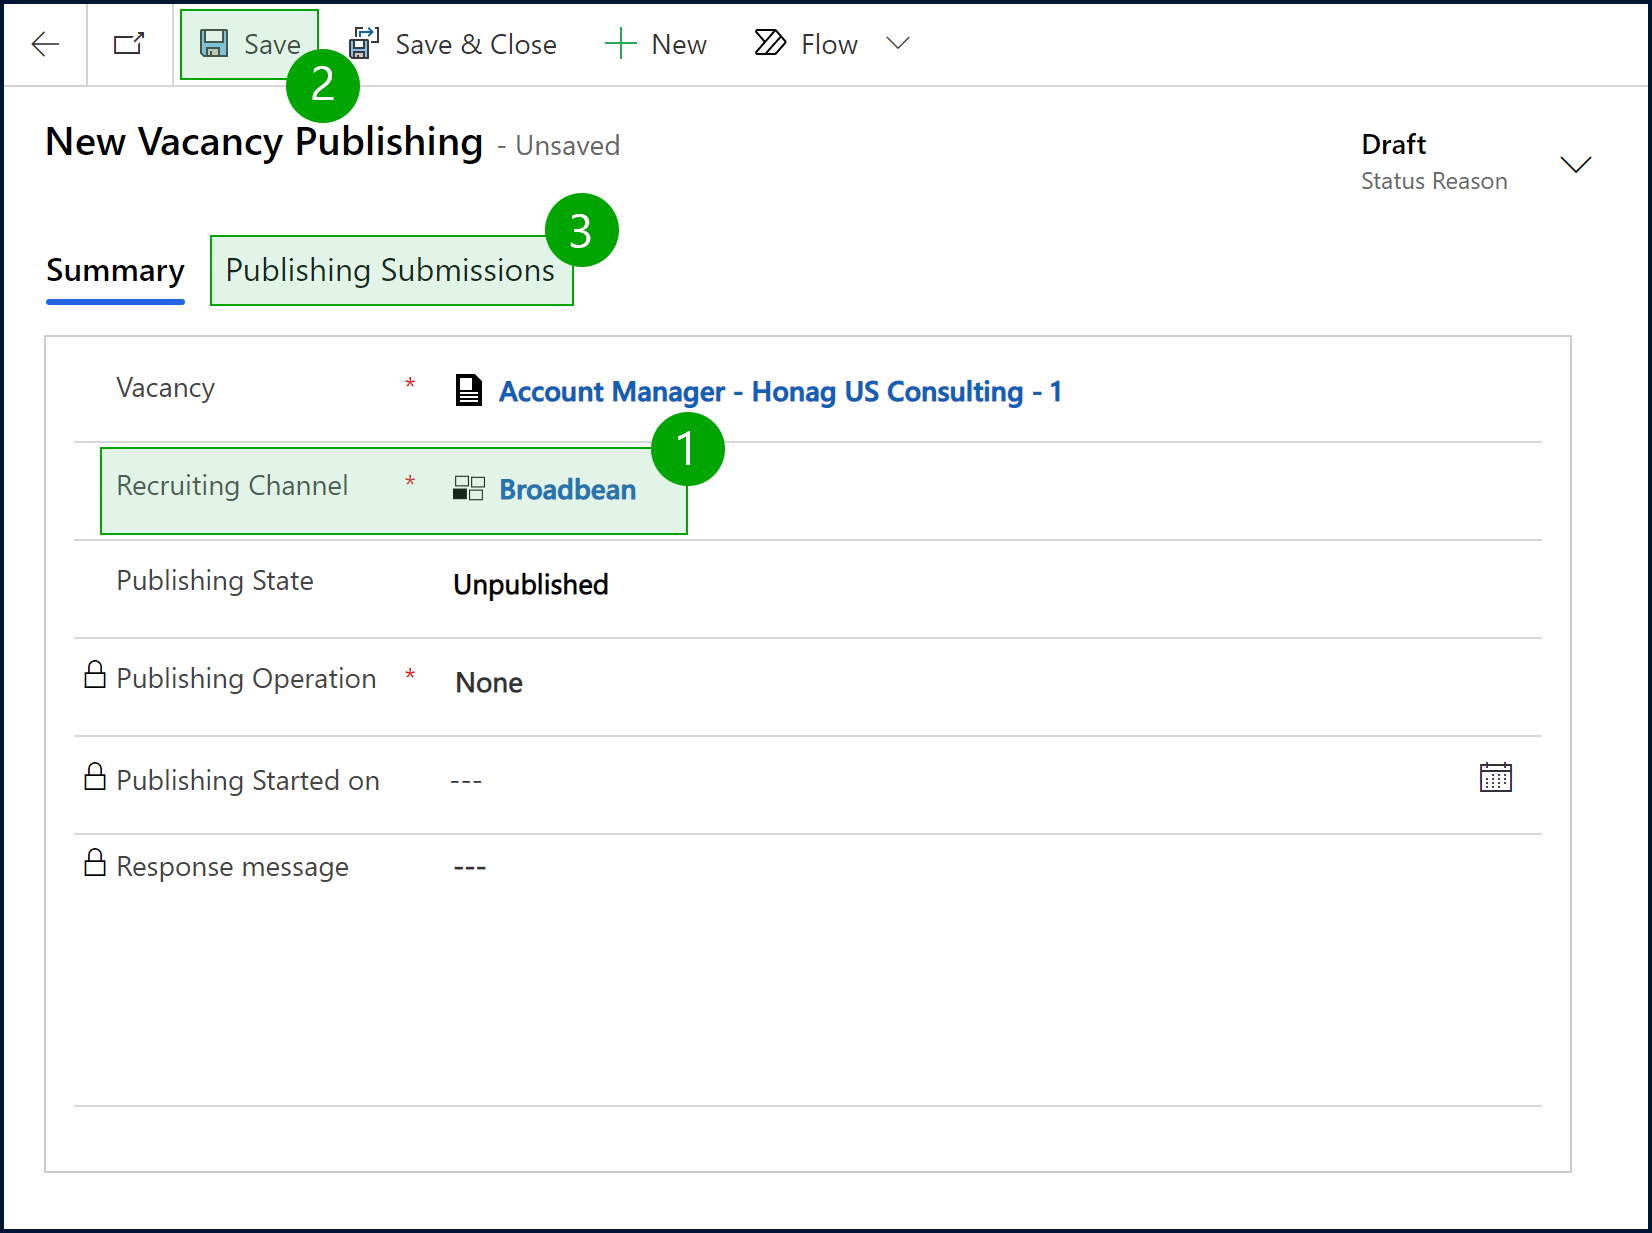
Now click on "New Vacancy Publishing" if no recruiting channel for Broadbean is listed yet. If an recruiting channel for Broadbean is already listed, you can skip this step.
Noww select "Broadbean" as the recruiting channel. Save your entry and switch to the "Publishing Submissions" tab.
Please make sure that the "Posting Identifier" was automatically filled after saving. If this is not the case, please create a numbering for the Posting Identifier first.
Further information can be found here.
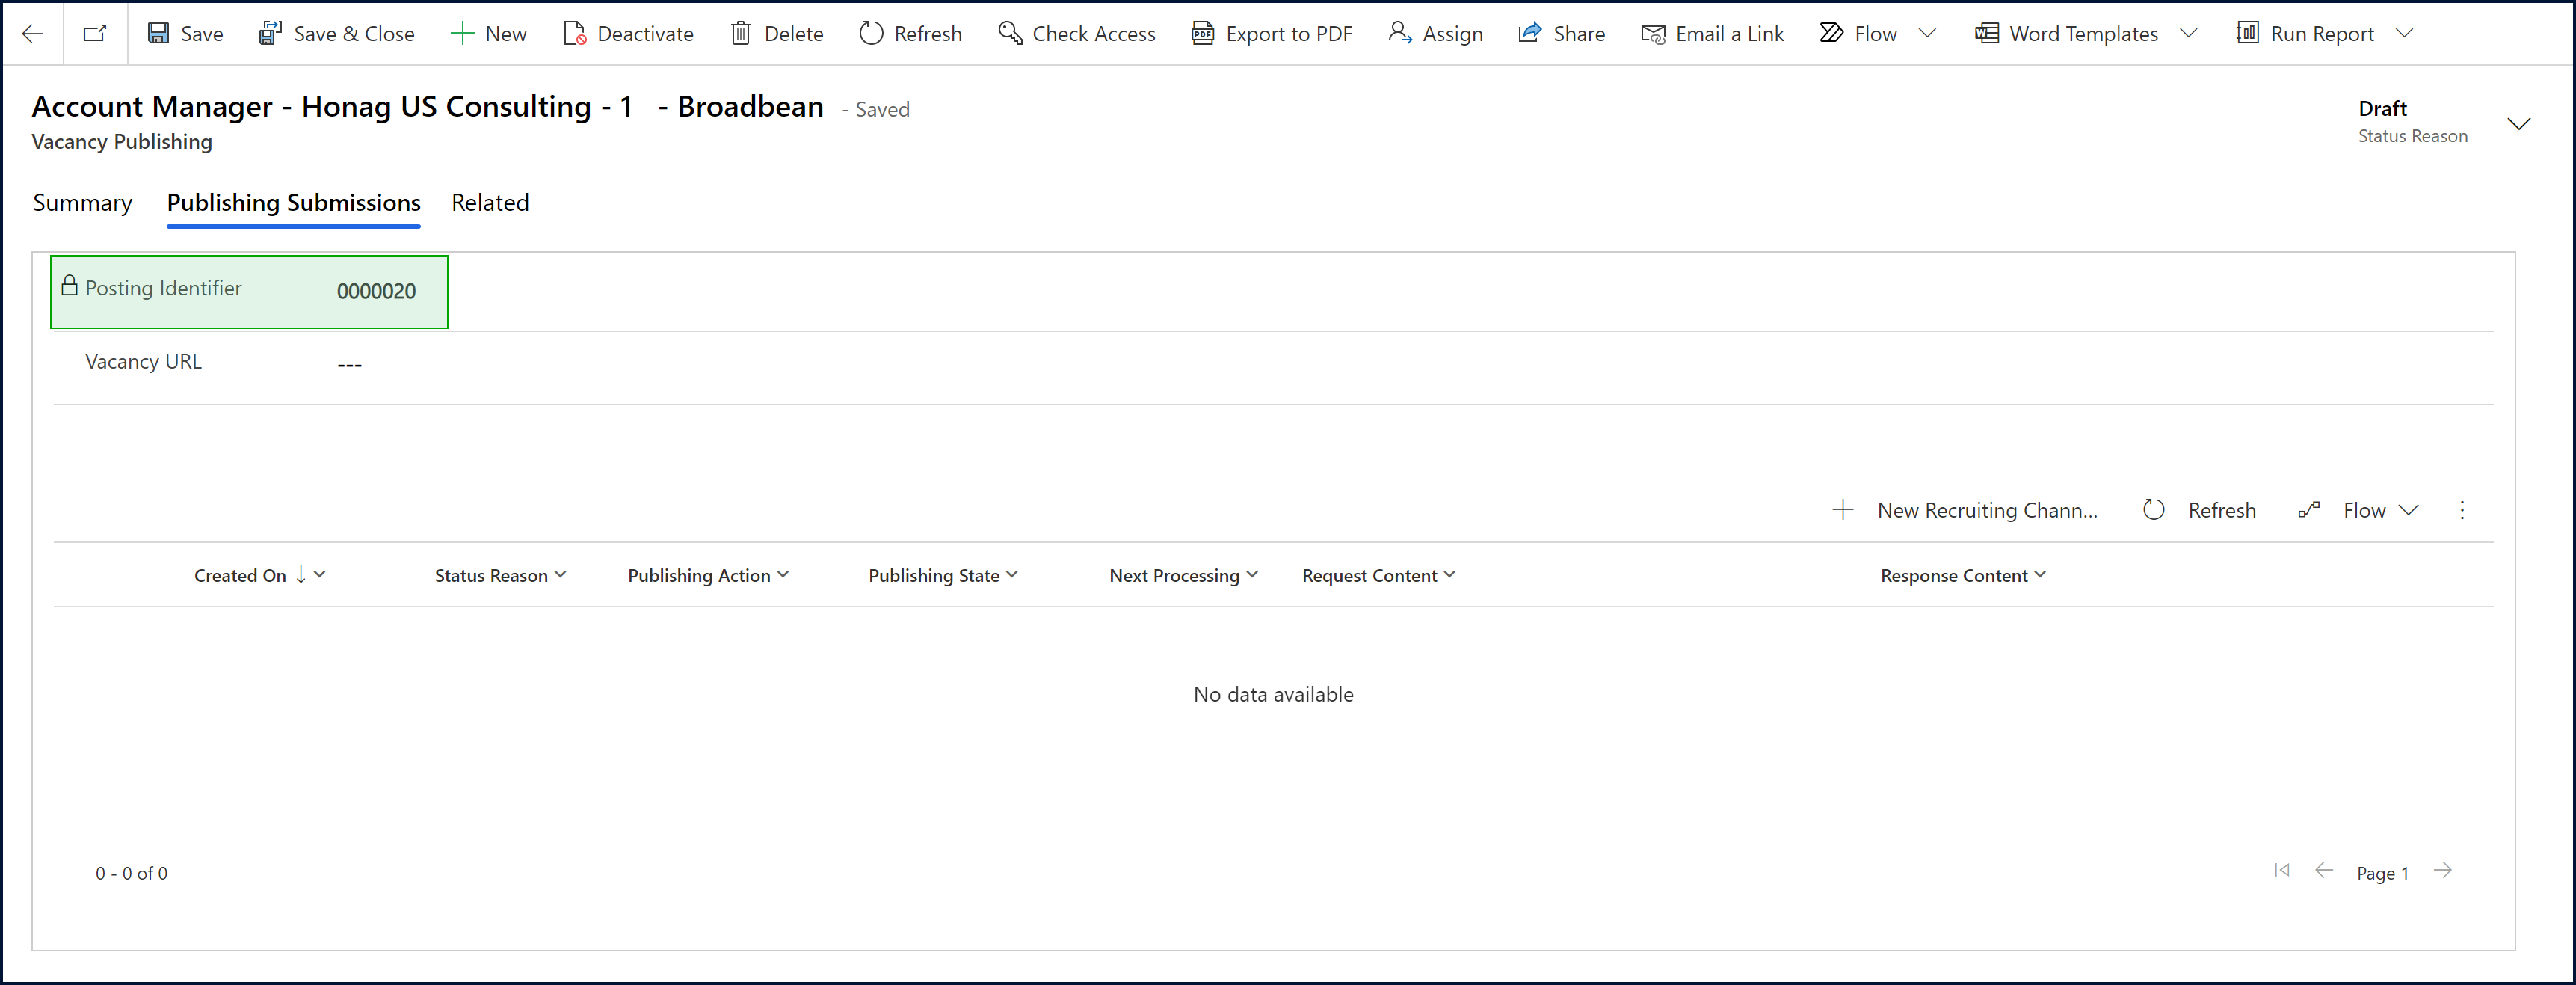
Close the "vacancy publishing" form and return to the vacancy. The recruiting channel "Broadbean" is now in the list of recruiting channels.
Now, in the "Details" tab (next to the "Summary" tab you are currently in), enter all the required fields for "Recruiting Contact Details".
Now switch to the "External Job Boards" tab and select "Broadbean" under "Validation - Show Required Fields For".
Fill in the fields with the required information and save your entries.
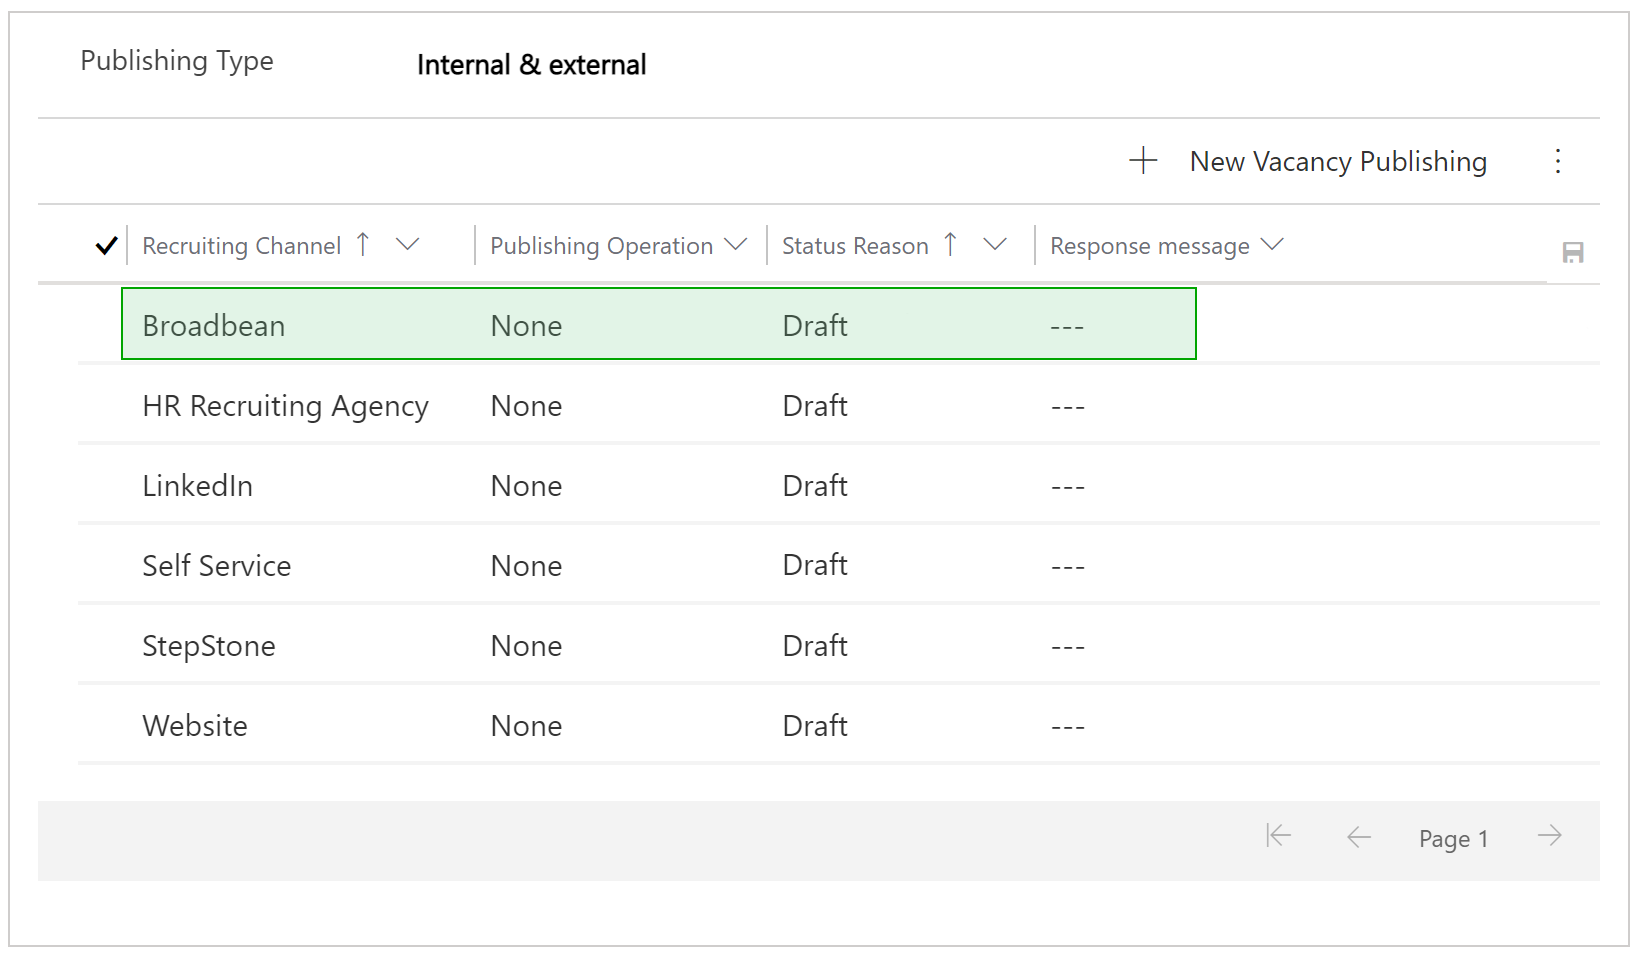
Then switch back to the "Summary" tab. To start the publishing operation, click None for "Broadbean" in the "Publishing Operation" column and start it by selecting Start.

Save the operation. Your vacancy will now be transmitted to Broadbean.
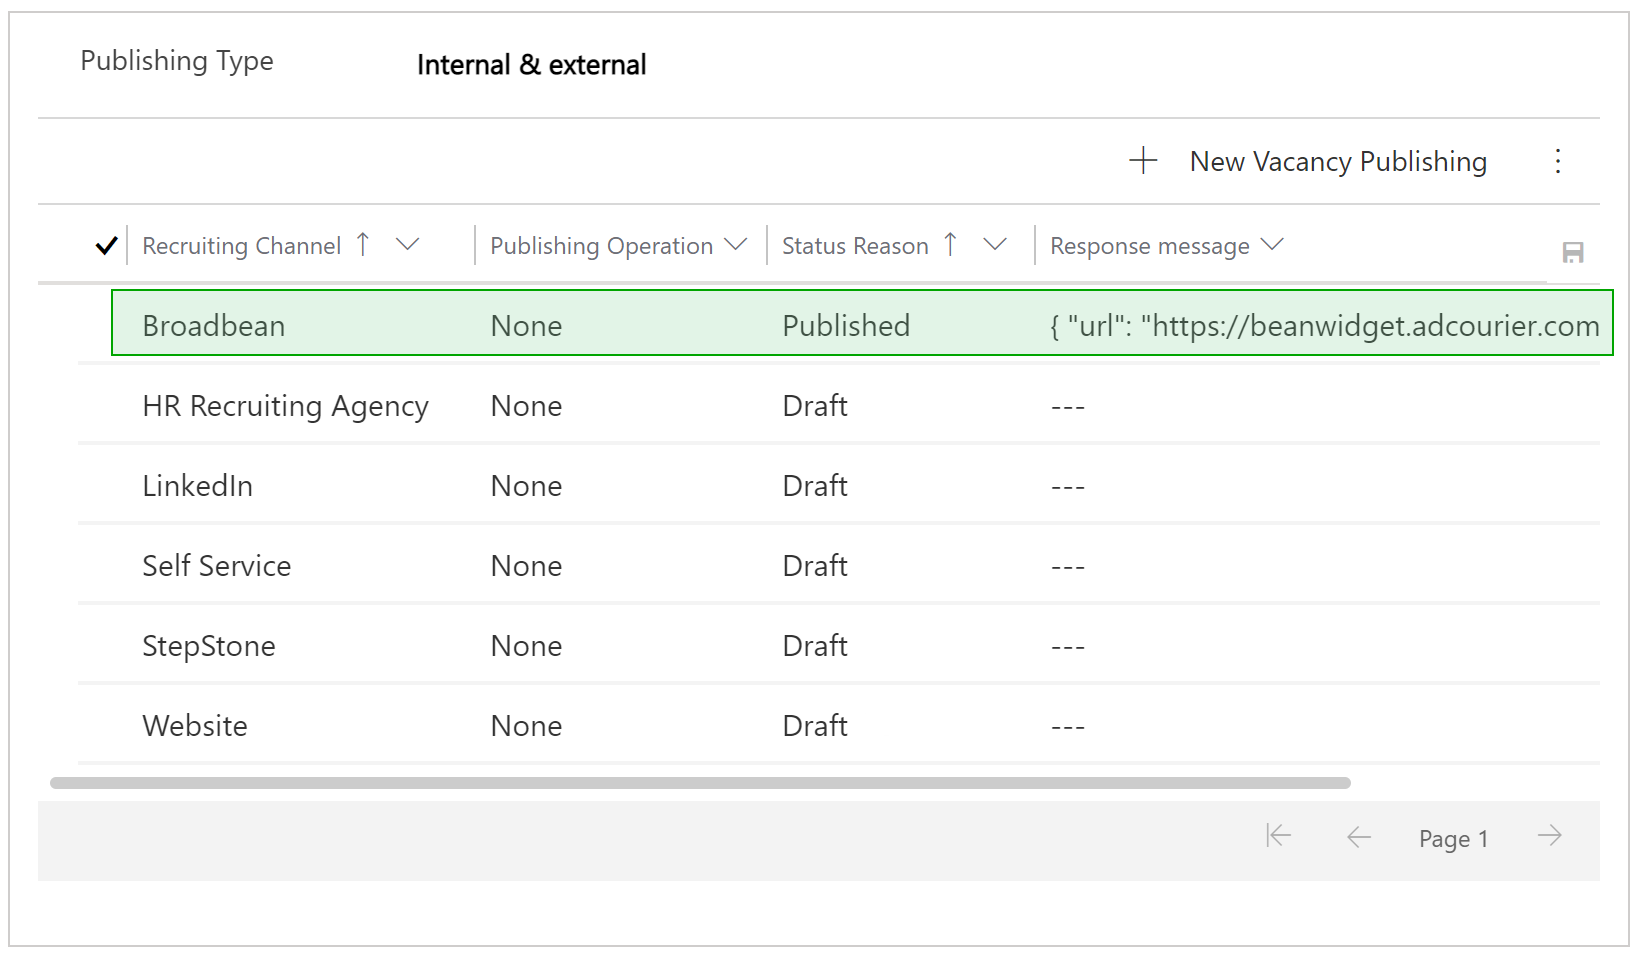
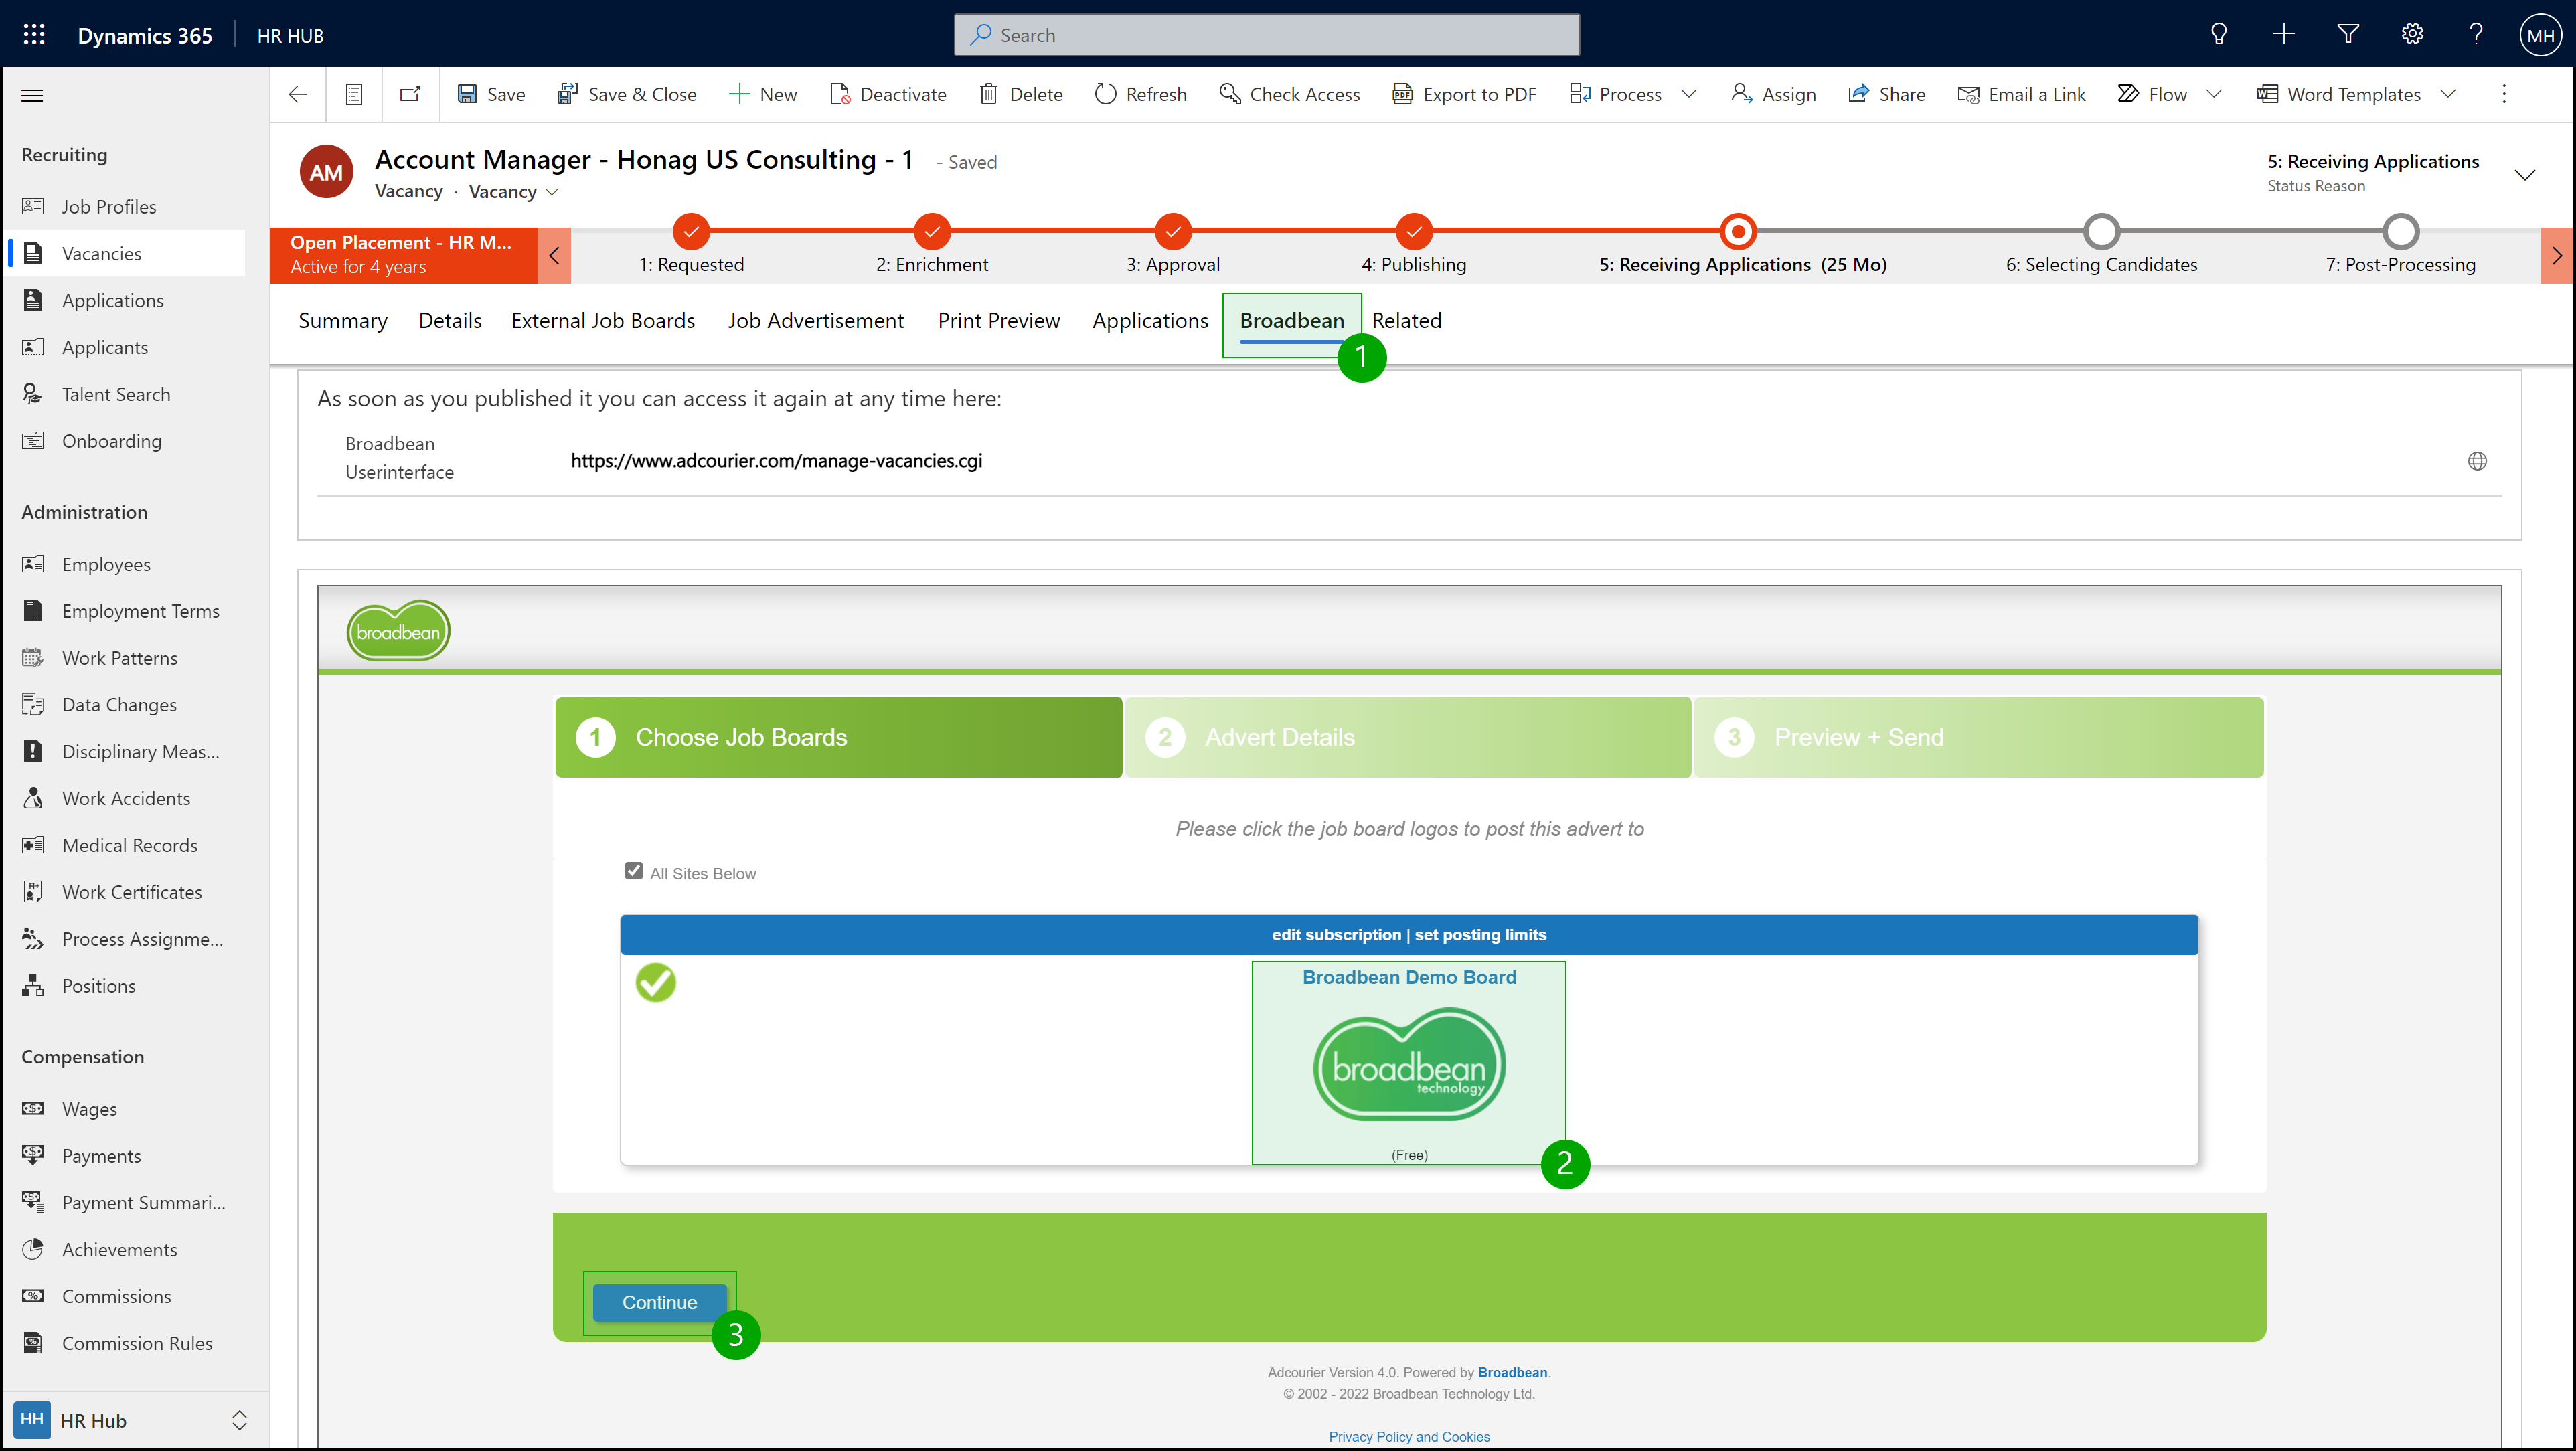
After you saved the record, the page will reload. In the table, the "Status Reason" in the row from Broadbean changes to Published and a string/URL appears in the "Response message" column. The transmission of the data to Broadbean was thus successful.
The bar of tabs in the vacancy has also been extended with another tab called "Broadbean". Click on the tab. You will see the Broadbean user interface and you can directly select the job portals on which you want to publish this vacancy. The selection is made by simply clicking on the grayed out logo of the desired job portal(s). In our case it is Broadbean Demo Board.
Once you have selected the job portal, a check mark appears in front of the job portal and the logo is no longer grayed out.
After you have selected the job portal(s), click Continue.
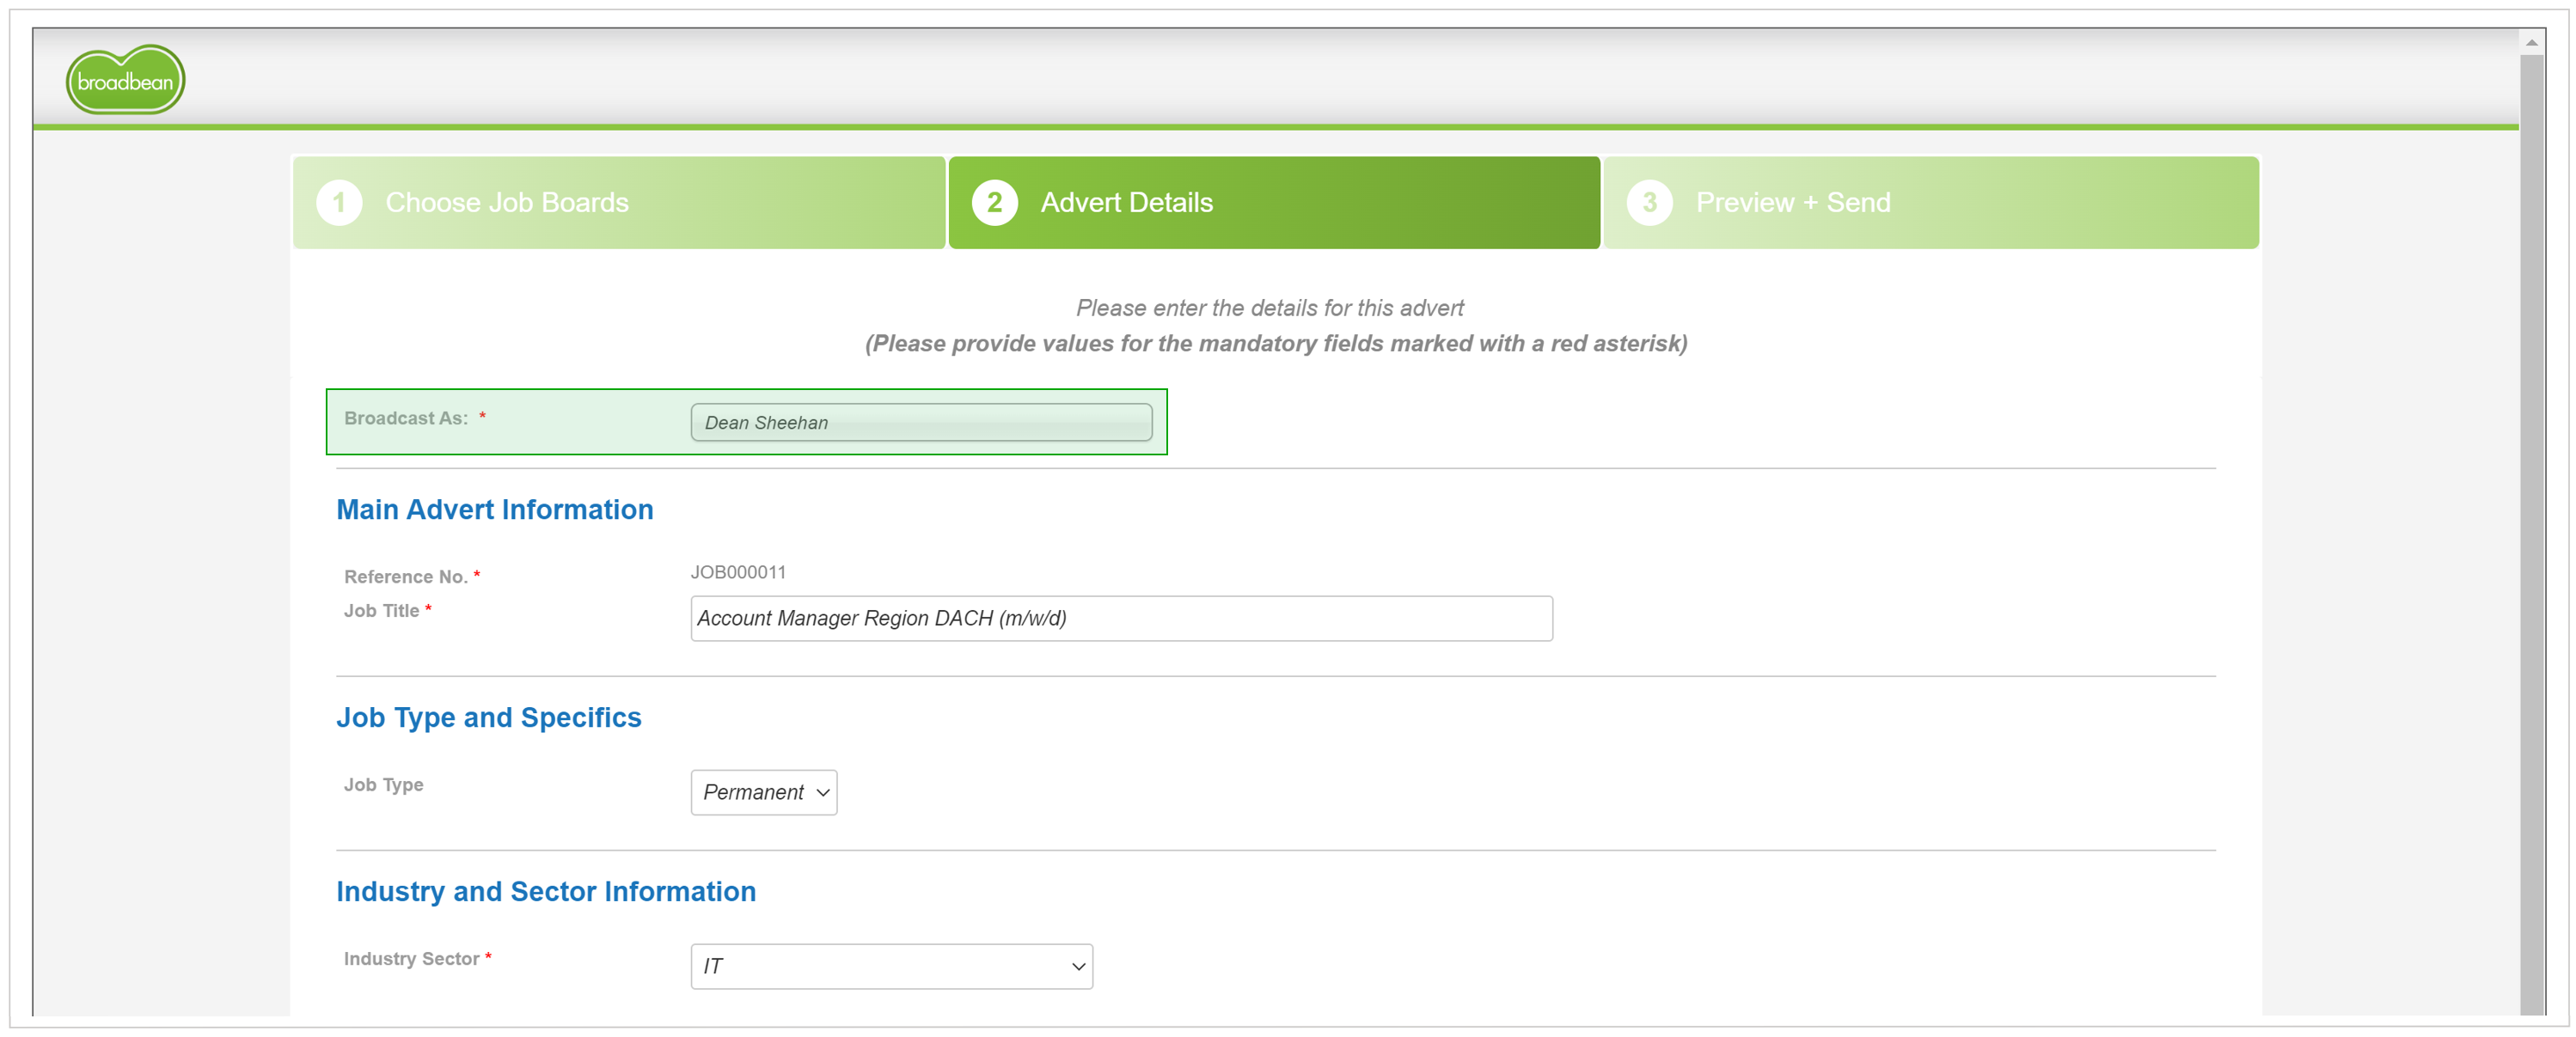
On the next page "Advert Details" you can add some more details about the vacancy for your publication on Broadbean. Most fields are already pre-filled with the data from HR for Dynamics. In the mandatory field Broadcast As, you only have to select the profile that is to be stored in the vacancy.
With Continue at the end of the page you can continue the process on the next page.
In the last step of the process, you have the opportunity to check all the information again. In addition, under Deliver this advert at you can specify the time when the vacancy should be published on Broadbean. In the Apply Online URL field, please enter the website URL where applicants can apply. In the "Destinations & Advertising Periods" section you can choose how long the vacancy should be published on the selected job portals. Click on Send Advert at the bottom right to send the vacancy and finally publish it on Broadbean.
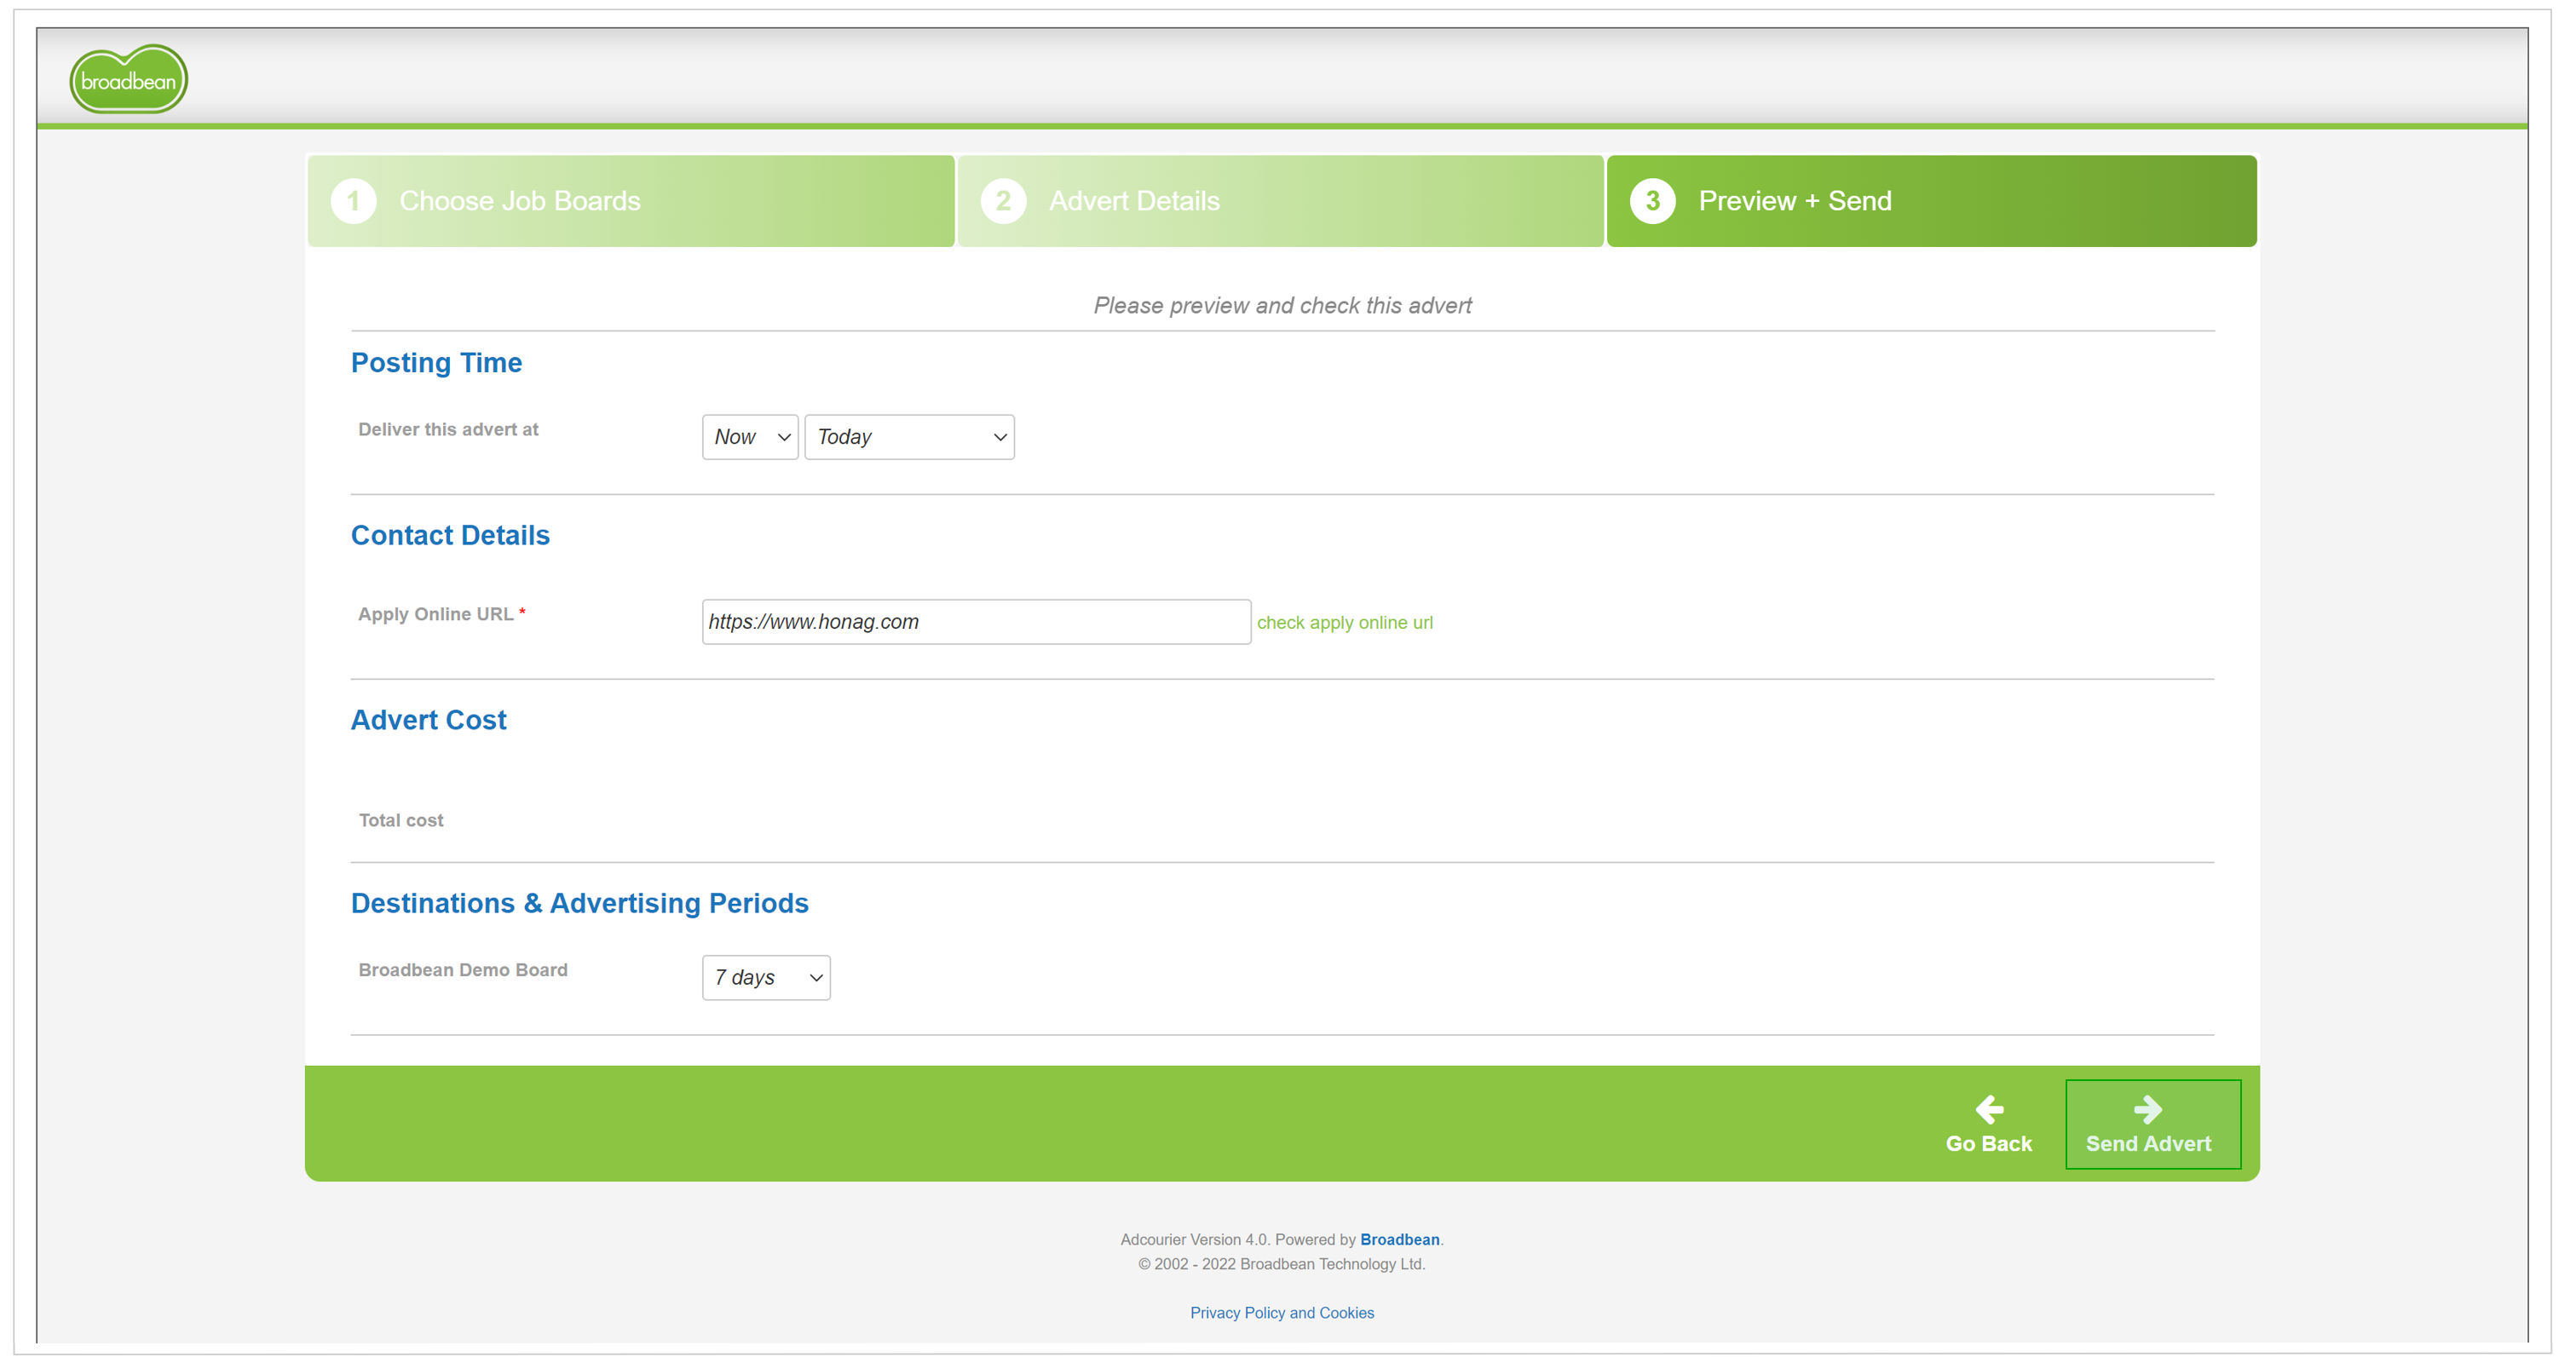
Broadbean will now take you to the familiar overview of your published vacancies on their portal for managing and reviewing them.
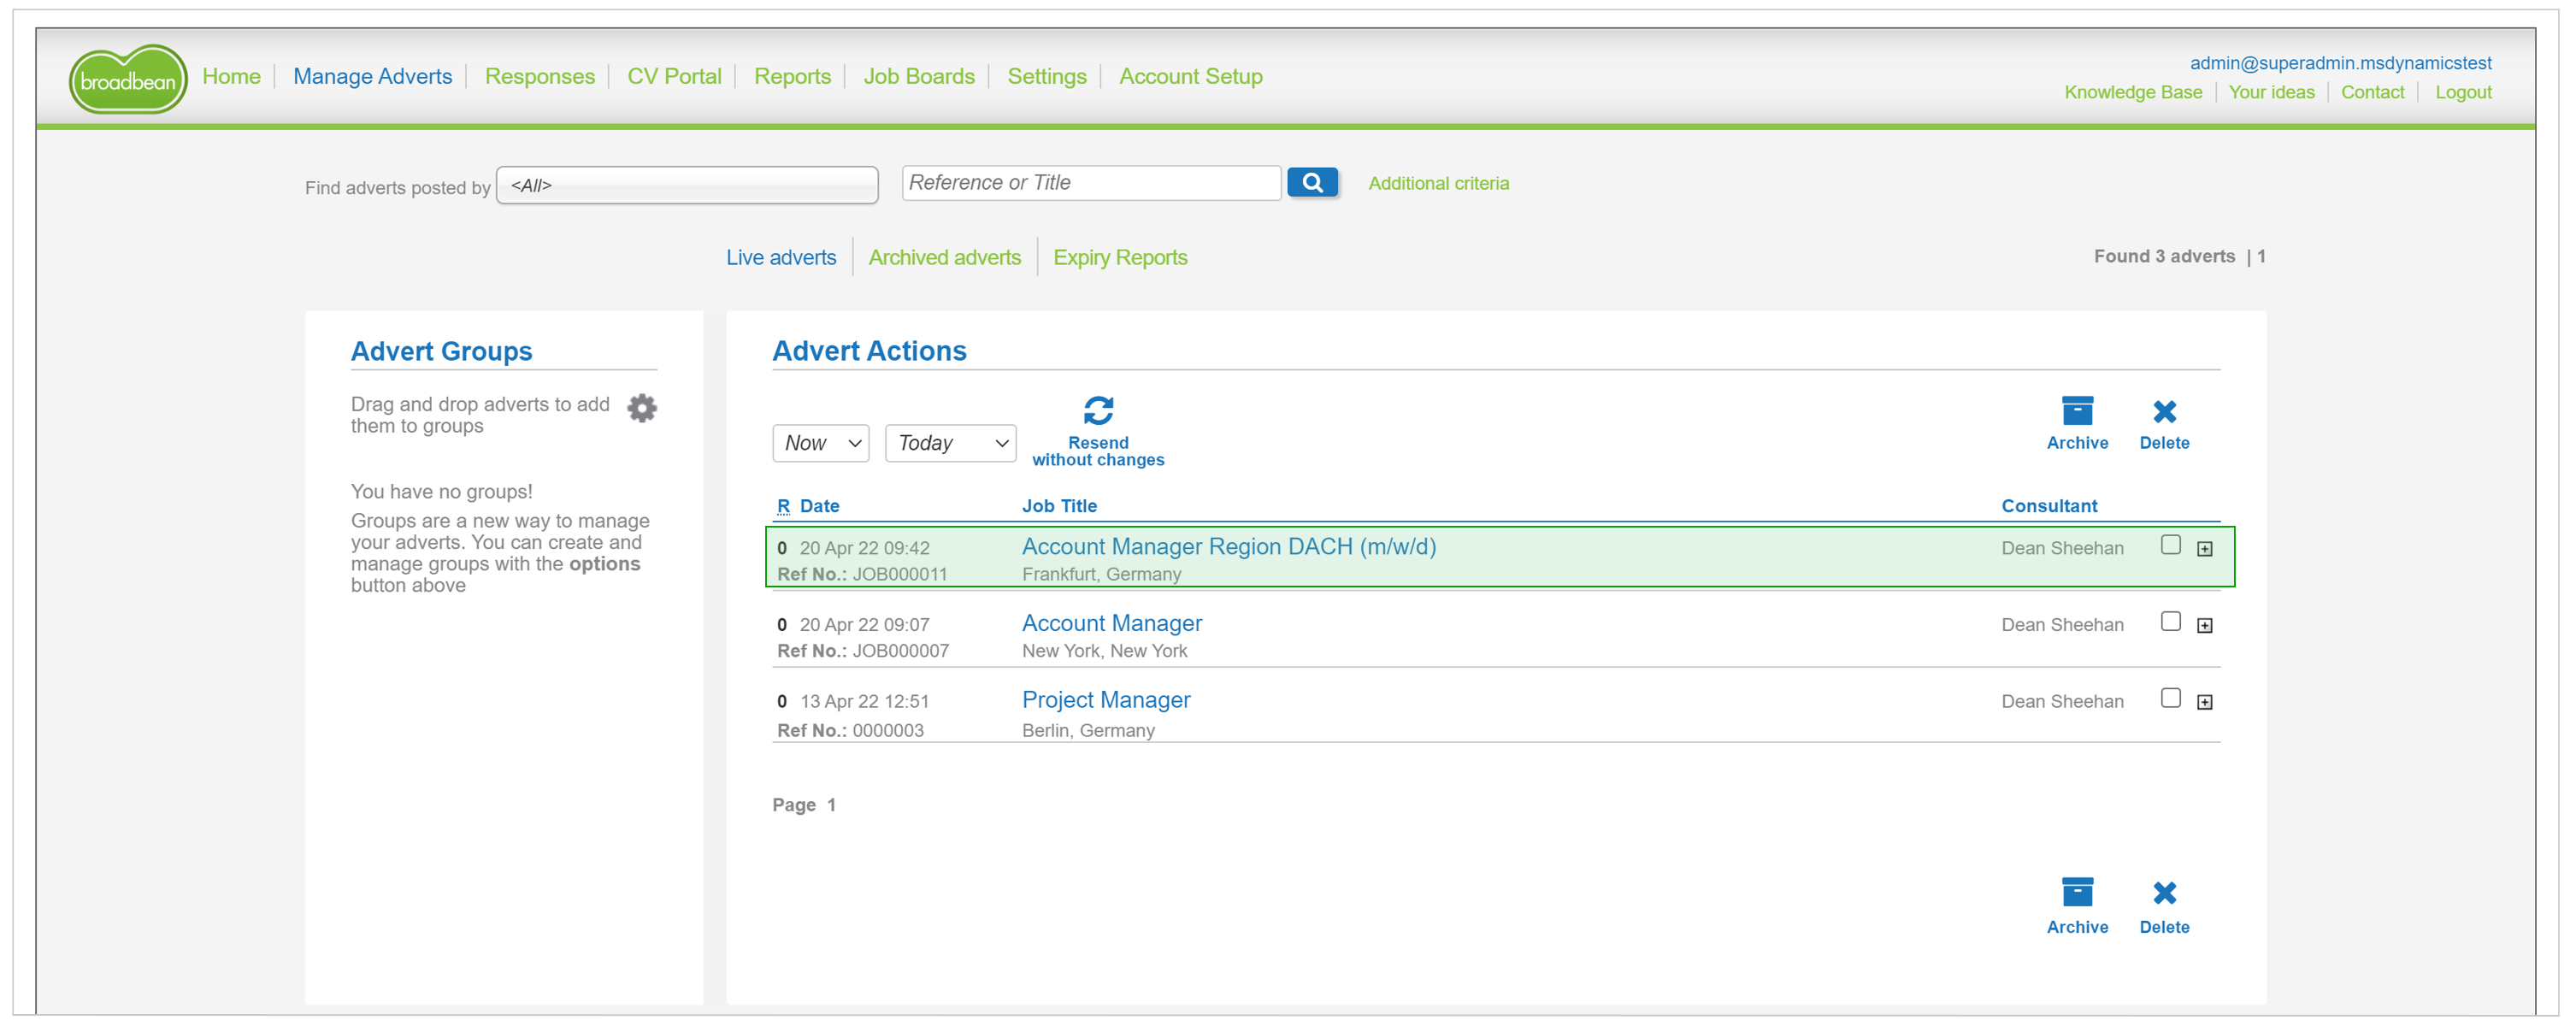
Your vacancy has been successfully published on Broadbean. If you refresh the page in your browser or click Refresh in HR for Dynamics and call up the "Broadbean" tab again, this list will have disappeared, as the connection to Broadbean is only established here for data transfer. If you would like to make changes to your vacancy on Broadbean, please log in directly to the Broadbean website with your user account.
Configuration of the recruiting channel
If the transmission of your vacancy to Broadbean did not work, please check if the configuration of the recruiting channel for Broadbean is correct.
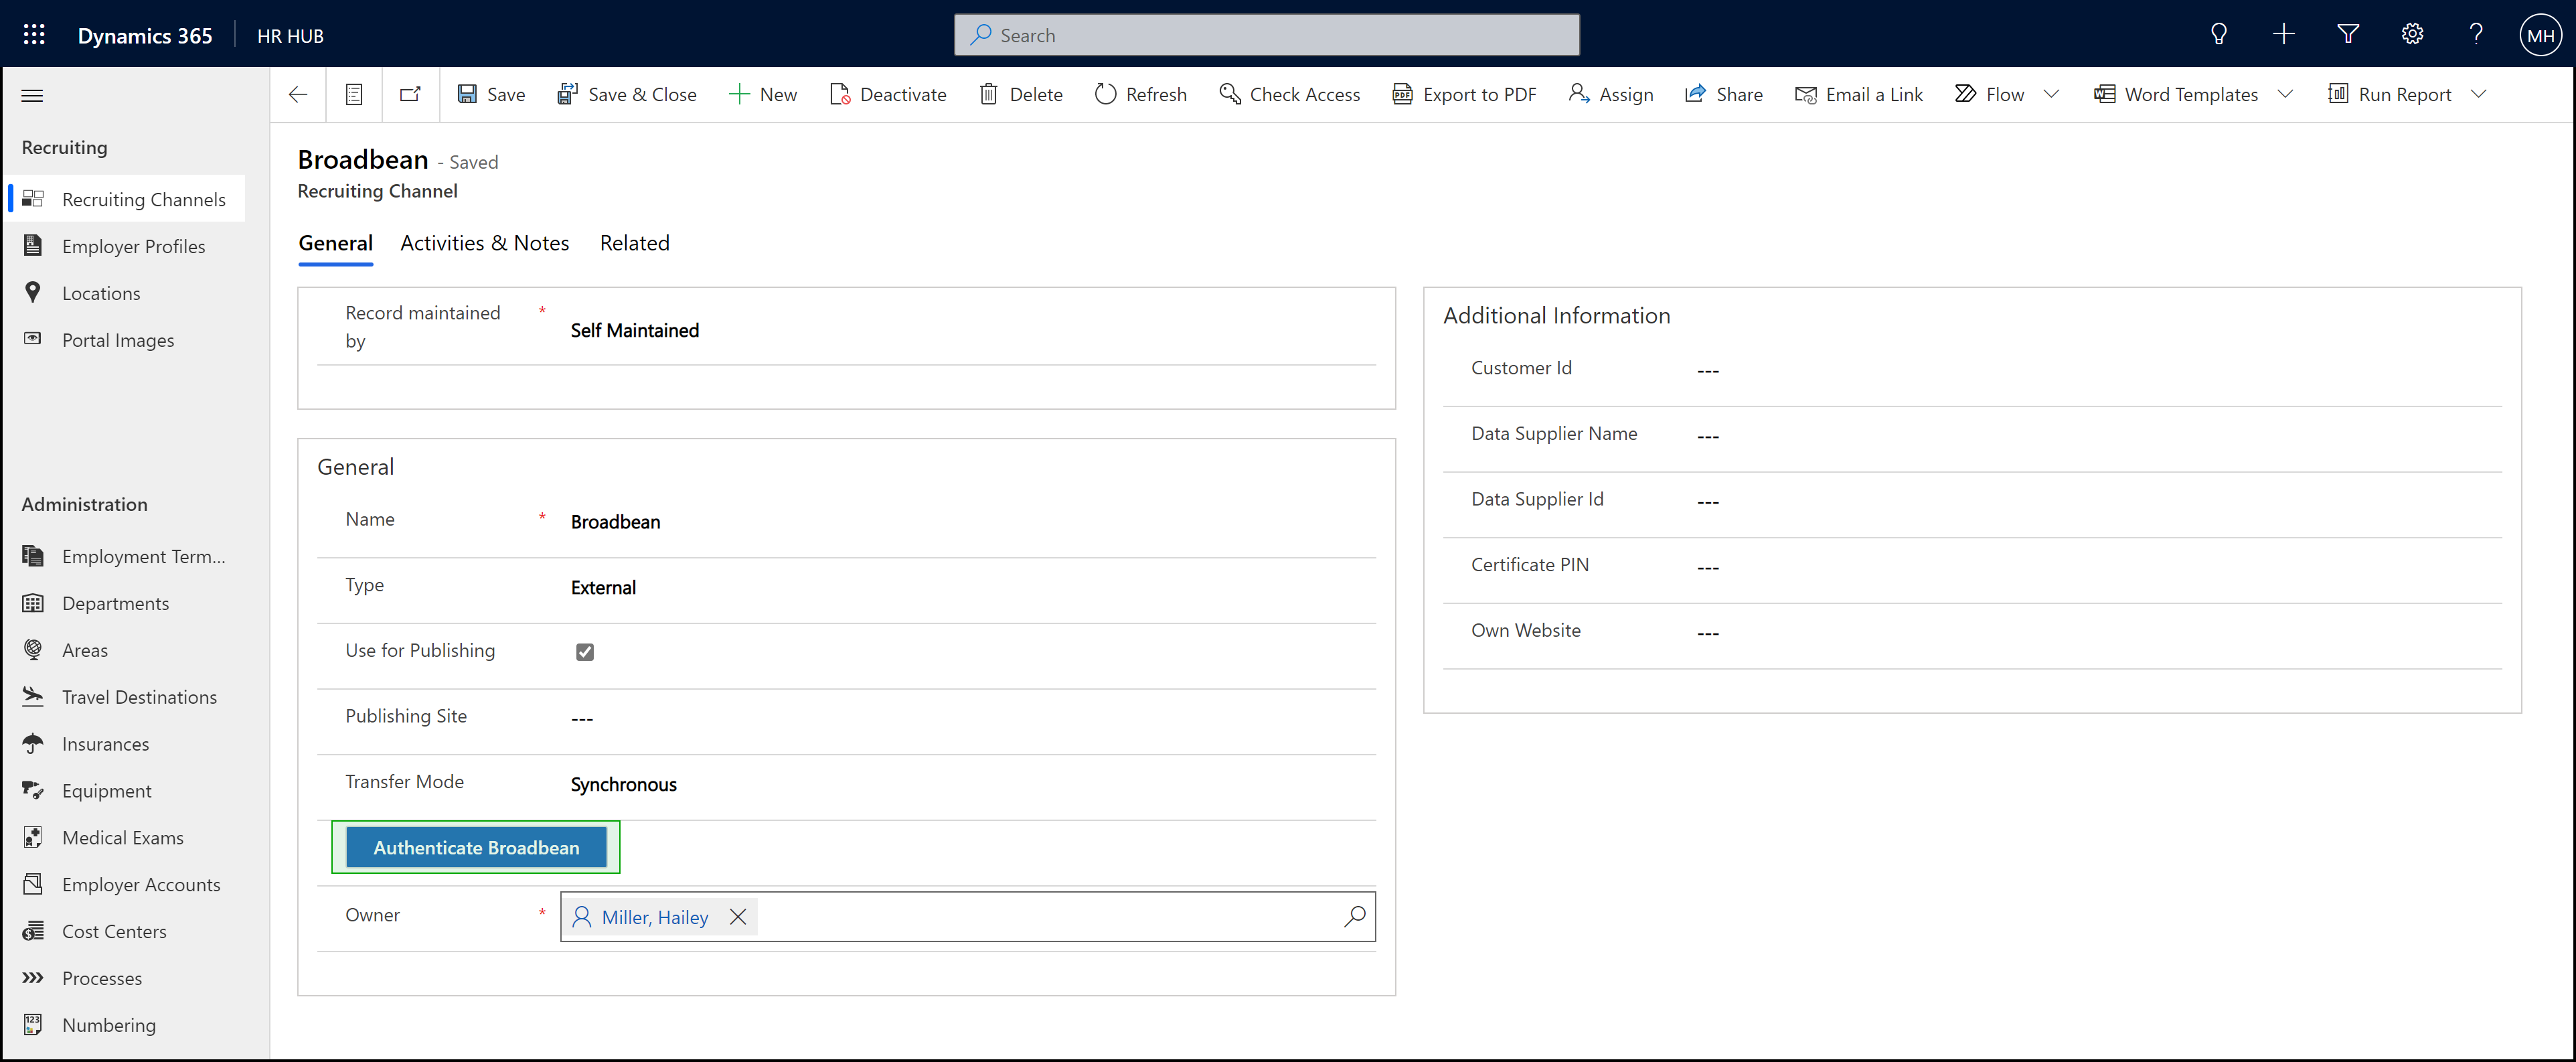
In the app you are currently in, switch to Settings in the bottom left corner and select Recruiting Channels in the navigation bar. Click on Broadbean. The record for this recruiting channel opens and you can start the authentication for Broadbean by clicking the Authenticate Broadbean button.
Please be careful not to deactivate this entry or create a new entry with the same name. There should be no entries with duplicate names.
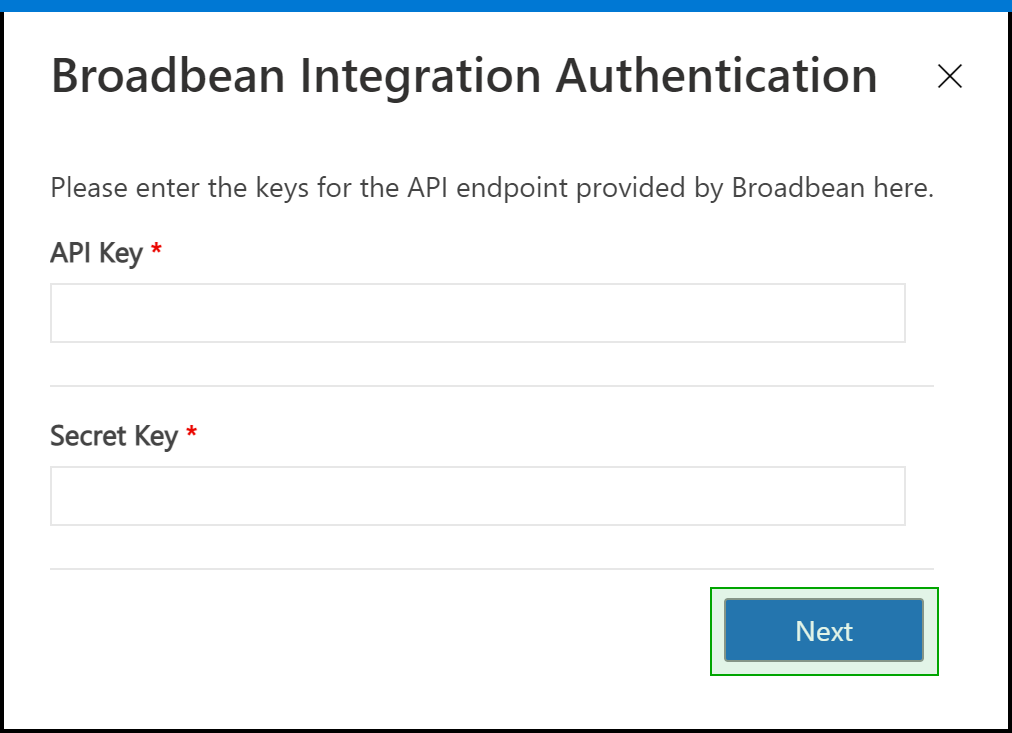
A dialog will open in which you can fill in the three mandatory fields with your login data for Broadbean. All access data will be provided to you by Broadbean after conclusion of the contract.

The Endpoint Service URL tells you at which URL your vacancy will be published in the Broadbean system.
To proceed to the next page, click Next after entering your data.
On the second page of authentication, please enter further access data.
Then click on Next again. It may take a short moment for the action to complete successfully.
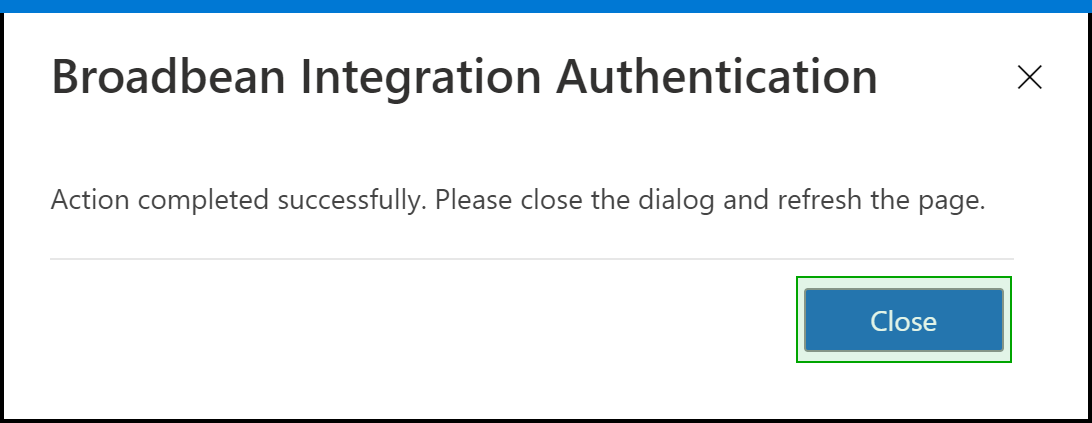
You can now Close the dialog. Please refresh the page.
After the Broadbean Integration Authentication is successfully completed, the system will create two records.
1. xRM1IntegrationSettings Entity Datensatz for "BroadbeanPublishing". This record contains the API access information for publishing vacancies listing in Broadbean.
Please do not delete this record. Do not create duplicates or disable this record as it will affect the vacancy posting on Broadbean.
2. xRM1IntegrationMapping Entity Datensatz for "BroadbeanPublishing". This record contains all fields related to mapping information between HR for Dynamics vacancies and Broadbean vacancies.
Please do not delete this record. Do not create duplicates or disable this record as it will affect the vacancy posting on Broadbean.
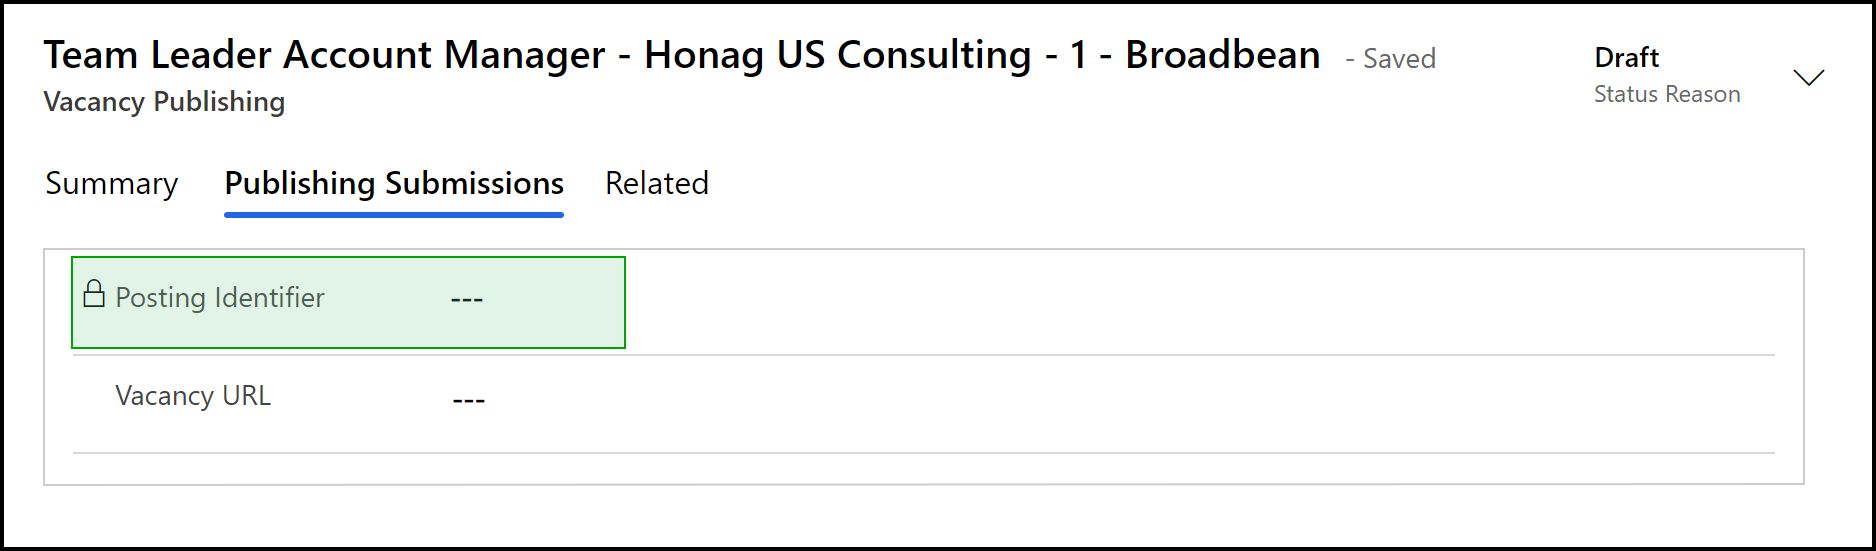
After this is successfully completed, the vacancy can be published. Before doing this, it is important that the Vacancy Id …
![]()
… and the Posting Identifier are configured.
If you have already configured the Vacancy Id and the Posting Identifier, you can skip this step.
If these fields are empty, please read how to create the numbering of the Vacancy Id and the Post Identifier
Once you have created the numbering methods, please navigate back to the vacancy that you would like to publish on Broadbean and delete the existing entry for "Broadbean" in the list of Recruiting Channels and create it once again. The Posting Identifier will then be generated automatically based on your previously defined settings.

After you have checked and configured everything, please switch back to Publish Vacancy and try again.
If your vacancy still cannot be successfully submitted to Broadbean, please get in touch with your contact person.
If you want to re-publish a previously published and deactivated vacancy on your recruiting channels, read the section Republishing a Vacancy.
Setup of StepStone Integration and Publishing of Vacancies
When an applicant applies via StepStone using "Quick-Apply" with their CV, the data from the CV is sent to Textkernel for CV parsing. StepStone receives this data back as an XML file, which is transferred directly into the HR for Dynamics system. There is no need to explicitly perform CV parsing on your side.
More information about CV parsing can be found here: CV Parsing.
This instruction will guide you through the process of submitting your created vacancies to the employer portal for StepStone.
Note: You can only configure recruiting channels with HR security roles.
To publish a vacancy to StepStone, please follow this instruction.
Publish Vacancy
Log in to Dynamics 365 and make sure you are in the "HR HUB" or "HR HUB Recruiting" app.
Switch to "HR Hub" at the bottom left, if it' s not already the case, and navigate to "Vacancies". Create a new vacancy.
Select the Job Profile, Quantity of Position, as well as the Department and save your entries.
Please make sure that the "Vacancy Id" is automatically filled after saving. If this is not the case, you need to create the numbering first.
Click here for more information.
Now click on "New Vacancy Publishing" if no recruiting channel for StepStone is listed yet. If an recruiting channel for StepStone is already listed, you can skip this step.
Now select "StepStone" as the Recruiting Channel. Save your entry and switch to the "Publishing Submissions" tab.
Please make sure that the "Posting Identifier" was automatically filled after saving. If this is not the case, please create a numbering for the Posting Identifier first.
Further information can be found here.
The recruiting channel "StepStone" is now in the list of recruiting channels.

Now, in the "Details" tab (next to the "Summary" tab you are currently in), enter all the required fields for "Recruiting Contact Details".
Now switch to the "External Job Boards" tab and select "StepStone" under "Validation - Show Required Fields For".
Fill in the fields with the required information and save your entries.
Then switch back to the "Summary" tab. To start the publishing operation, click None for "StepStone" in the Publishing Operation and start it by clicking Start.
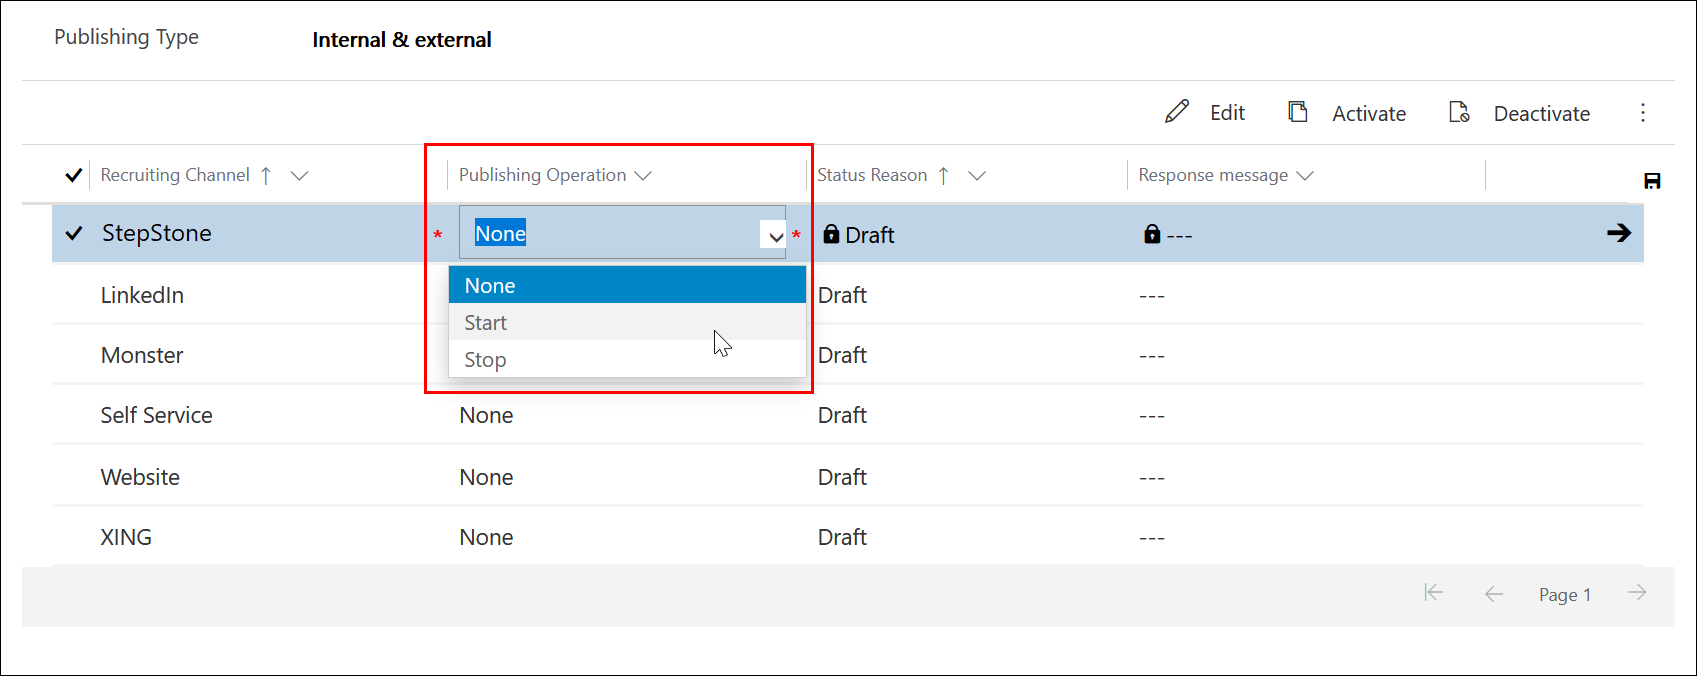
Save the operation. Your vacancy will now be transmitted to StepStone.
It may take a few minutes before you receive feedback that your vacancy has been successfully submitted to StepStone. If your vacancy has been successfully submitted, it will be listed on the StepStone employer portal.
Configuration of the Recruiting Channel
If the transmission of your vacancy to StepStone did not work, please check if the configuration of the recruiting channel for StepStone is correct.
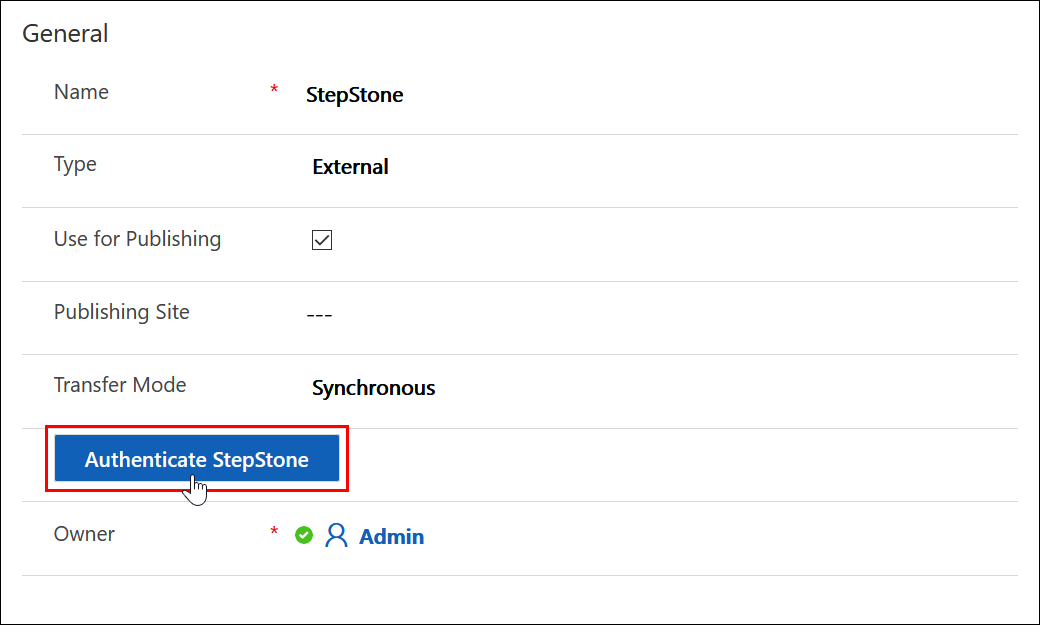
Navigate to Settings - Recruiting Channels and open the entry for StepStone.
Please be careful not to deactivate this entry or create a new entry with the same name. There should be no entries with duplicate names.
Click on the button "Authenticate StepStone".
A dialog opens. Please enter the required information. You will receive this information from StepStone. If you do not have it, please contact your StepStone contact person.
- Endpoint Service URL: https://jobfeed.stepstone.com/listing/httpxml.cfm.utf-8
- Login Username for StepStone API Endpoint: Enter your username
- Login Password for StepStone API Endpoint: Enter your password
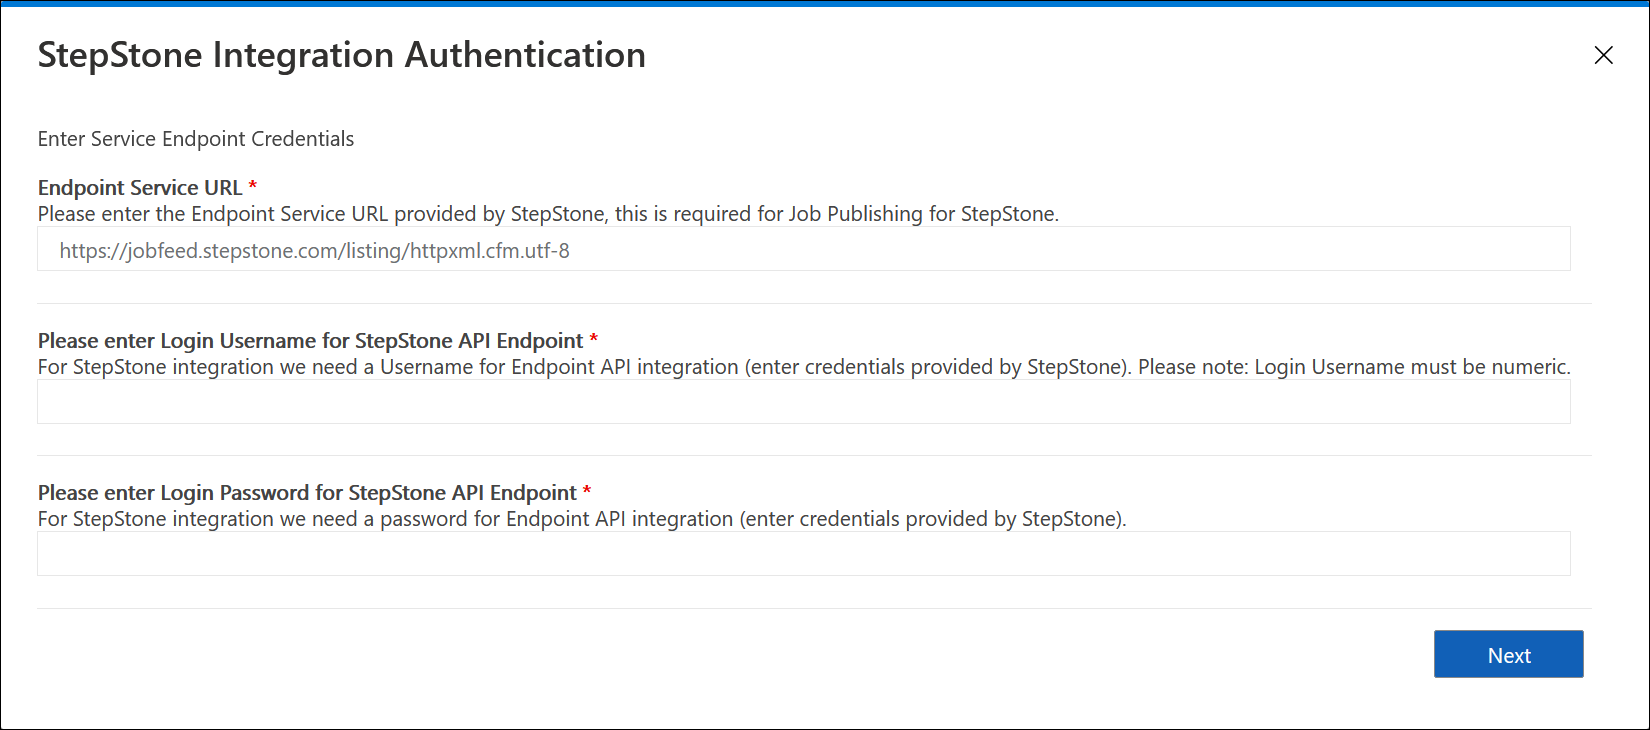
Click on Next.
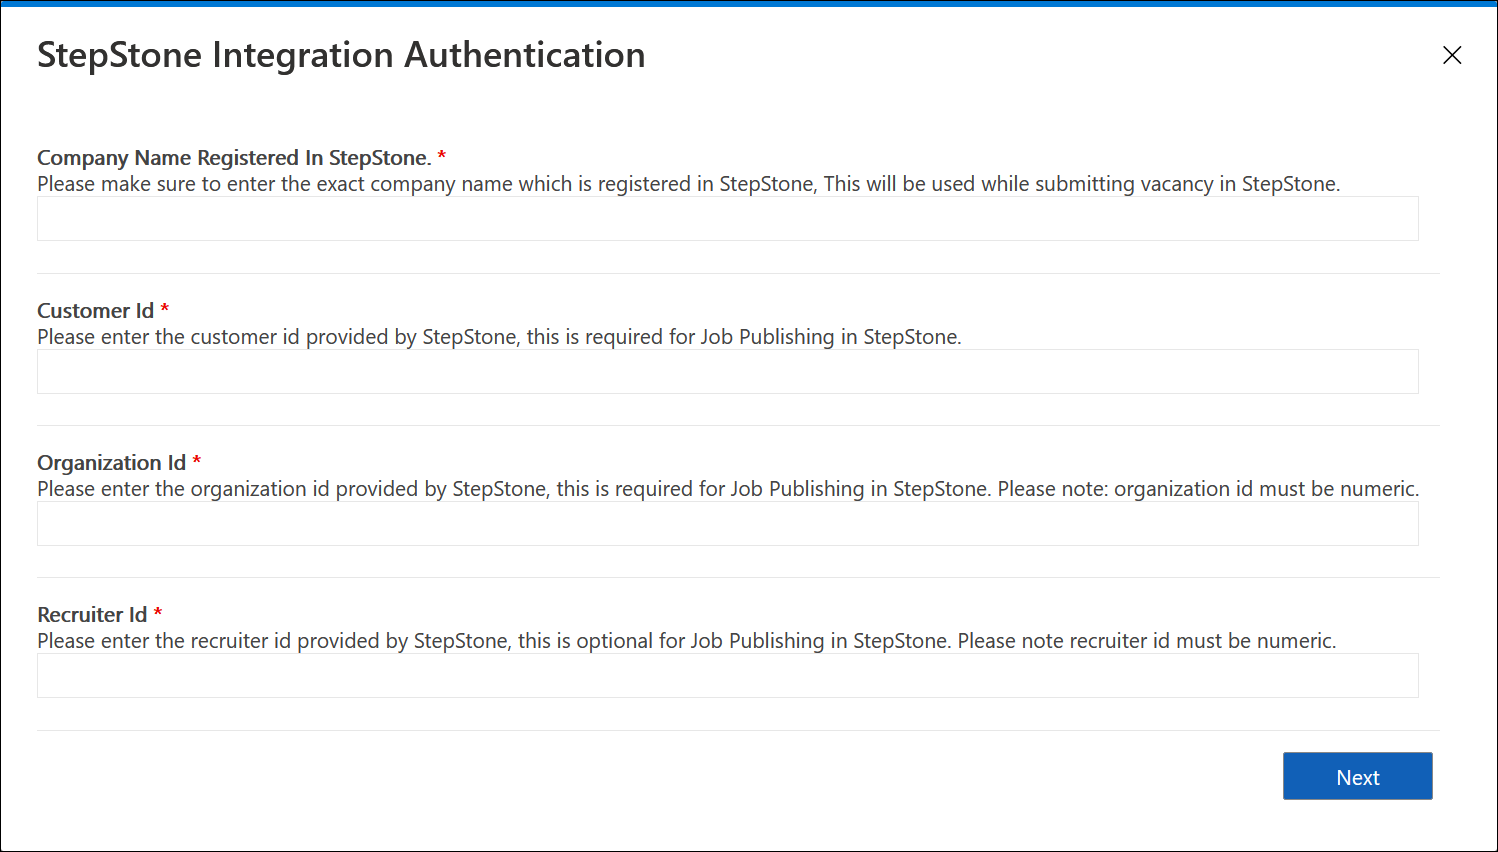
Now enter your Company Name registered in StepStone, as well as Customer Id, Organization Id and Recruiter Id.
Then click on Next again. It may take a short moment for the action to complete successfully.
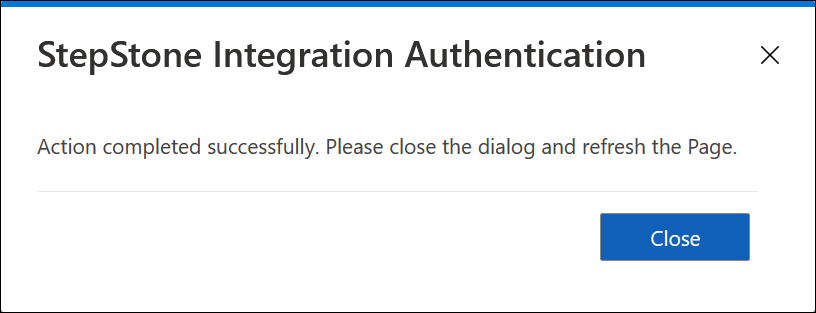
You can now close the dialog. Please refresh the page.
After the StepStone Integration Authentication is successfully completed, the system will create three records.
1. xrm1IntegrationSettings Entity record for "StepstonePublishing". This record contains the API access information for publishing vacancies listing in StepStone.
Please do not delete this record. Do not create duplicates or disable this record as it will affect the vacancy posting on StepStone.
2. xrm1IntegrationMapping Entity record for "StepStonePublishing". This record contains all fields related to mapping information between HR for Dynamics vacancies and StepStone vacancies.
Please do not delete this record. Do not create duplicates or disable this record as it will affect the vacancy posting on StepStone.
3. Employer Profile Entity record for employer information provided by StepStone. This record refers to the StepStone recruiting channel.
After this is successfully completed, the vacancy can be published. Before doing this, it is important that the Vacancy Id …
… and the Posting Identifier are configured.
If you have already configured the Vacancy Id and the Posting Identifier, you can skip this step.
Numbering - Vacancy ID
Navigate to "Numbering" (Settings) and create a new numbering.
Fill in the fields "Numbered Entity" and "Numbered Field" as follows:
- Numbered Entity: xrm1_open_placement
- Numbered Field: xrm1_vacancy_id
Make sure that the spelling of "Numbered Entity" and "Numbered Field" is correct.
Select the desired Numbering Method. You can now also define a Prefix, Number of Digits, and Separator. For "Record maintained by" select "Self Maintained". The Vacancy Id will then be created automatically after saving a new vacancy, according to your previously defined settings.
Save your entries.
Numbering - Posting Identifier
Create another numbering for the Posting Identifier.
Fill in the fields "Numbered Entity" and "Numbered Field" as follows:
- Numbered Entity: xrm1_channel_publishing
- Numbered Field: xrm1_posting_identifier
Please make sure here as well, that the spelling of "Numbered Entity" and "Numbered Field" is correct.
Select the desired Numbering Method. You can now also define a Prefix, Number of Digits, and Separator. For "Record maintained by" select "Self Maintained".
Save your entries.
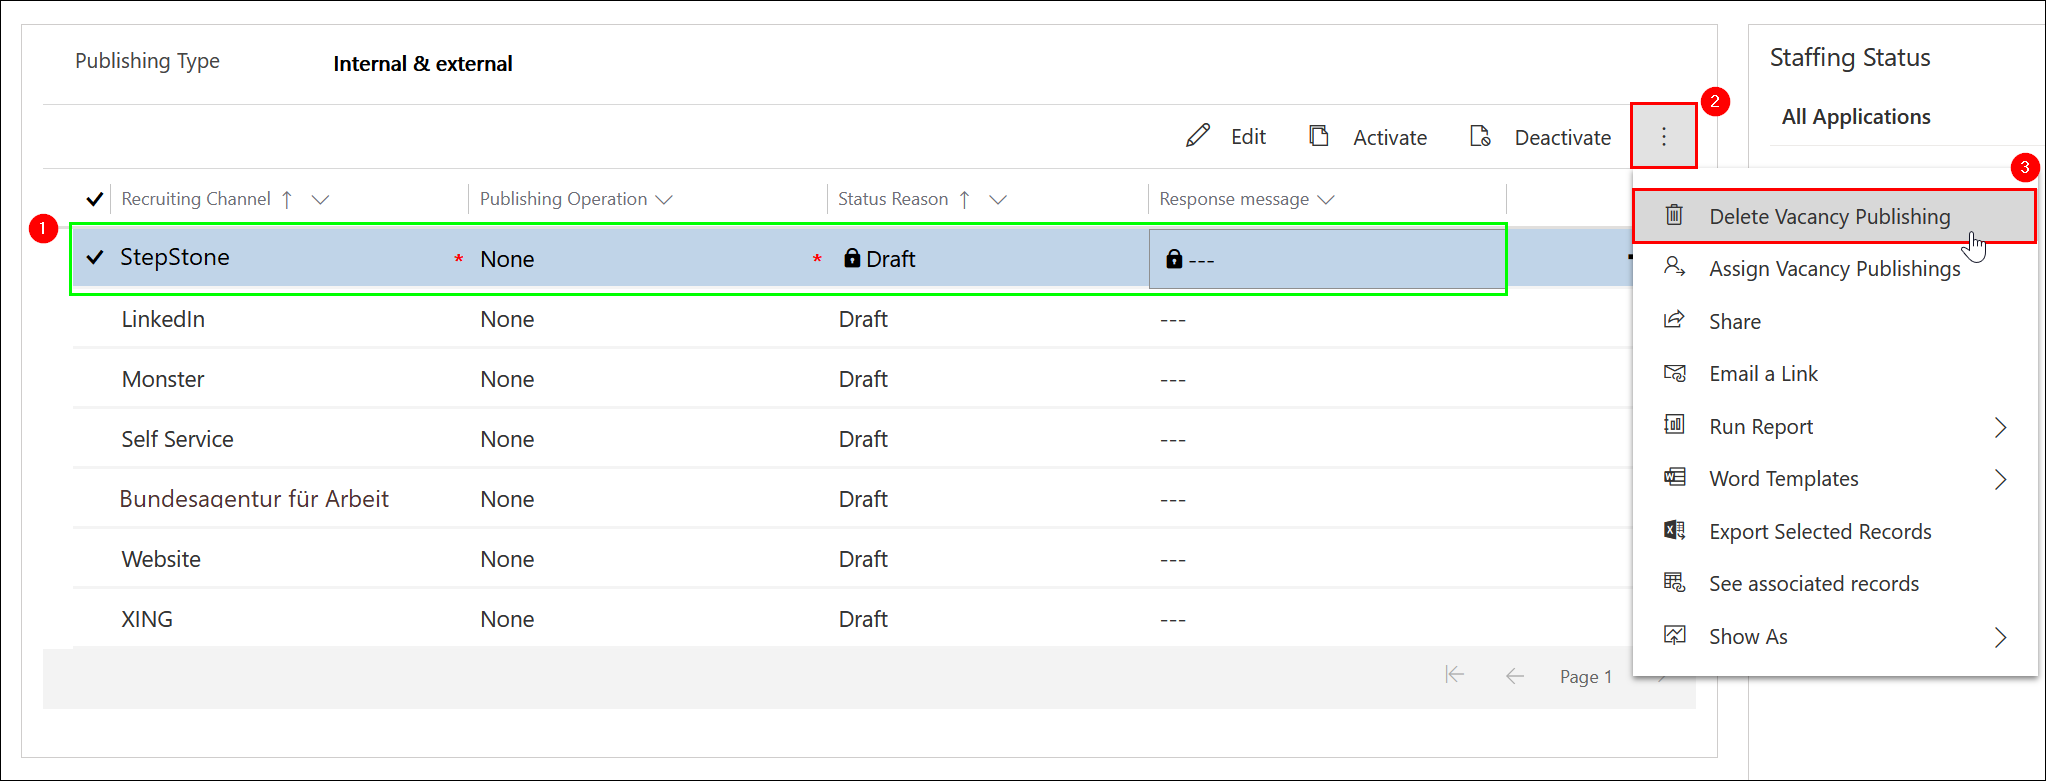
Now please delete the existing entry for "StepStone" in the list of Recruiting Channels and create it once again. The Posting Identifier will then be generated automatically based on your previously defined settings.
After you have checked and configured everything, please switch back to Publish Vacancy and try again.
If your vacancy still cannot be successfully submitted to StepStone, please get in touch with your contact person.
Republishing a Vacancy
If you want to publish the same vacancy again after a certain period of time, e.g. because the vacancy is up for recruitment again, you don't have to create the vacancy again. You can simply use your previous vacancy.
In this case, you can simply go back to the desired level in the process. However, be sure to set the "All positions filled" field to No in the 7th "Post-Processing" stage. In addition, set the "Expiry Extended" to Yes.
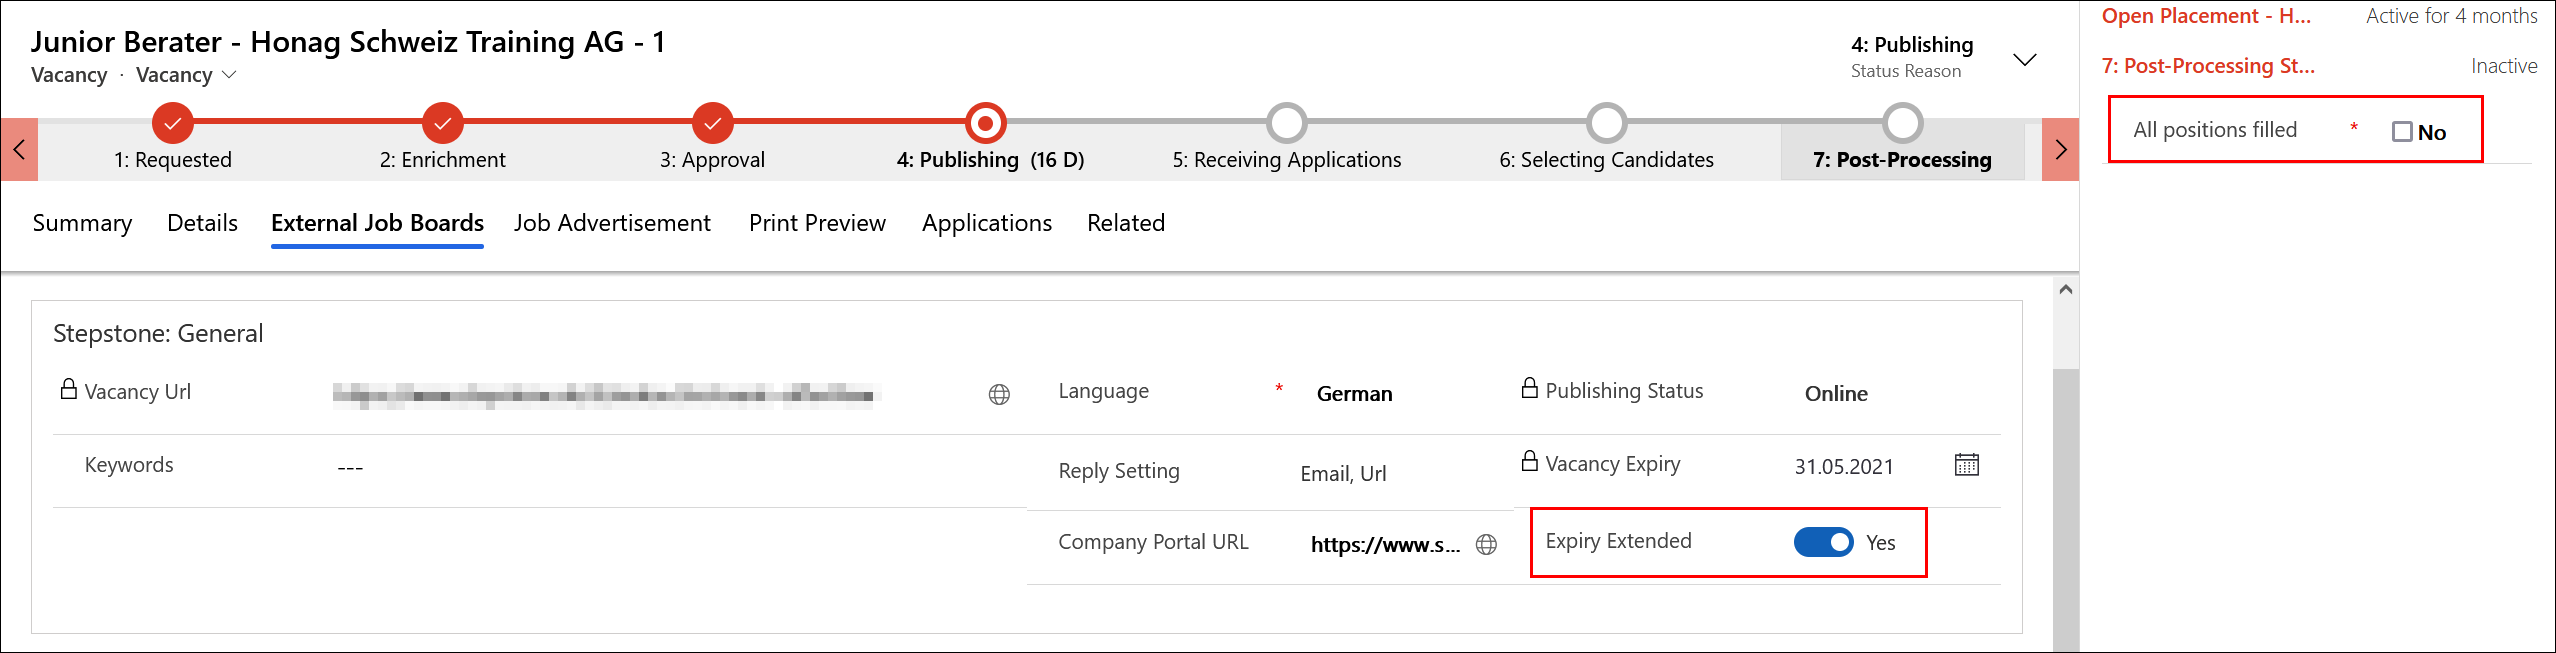
Save your changes. Then you can proceed as usual and publish your vacancy again.
Create Applicants and Applications automatically from received E-Mail
Most companies use generic e-mail addresses like for example Application@Honag-US.com to receive applications.
You can configure your Dynamics 365 to automatically create applicant- and application records out of e-mails received by a specified e-mail address.
Requirements:
- Admin access to Dynamics 365
- Generic Mailbox for incoming applications
- a Customizing Solution (How to create one)
Create a queue
Configure the mailbox
1. Create a queue
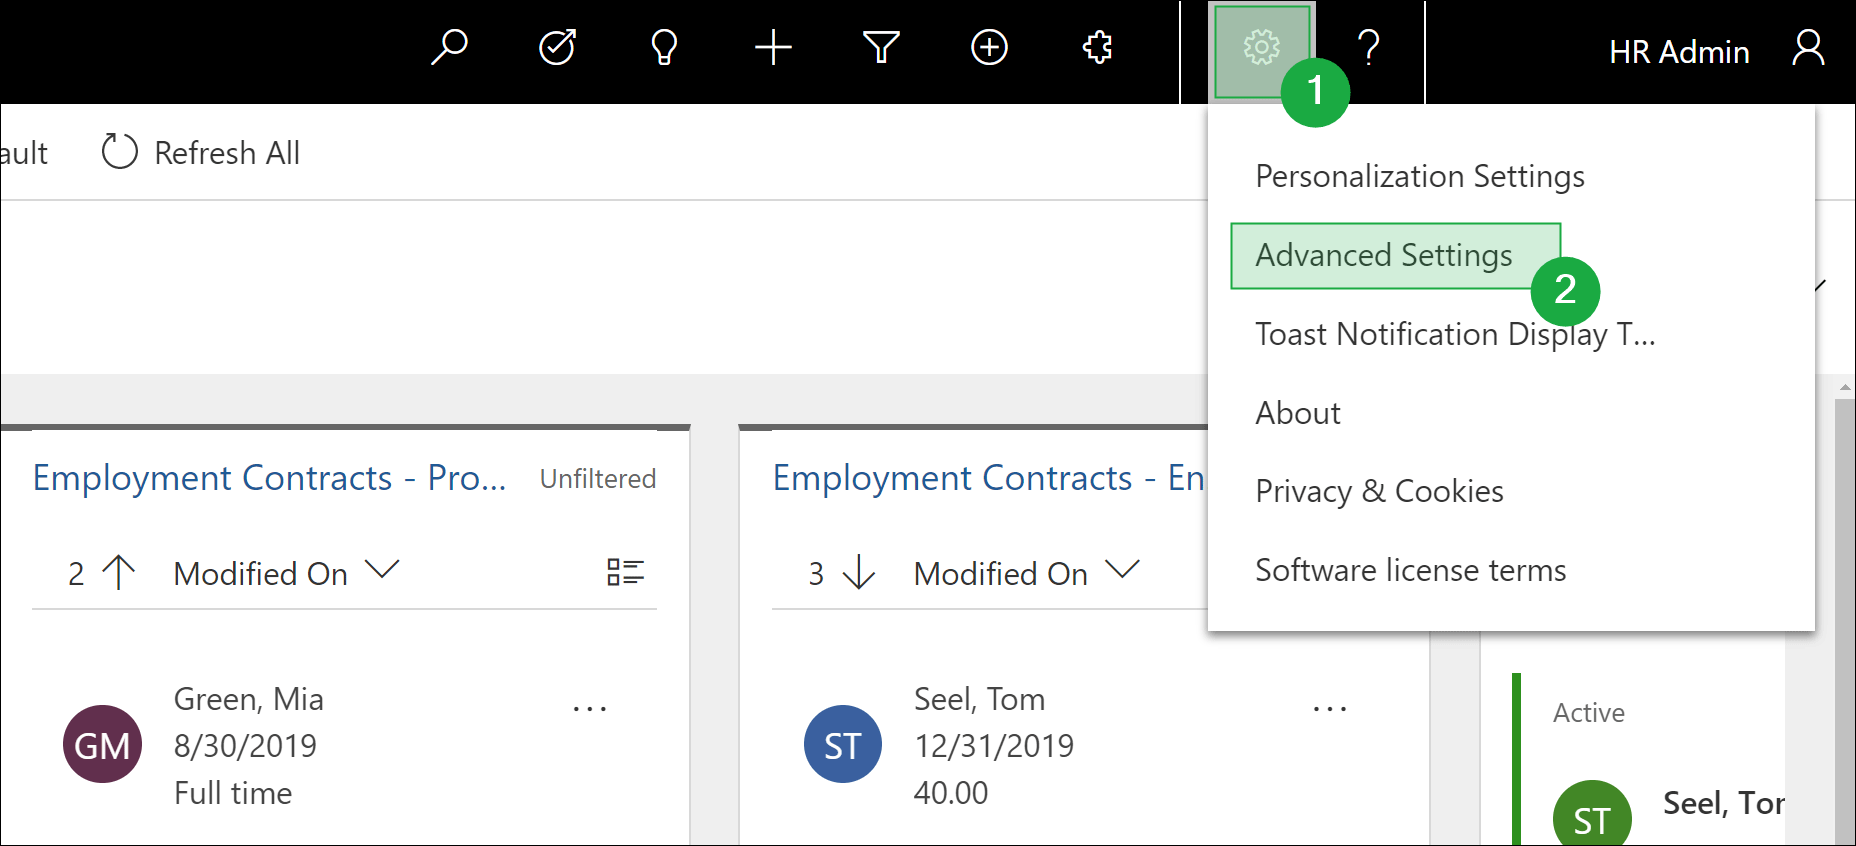
Log in to Dynamics 365 and open the Advanced Settings via the gear in the upper right corner.
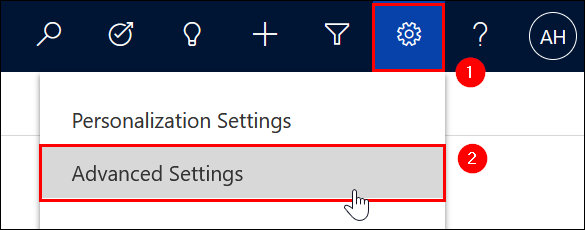
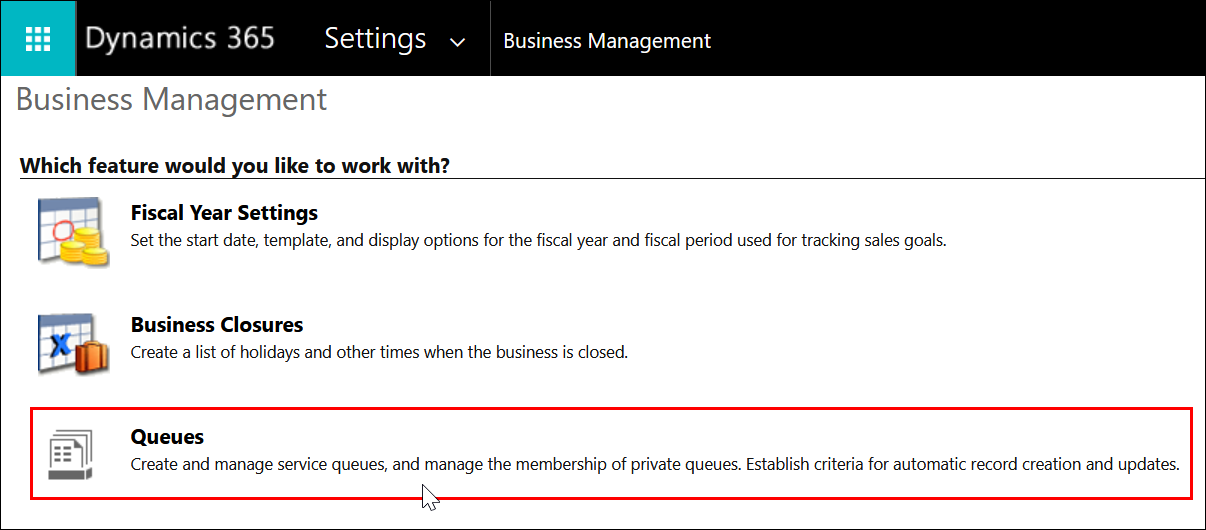
Then click on "Queues".
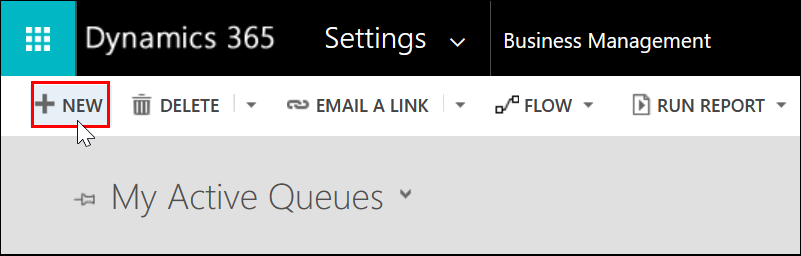
Now create a new queue by clicking NEW in the upper left corner.
Enter a descriptive name and your generic email address. Leave the "Type" set to Public, it is already set that way by default.
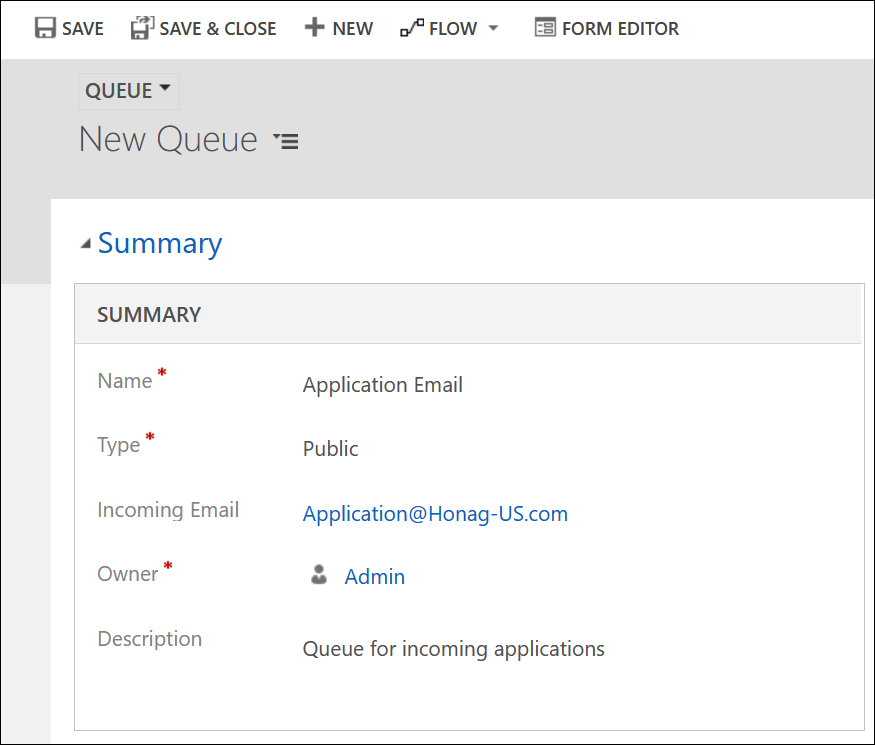
Save and close your entries.
2. Configure the mailbox
Navigate back to the Advanced Settings.
Now click on the arrow next to "Settings". Under the "System" heading, click on "Email Configuration".

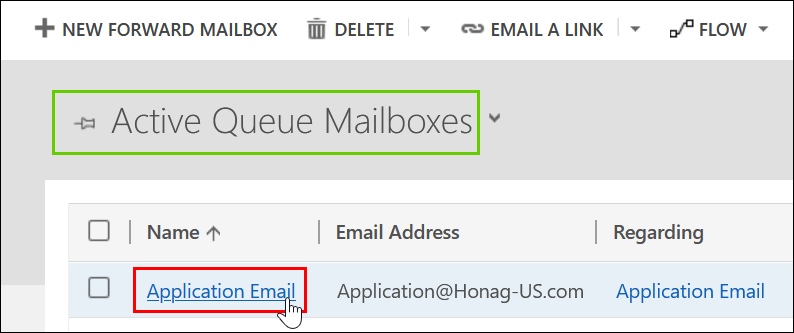
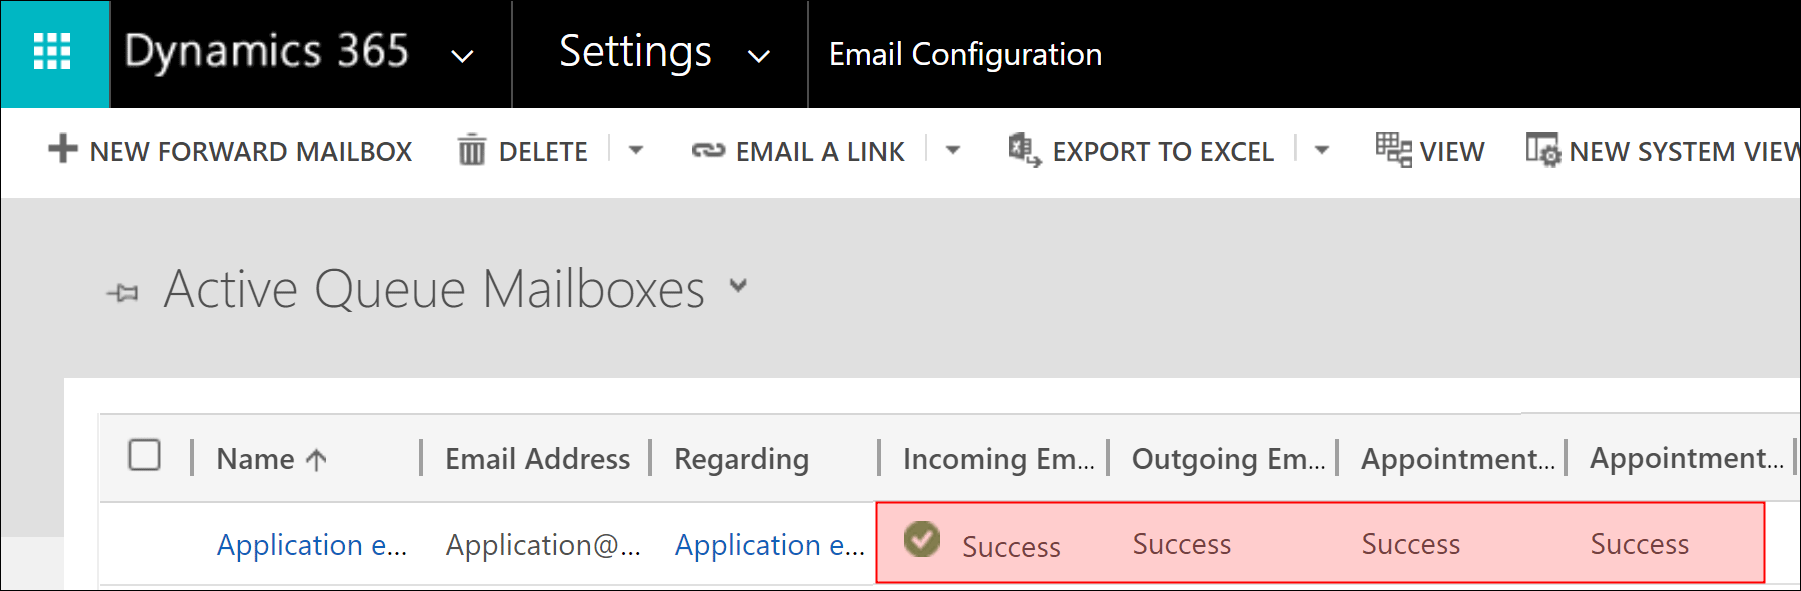
Click on "Mailboxes" in the e-mail configuration area.

Now switch the view from "My active mailboxes" to "Active Queue Mailboxes" and open the previously created queue.
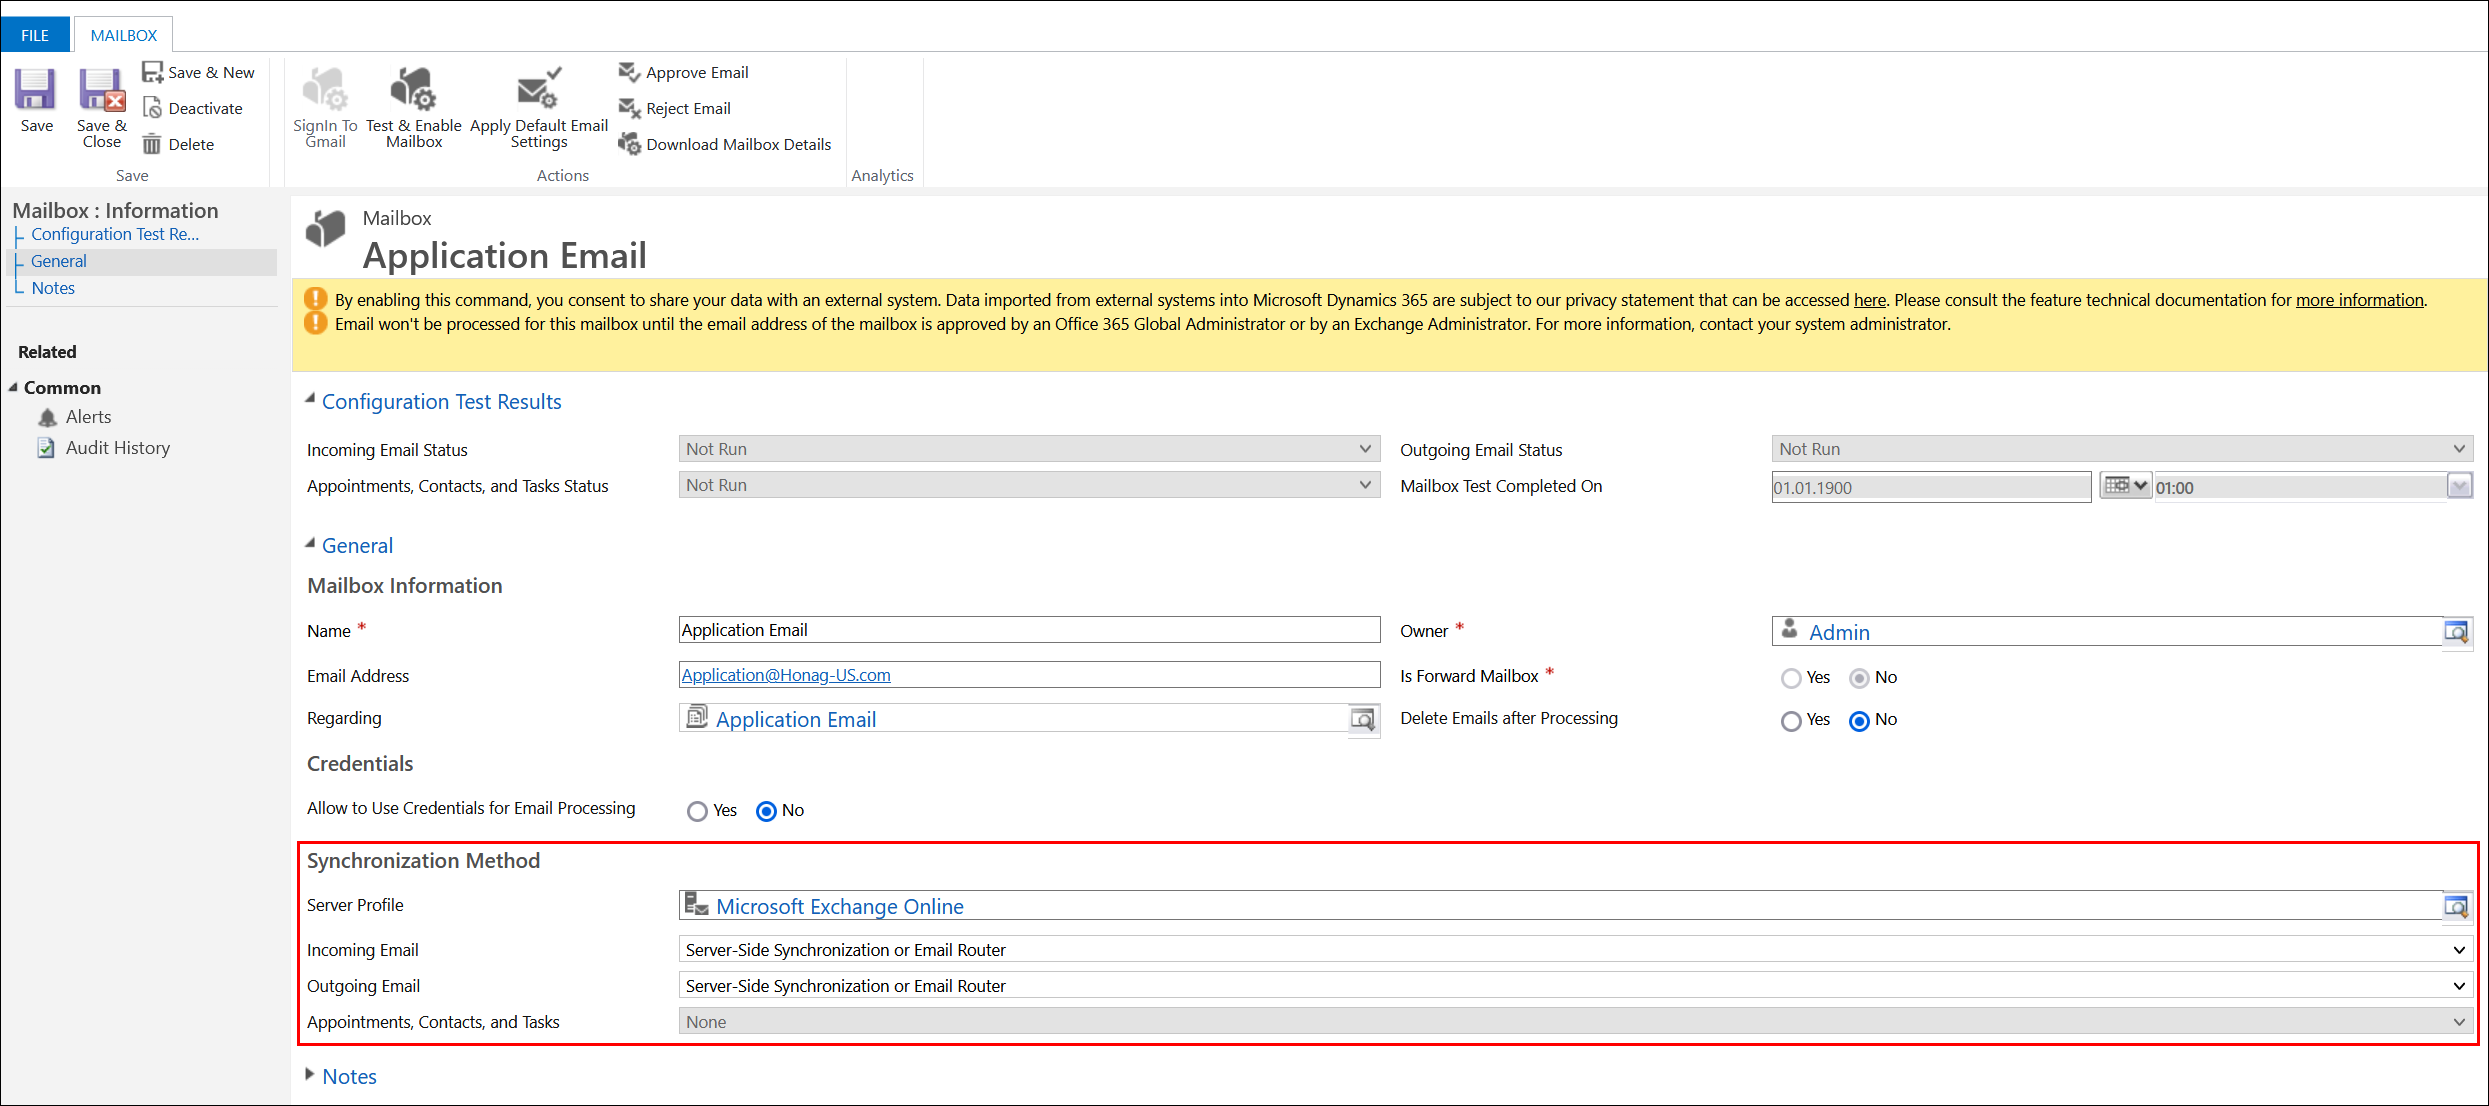
A new window opens. Set the synchronization method to "Server-Side Synchronization or Email Router". Then save and close the configuration.
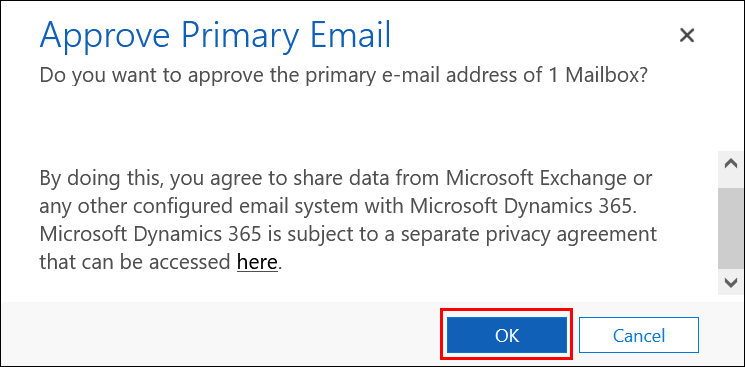
Now select the record for your application inbox and click Approve Email.

A dialog opens. Confirm this by clicking on "OK".
After you have approved the email address, select the record again and click Test & Enable Mailboxes.
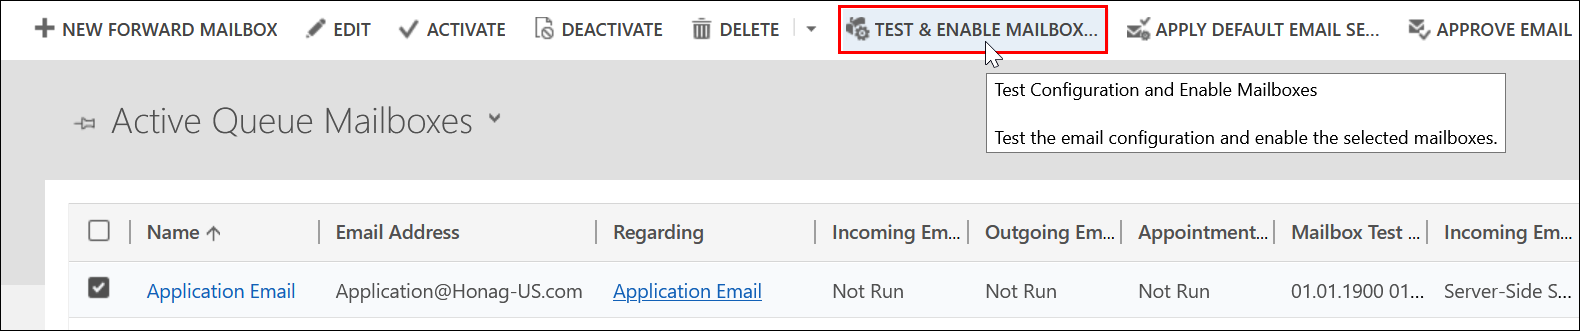
A dialog opens again. Make sure that the option marked in the screenshot is activated and confirm with OK.
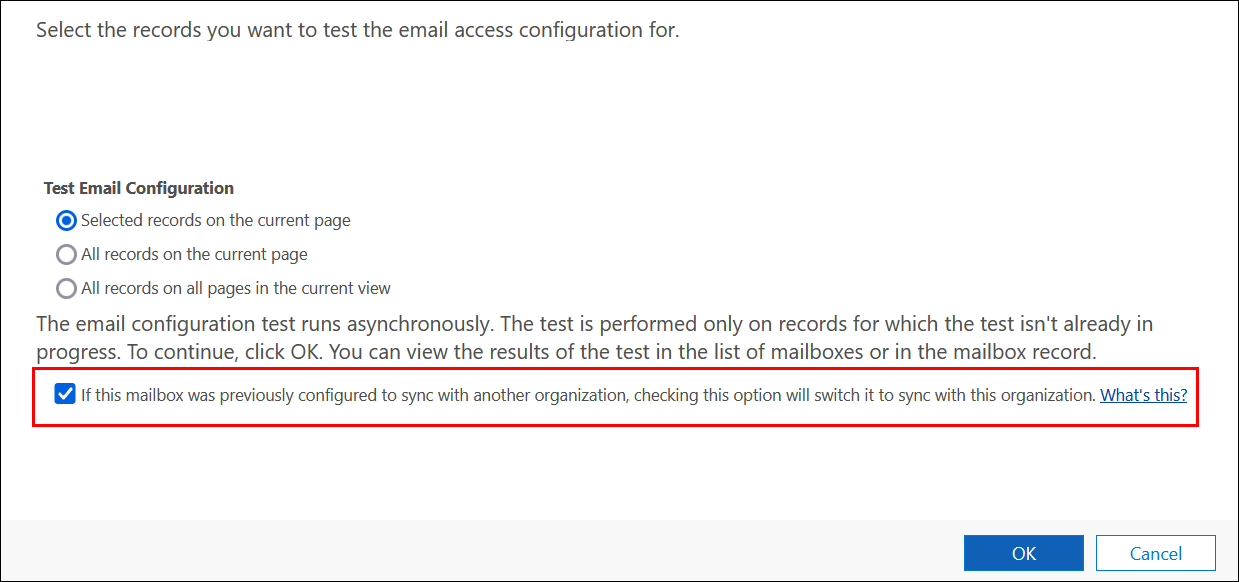
You can view the results of the test in the list of mailboxes or in the mailbox record.
3. Create distribution process
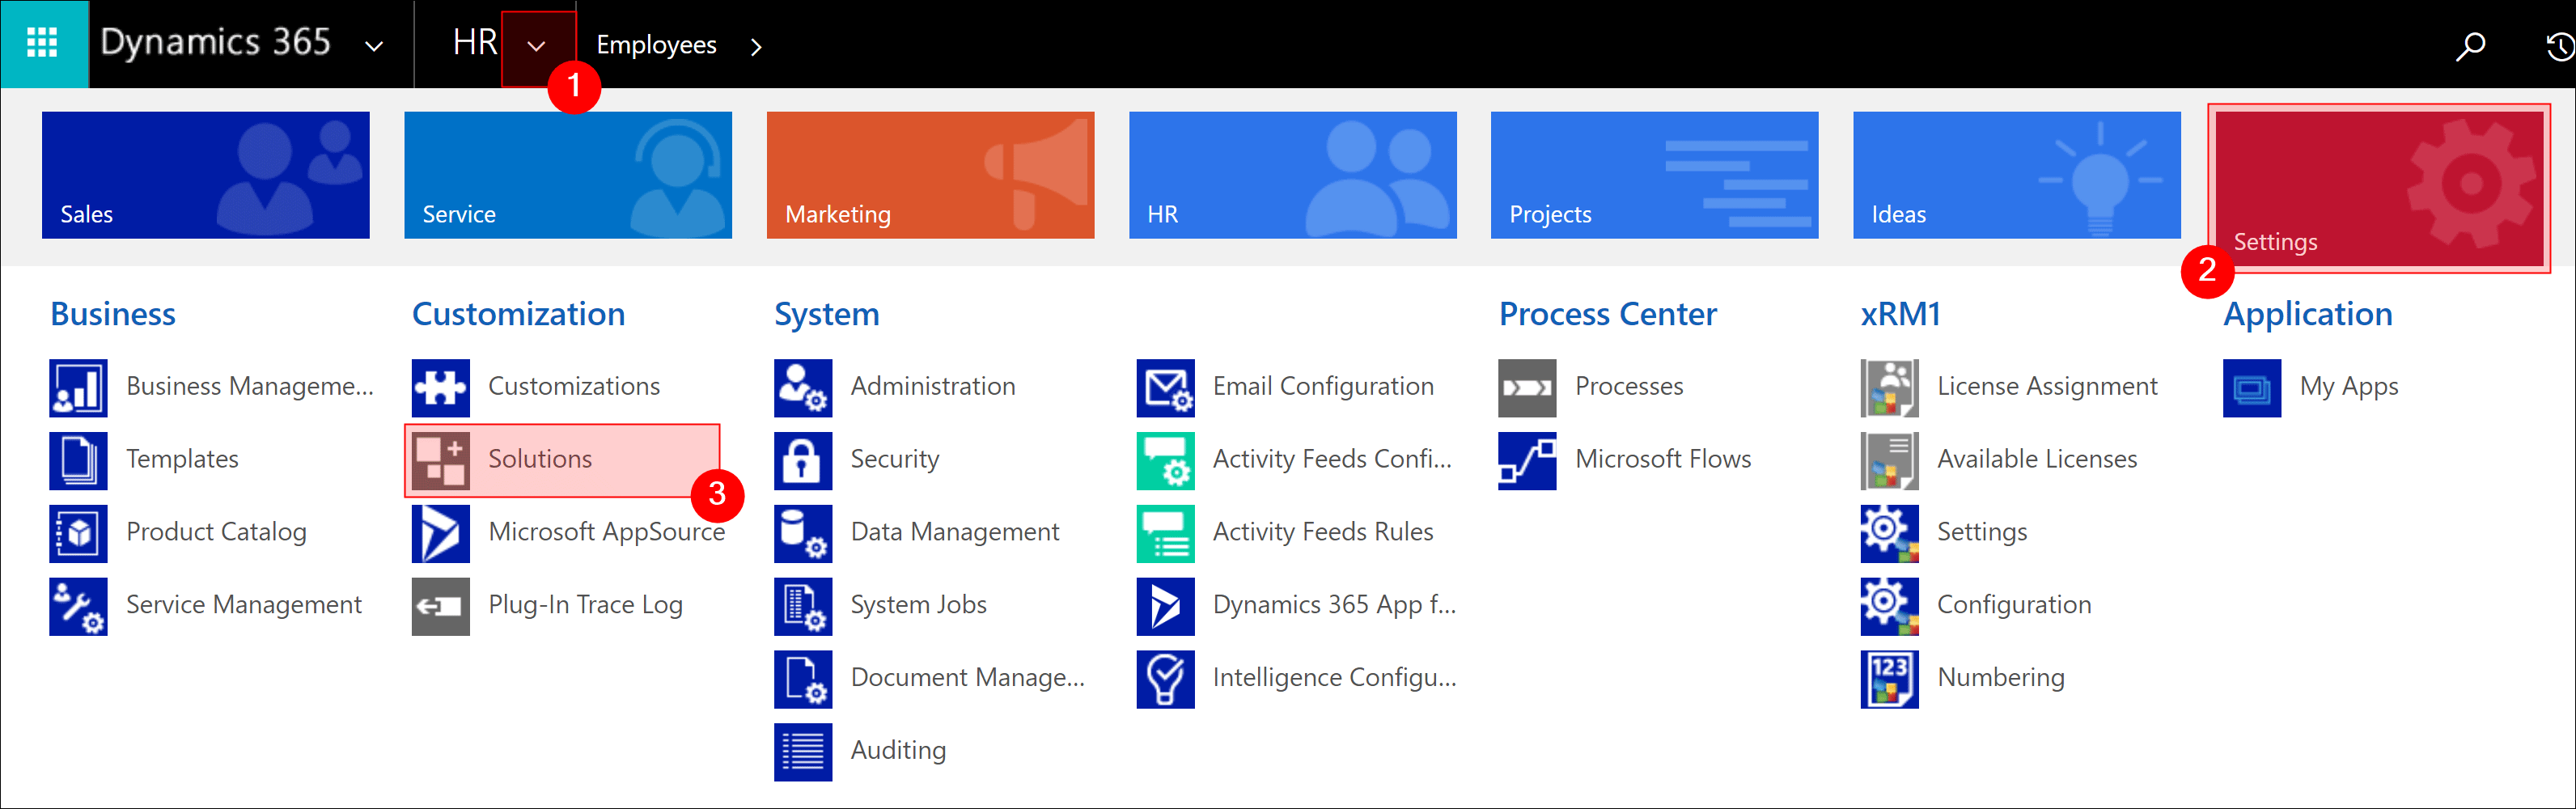
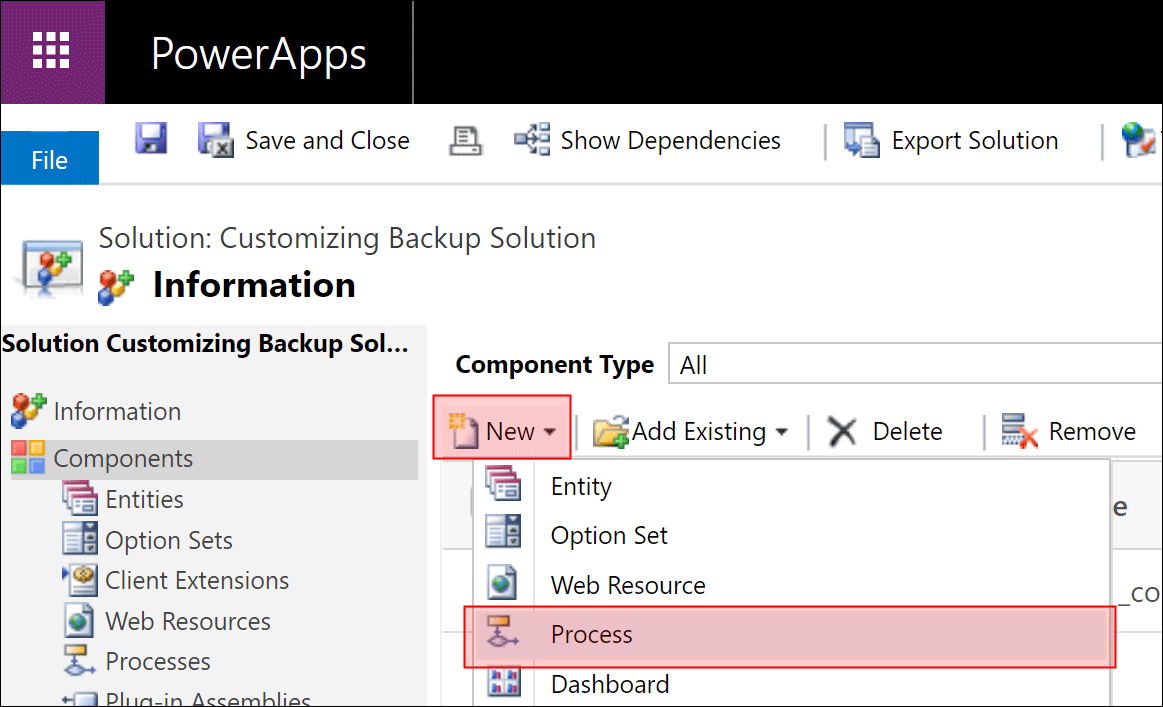
Go to Navigation Bar -> Settings -> Solutions and open your Customizing Solution with a double-click
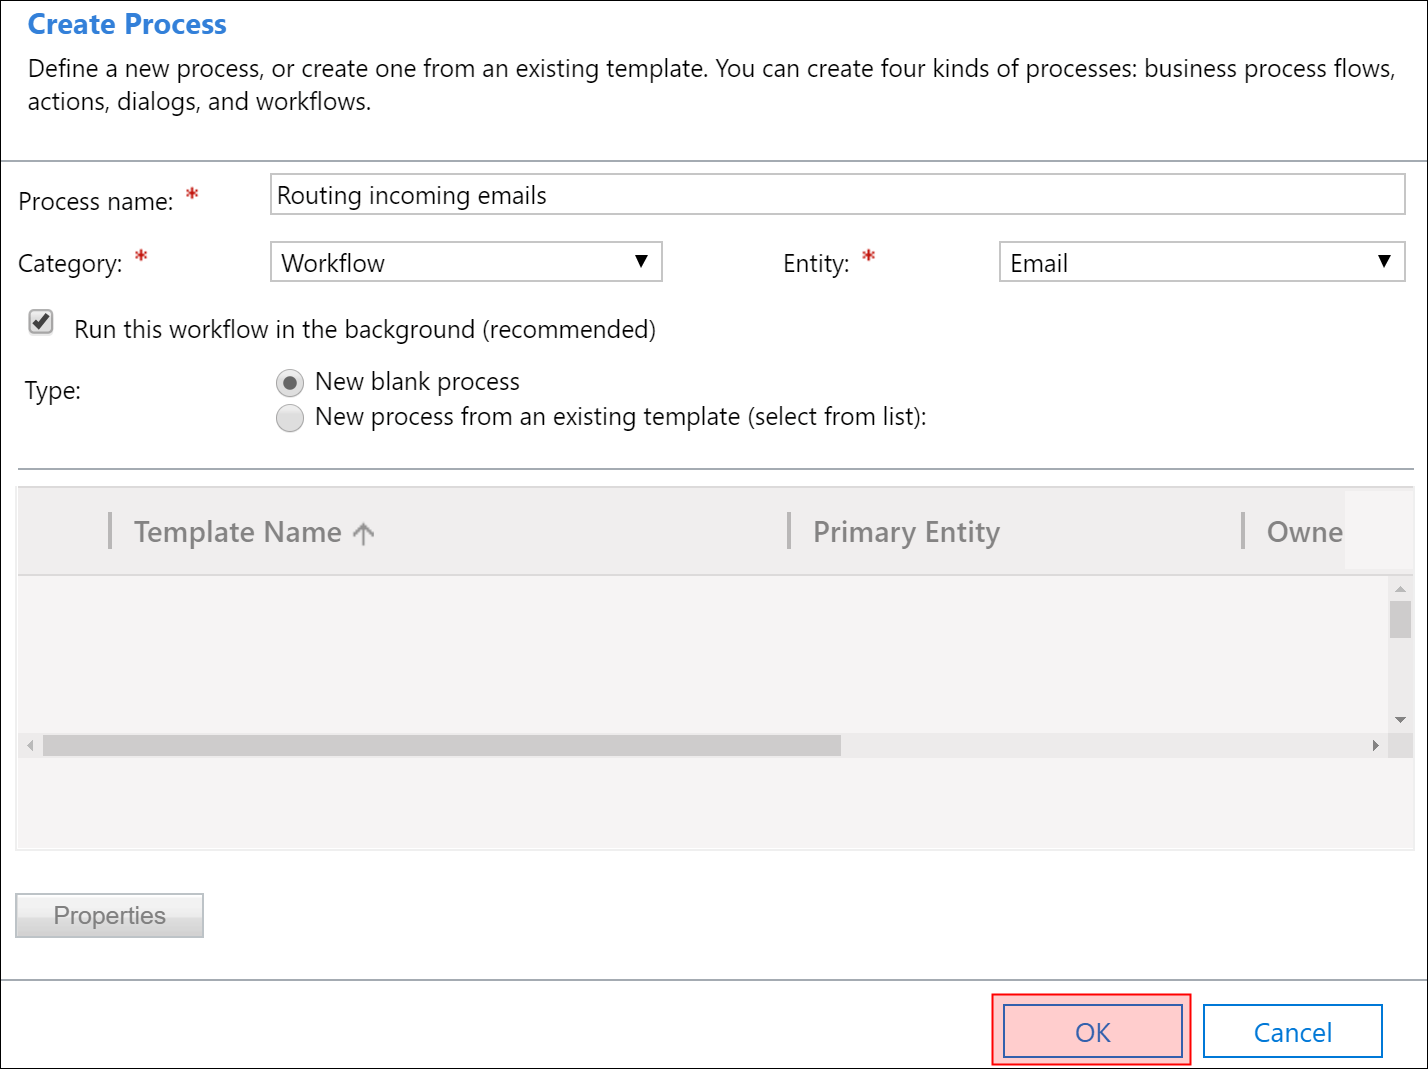
Click on New and select Process
Enter the details as shown below and press OK
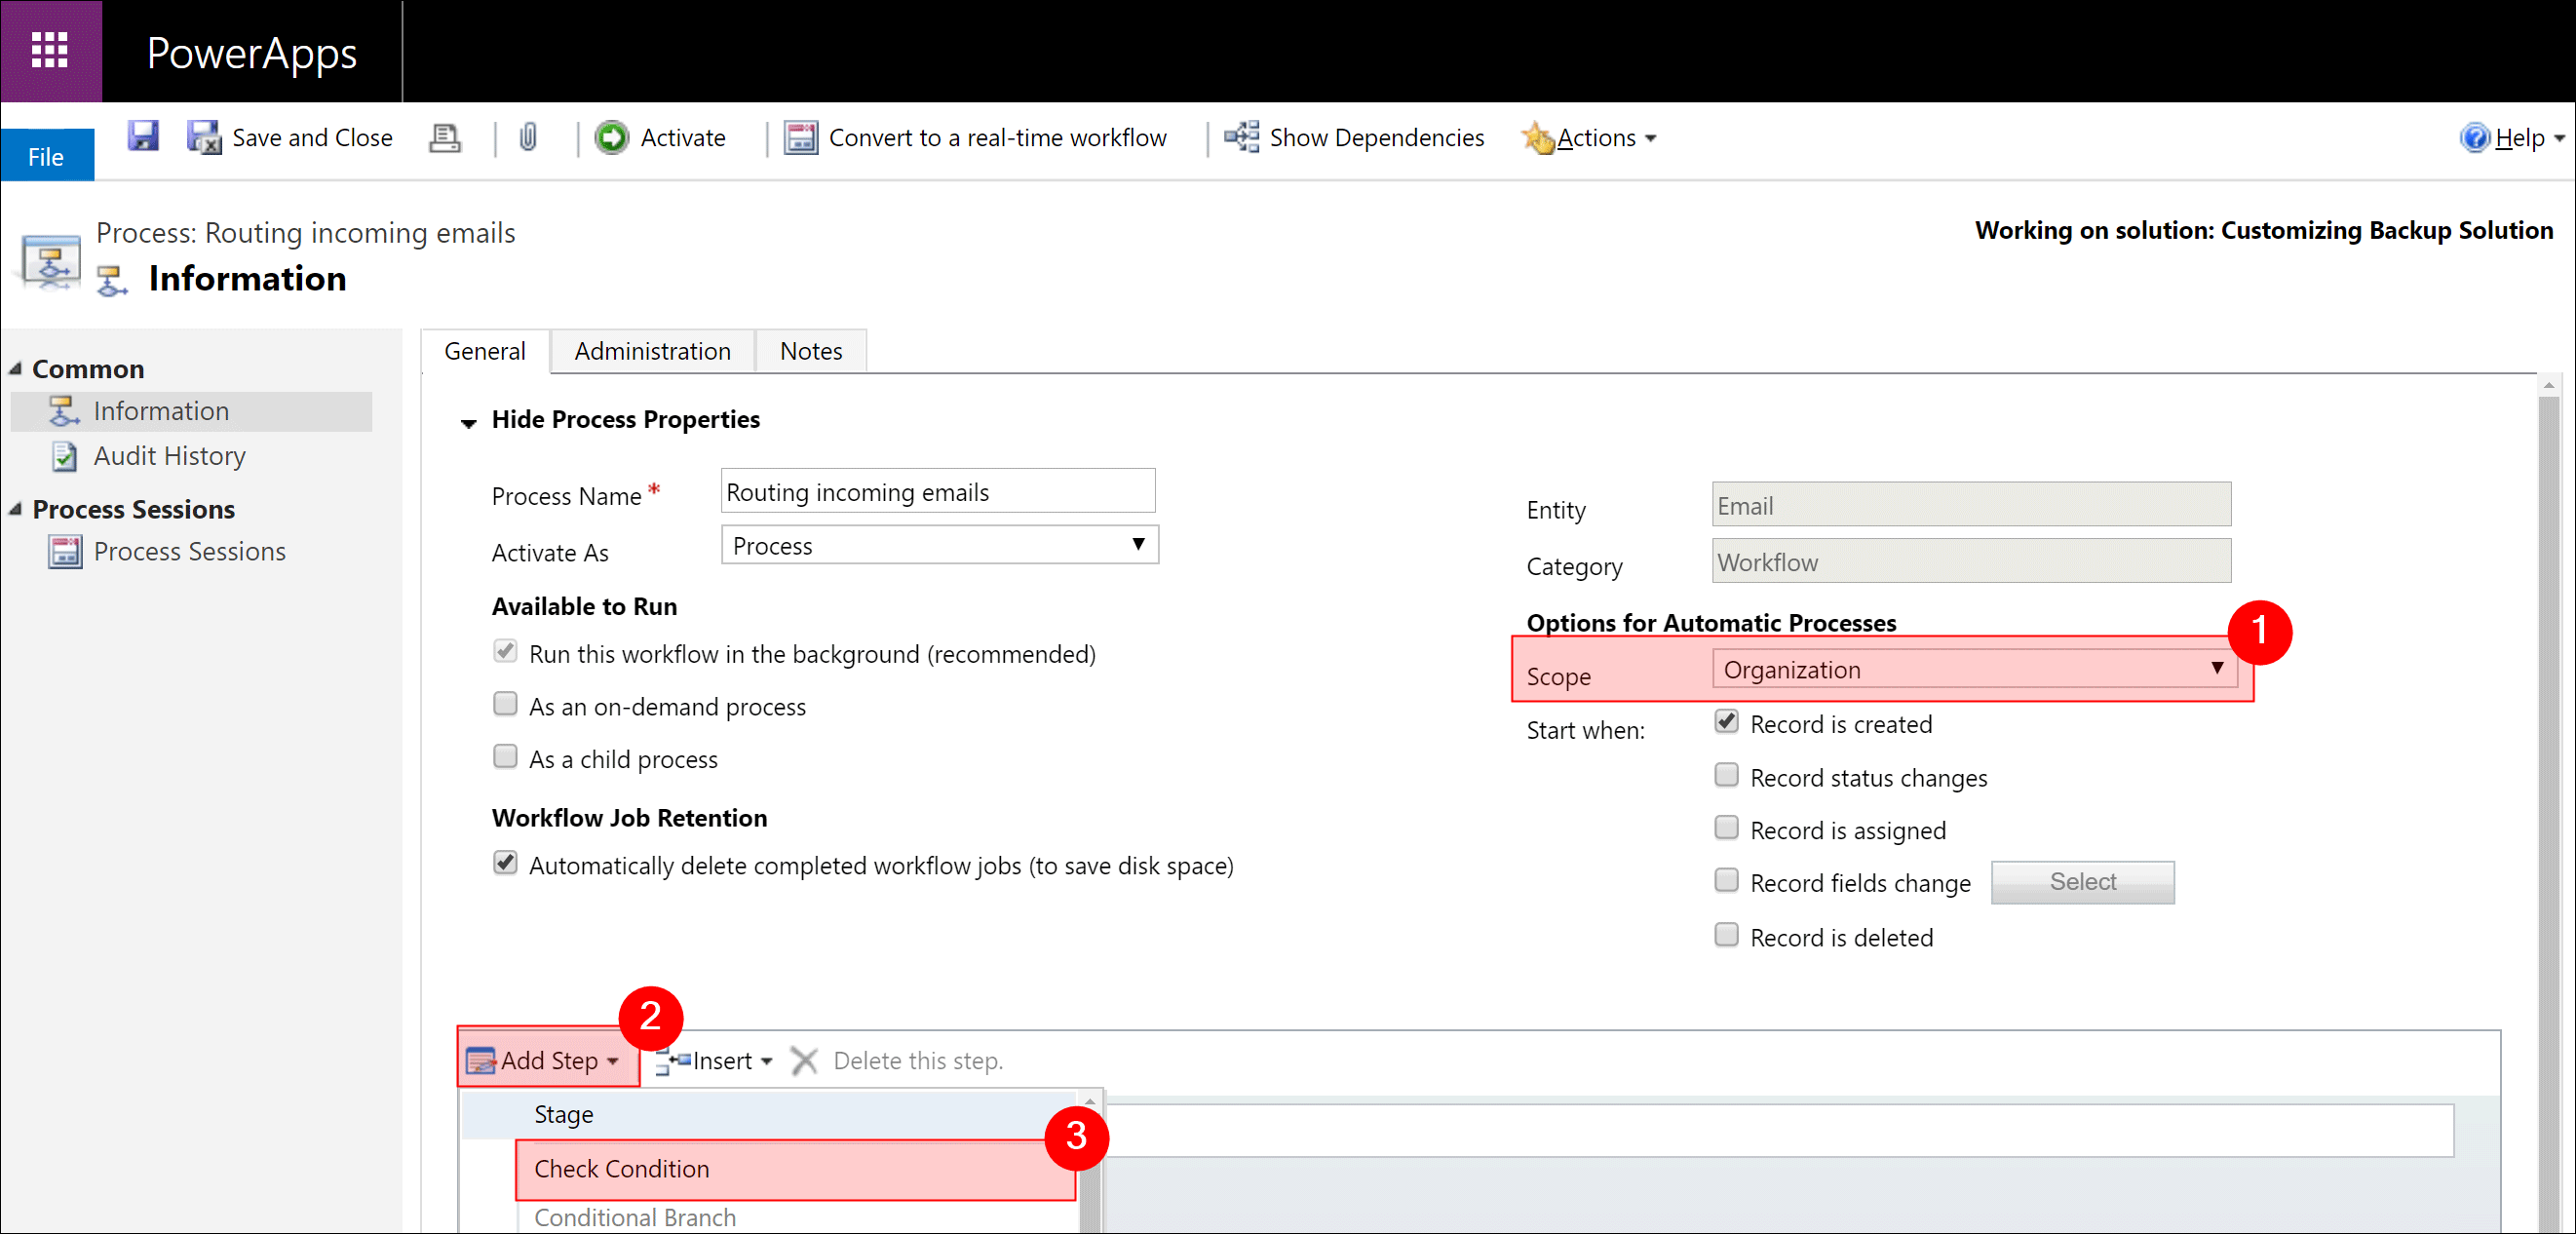
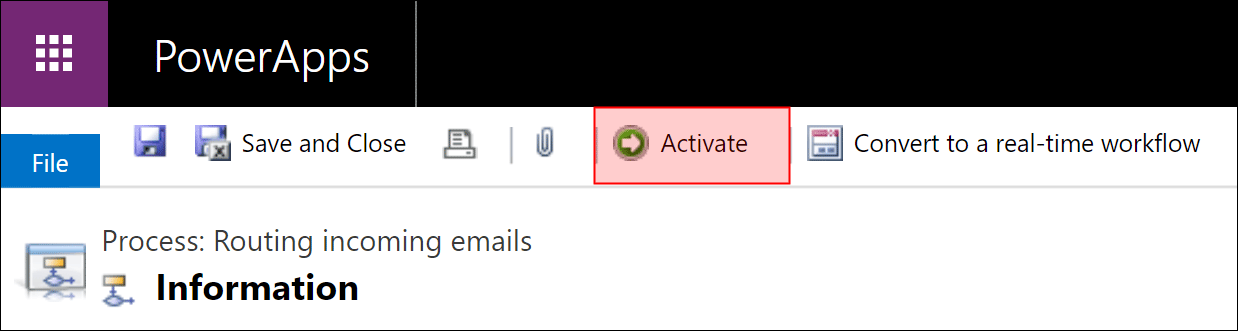
Open the workflow you just created and set the Scope to Organization.
Afterwards, click on Add Step and select Check Condition
Click here to configure the condition
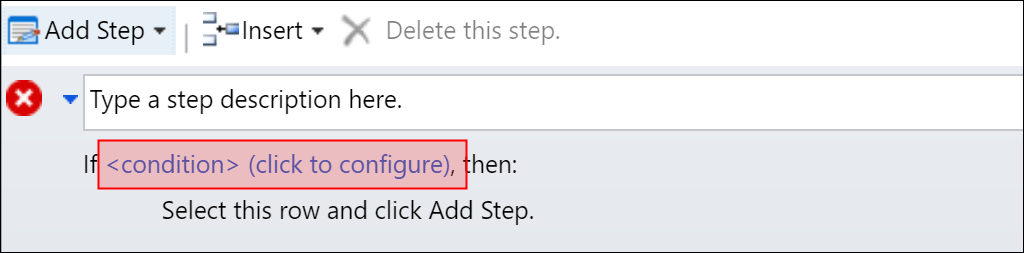
Enter the following parameter and Save & Close
The last field is a look up field. Search for the Active Queue you created before.

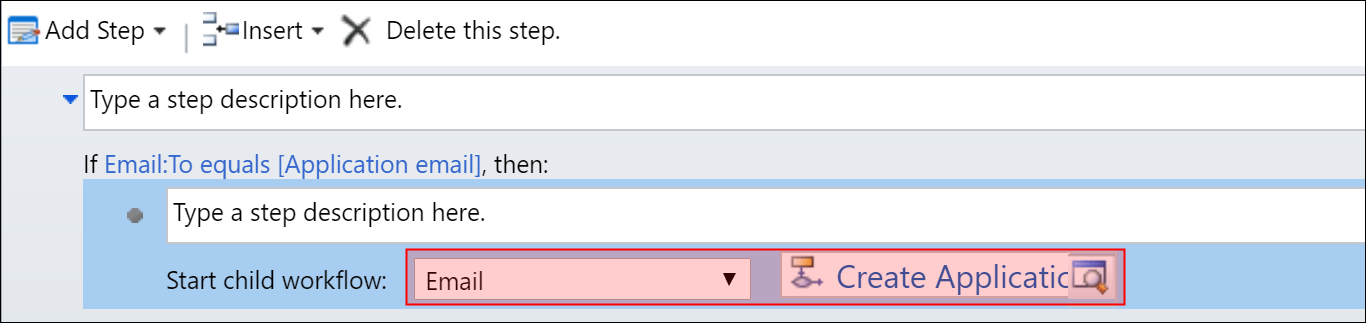
Select the row below the condition, click on Add Step and select Start Child Workflow
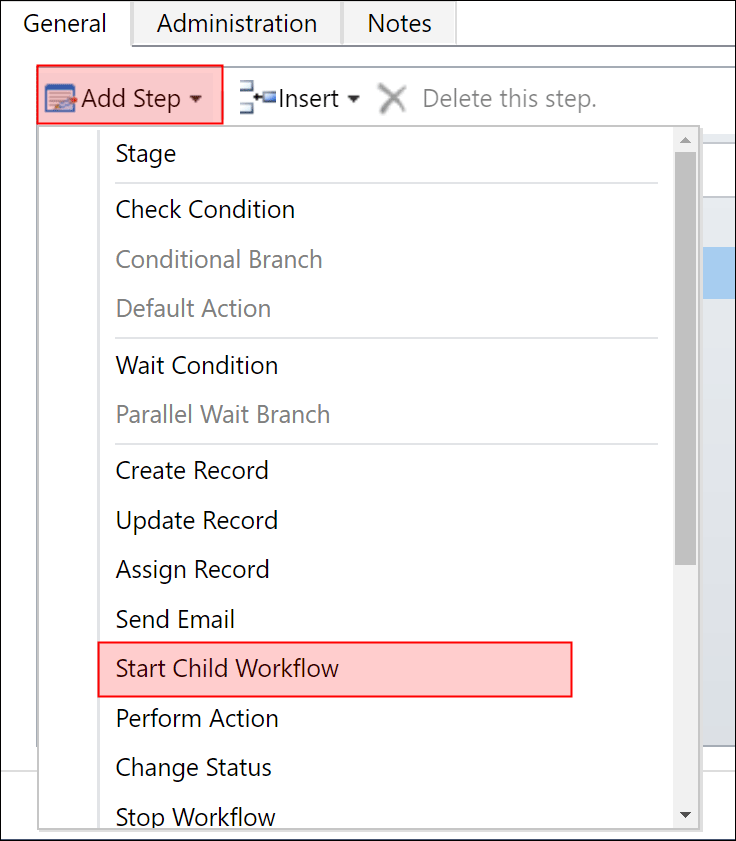
Select the entity Email and finally the existing workflow Create Application from Email - HR-Management [Multilingual] - xRM1
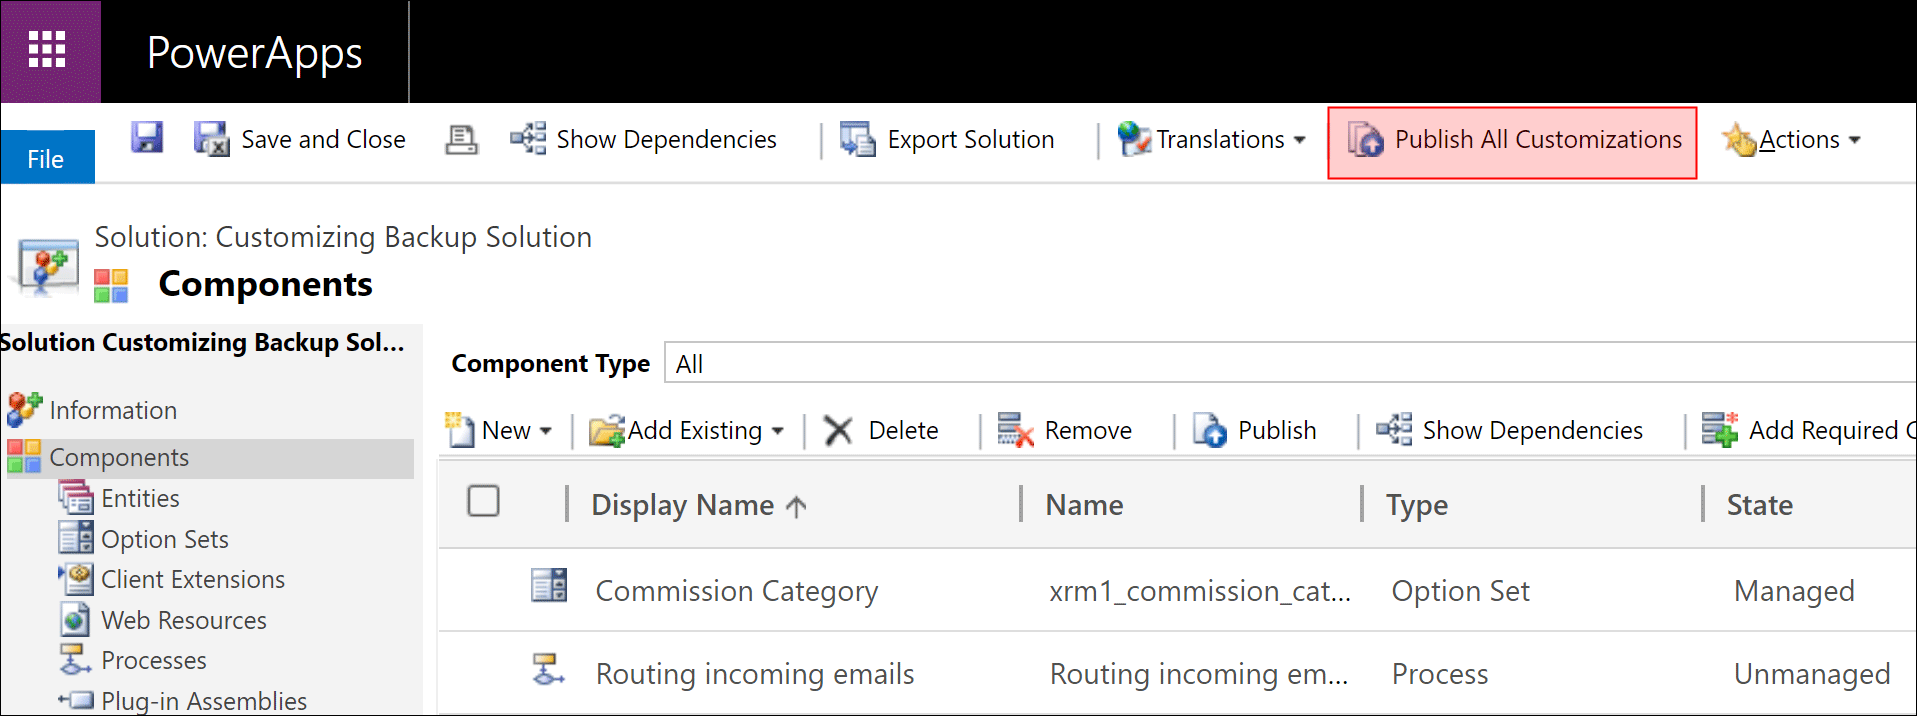
In the menu bar click on Activate and then on Publish All Customizations
Autoresponse on Application
You can send applicants an automatic confirmation of receipt. This can be individually adapted to your company and can also contain dynamic content.
Log in to Dynamics 365 and open the Advanced Settings
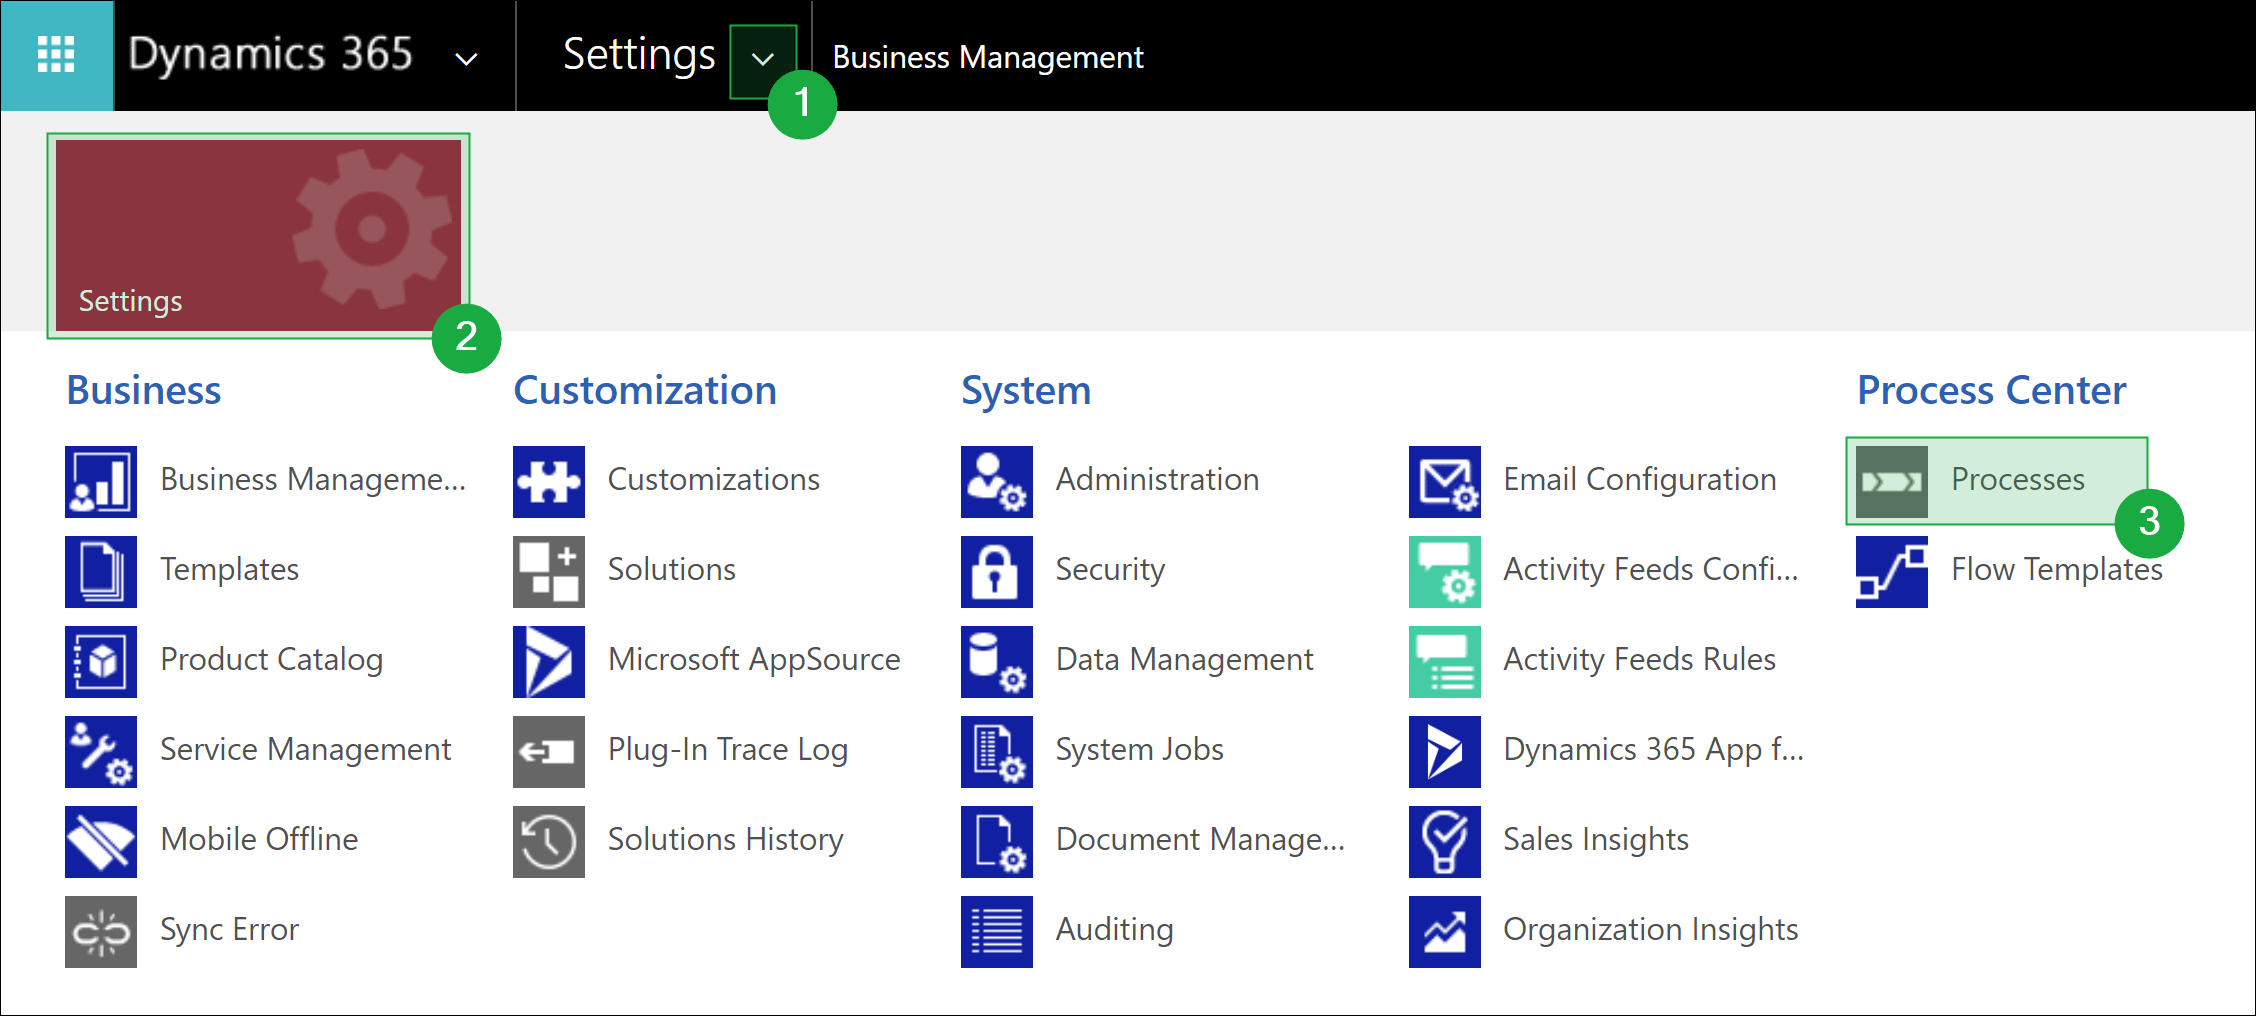
Navigate to Navigation bar -> Settings -> Processes
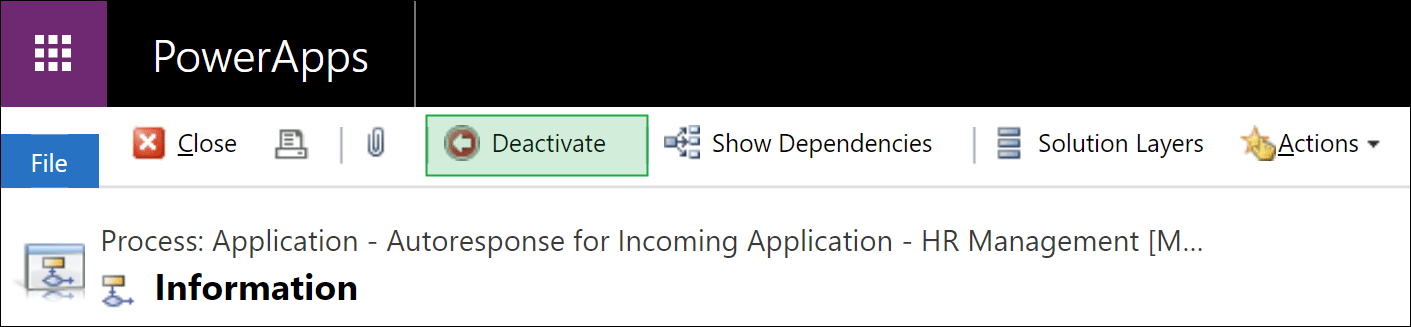
Use the search function and open the workflow Application - Autoresponse for Incoming Application - HR Management [Multilingual] - xRM1

Deactivate the workflow
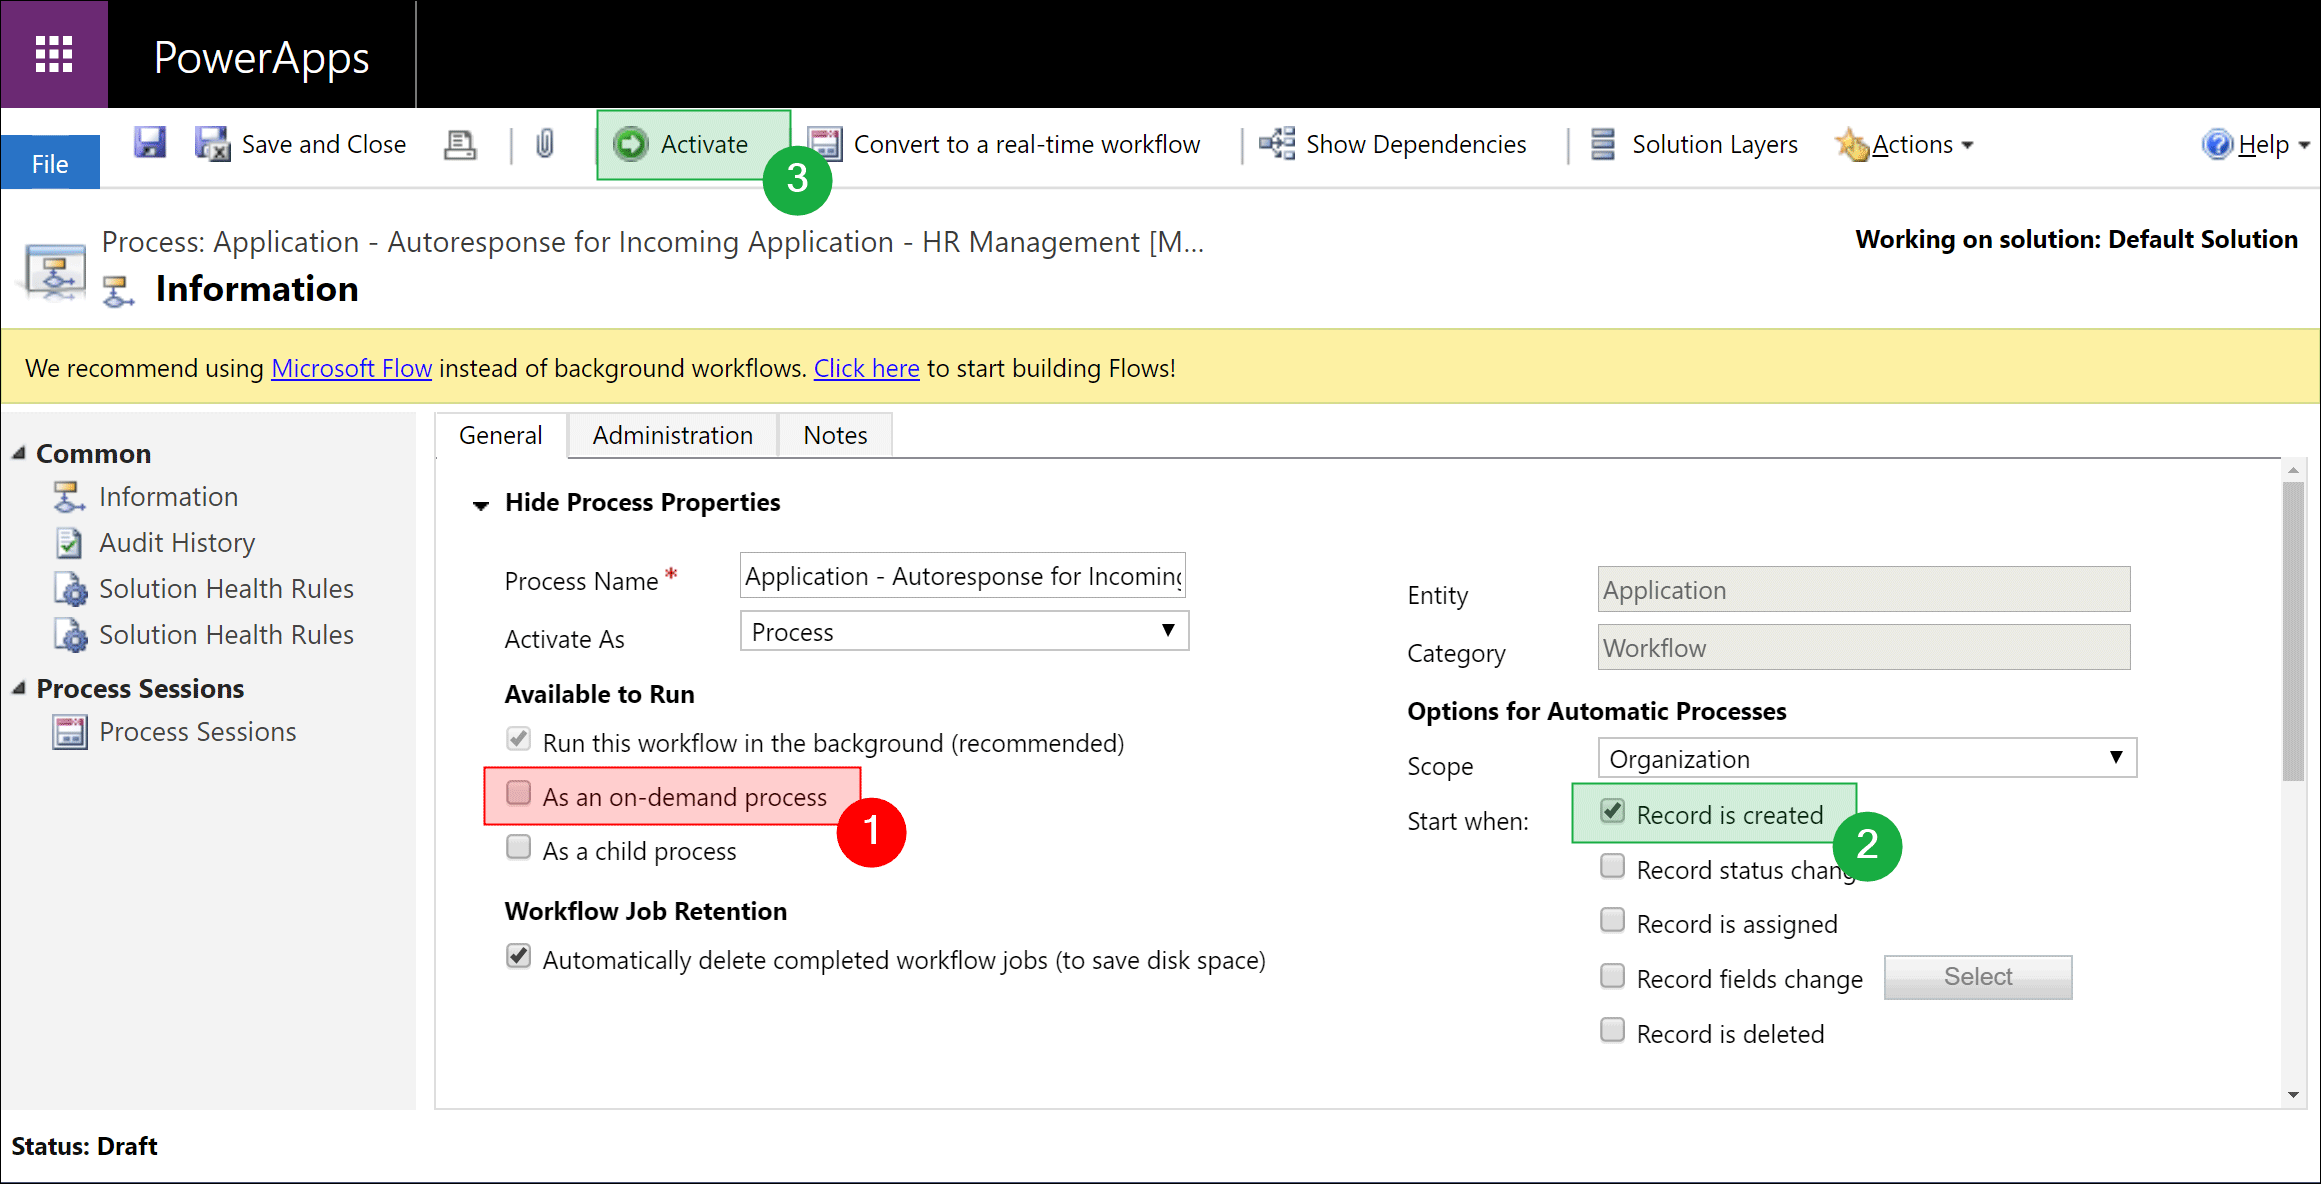
Now remove the check mark at On demand process, set a check mark at Record is created and Activate the process
Activate CV Parsing
Using CV Parsing, data from the CV is analyzed and saved afterwards. This data can be quickly viewed without having to look at the CV in detail. For example, the database can be searched for a specific keyword, after which a list of relevant candidates can be generated. This facilitates the search for candidates and ensures a faster recruiting process.
HR for Dynamics offers a CV parsing feature in collaboration with our partner Textkernel.
Note: To use CV Parsing, you need a license from Textkernel. Please get in touch with your contact person.
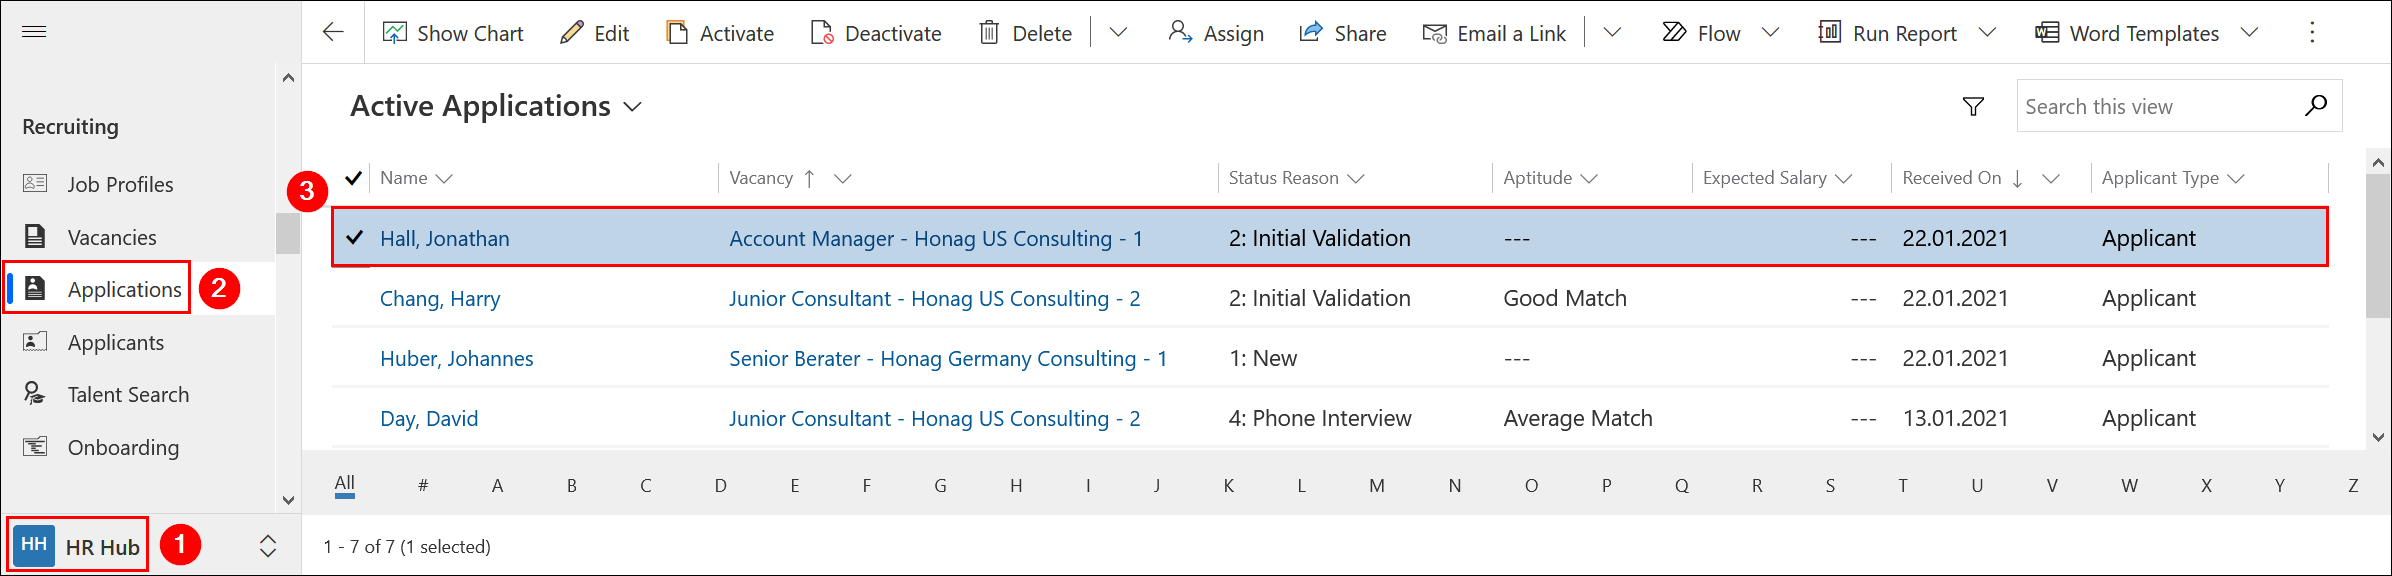
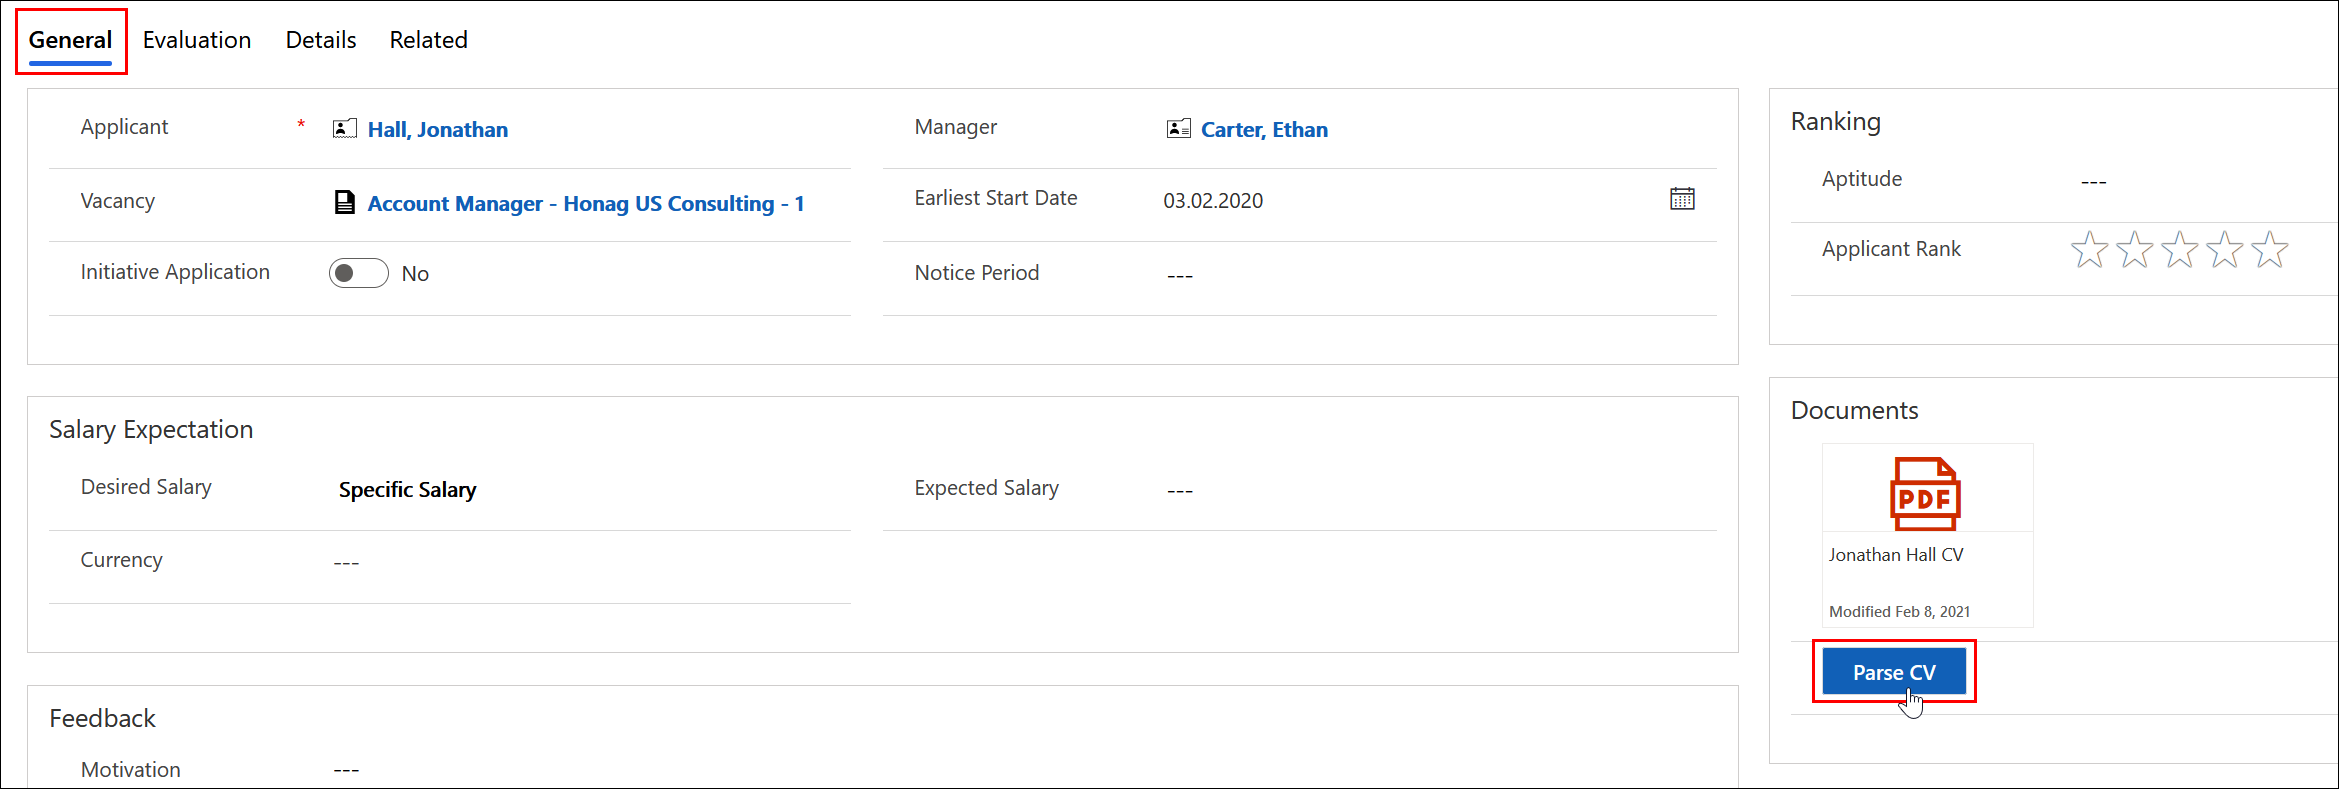
To start CV parsing, navigate to HR Hub - Applications - Active Applications and double-click to open the desired entry.
Under the "General" tab, on the right side you will see an area for documents, which you can upload there. Upload the applicant's CV and then click the "Parse CV" button.
A dialog opens. Enter your credentials for your Textkernel account there. You only need to enter the credentials once.
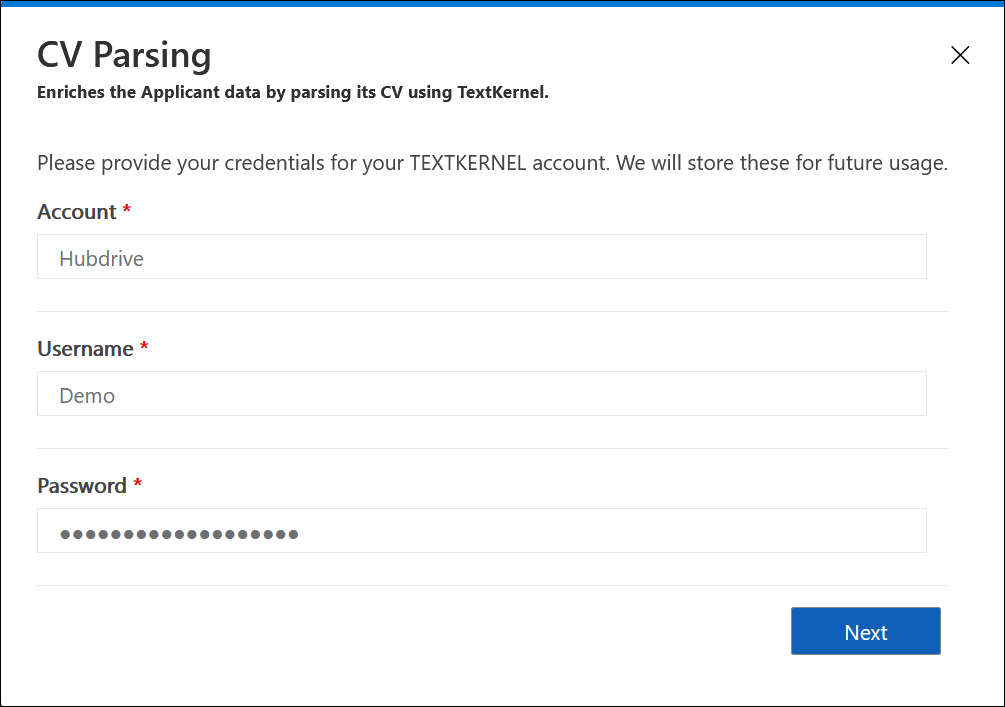
Click on Next.
After your authorization was successful, you can already parse the CV you just selected. To do this, select the document you want to process and click Next.
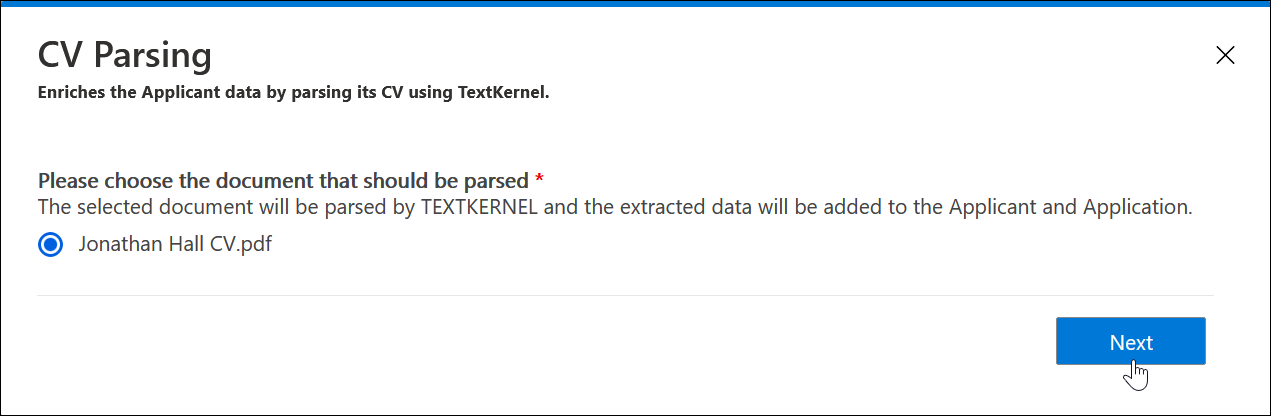
The selected CV is now analyzed.
Note: The quality of the extracted data strongly depends on the used CV. We recommend checking the data after CV parsing in the applicant record.
For more information on how to use CV parsing, click here.
List of workflows that send emails or create tasks
Please view this article on how to change the content of the email: How to customize workflows and personalize email content
| Name of the workflow | Trigger | Recipient |
|---|---|---|
| Application - Send Letter of Refusal - HR Management [EN] - xRM1 | After an application is rejected. If the applicant has multiple applications, an email is sent to the HR Manager. If there is only one application, an email goes to the applicant | Applicant or HR Manager |
| Application - Autoresponse for Incoming Application - HR Management [EN] - xRM1 | On demand within an application, can be sent automatically | Applicant, if email adress is available |
| Application - Process Final Decision – HR Management [EN] - xRM1 | As soon as the final decision is Rejected by Company or Declined by Applicant | Owner of the application |
|
Execute recurrent search and send email - HR Management [Multilingual] - xRM1 |
After a recurring talent search found results |
Person which created the Talent Search |
| GDPR Recruiting Start Privacy Processing 1/3 - HR Management [Multilingual] - xRM1 | 3 month after an applicant was put in the application pool (recurring every 3 month, until applicant refuses to be kept in the application pool) | Applicant in application pool |
| Inform Manager to give feedback on Application - HR Management [EN] - xRM1 | As soon as an application has a supervisor entered and reaches Stage 3: Line Manager Feedback | Manager entered in the application |