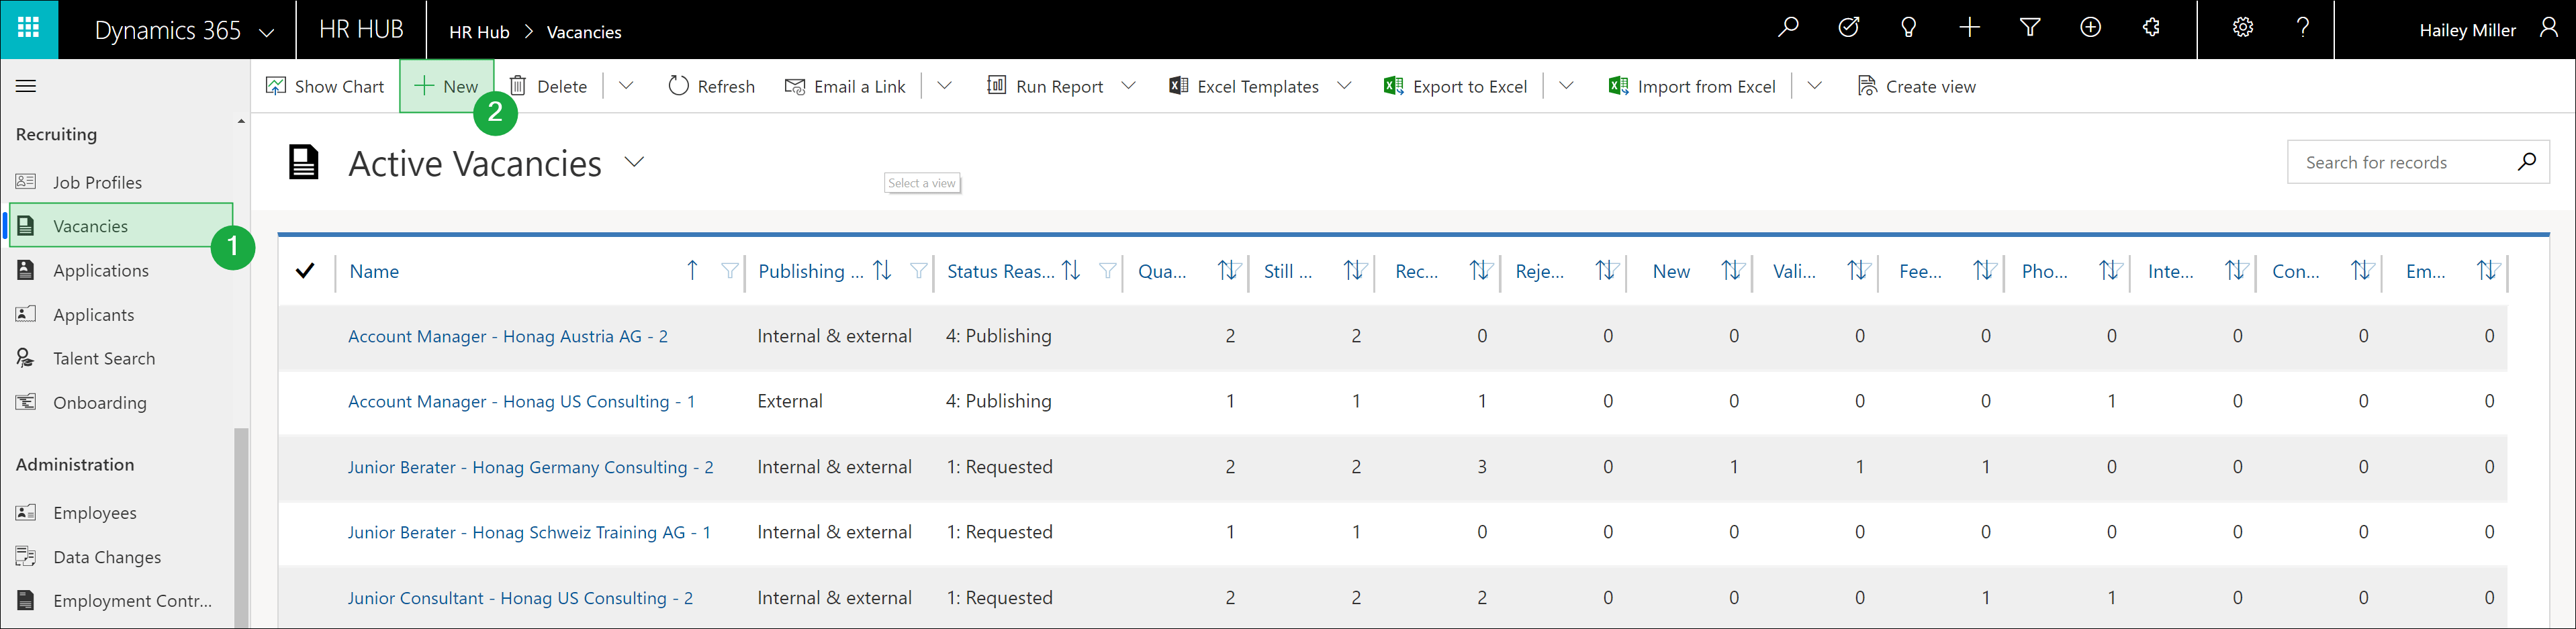
Vacancies
Go to Vacancies and press +NEW
If the sidebar is not opened, follow these steps
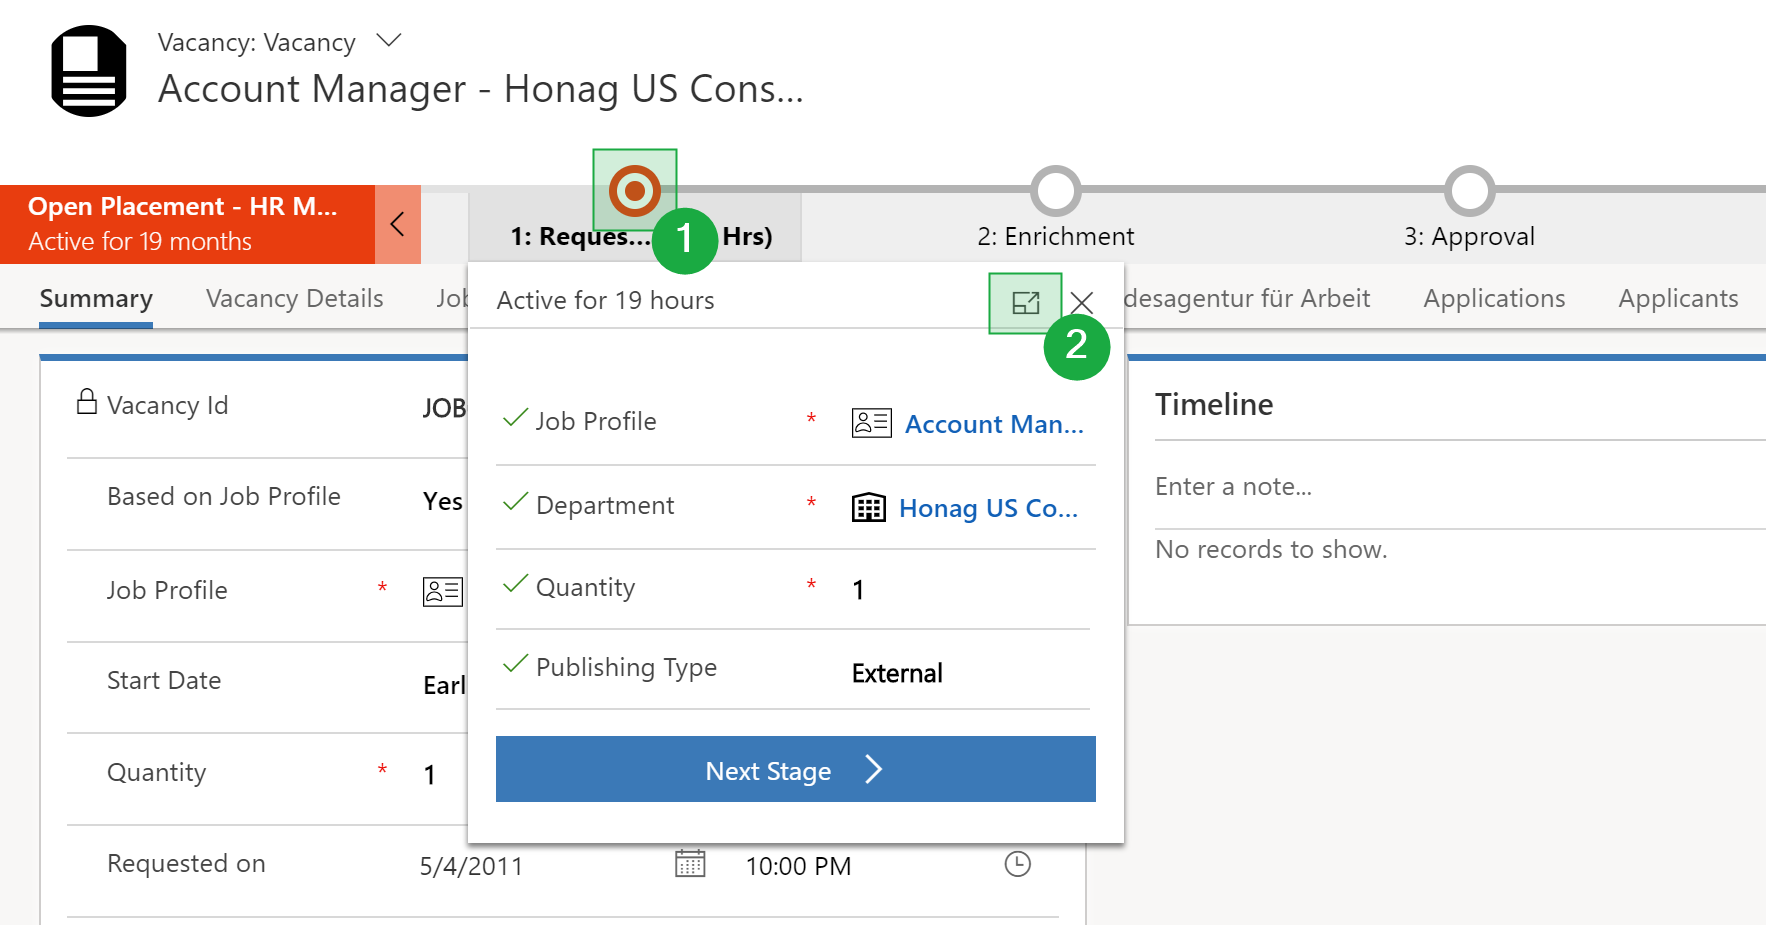
Phase 1: Requested
Phase 2: Enrichment
Phase 3: Approval
Phase 4: Publishing
Phase 5: Receiving Applications
Phase 6: Selecting Candidates
Phase 7: Post-Processing
Phase 1: Requested
Select the Job Profile you want to use, the department you are recruiting for and the amount of positions you want to fill.
Click on Next Phase
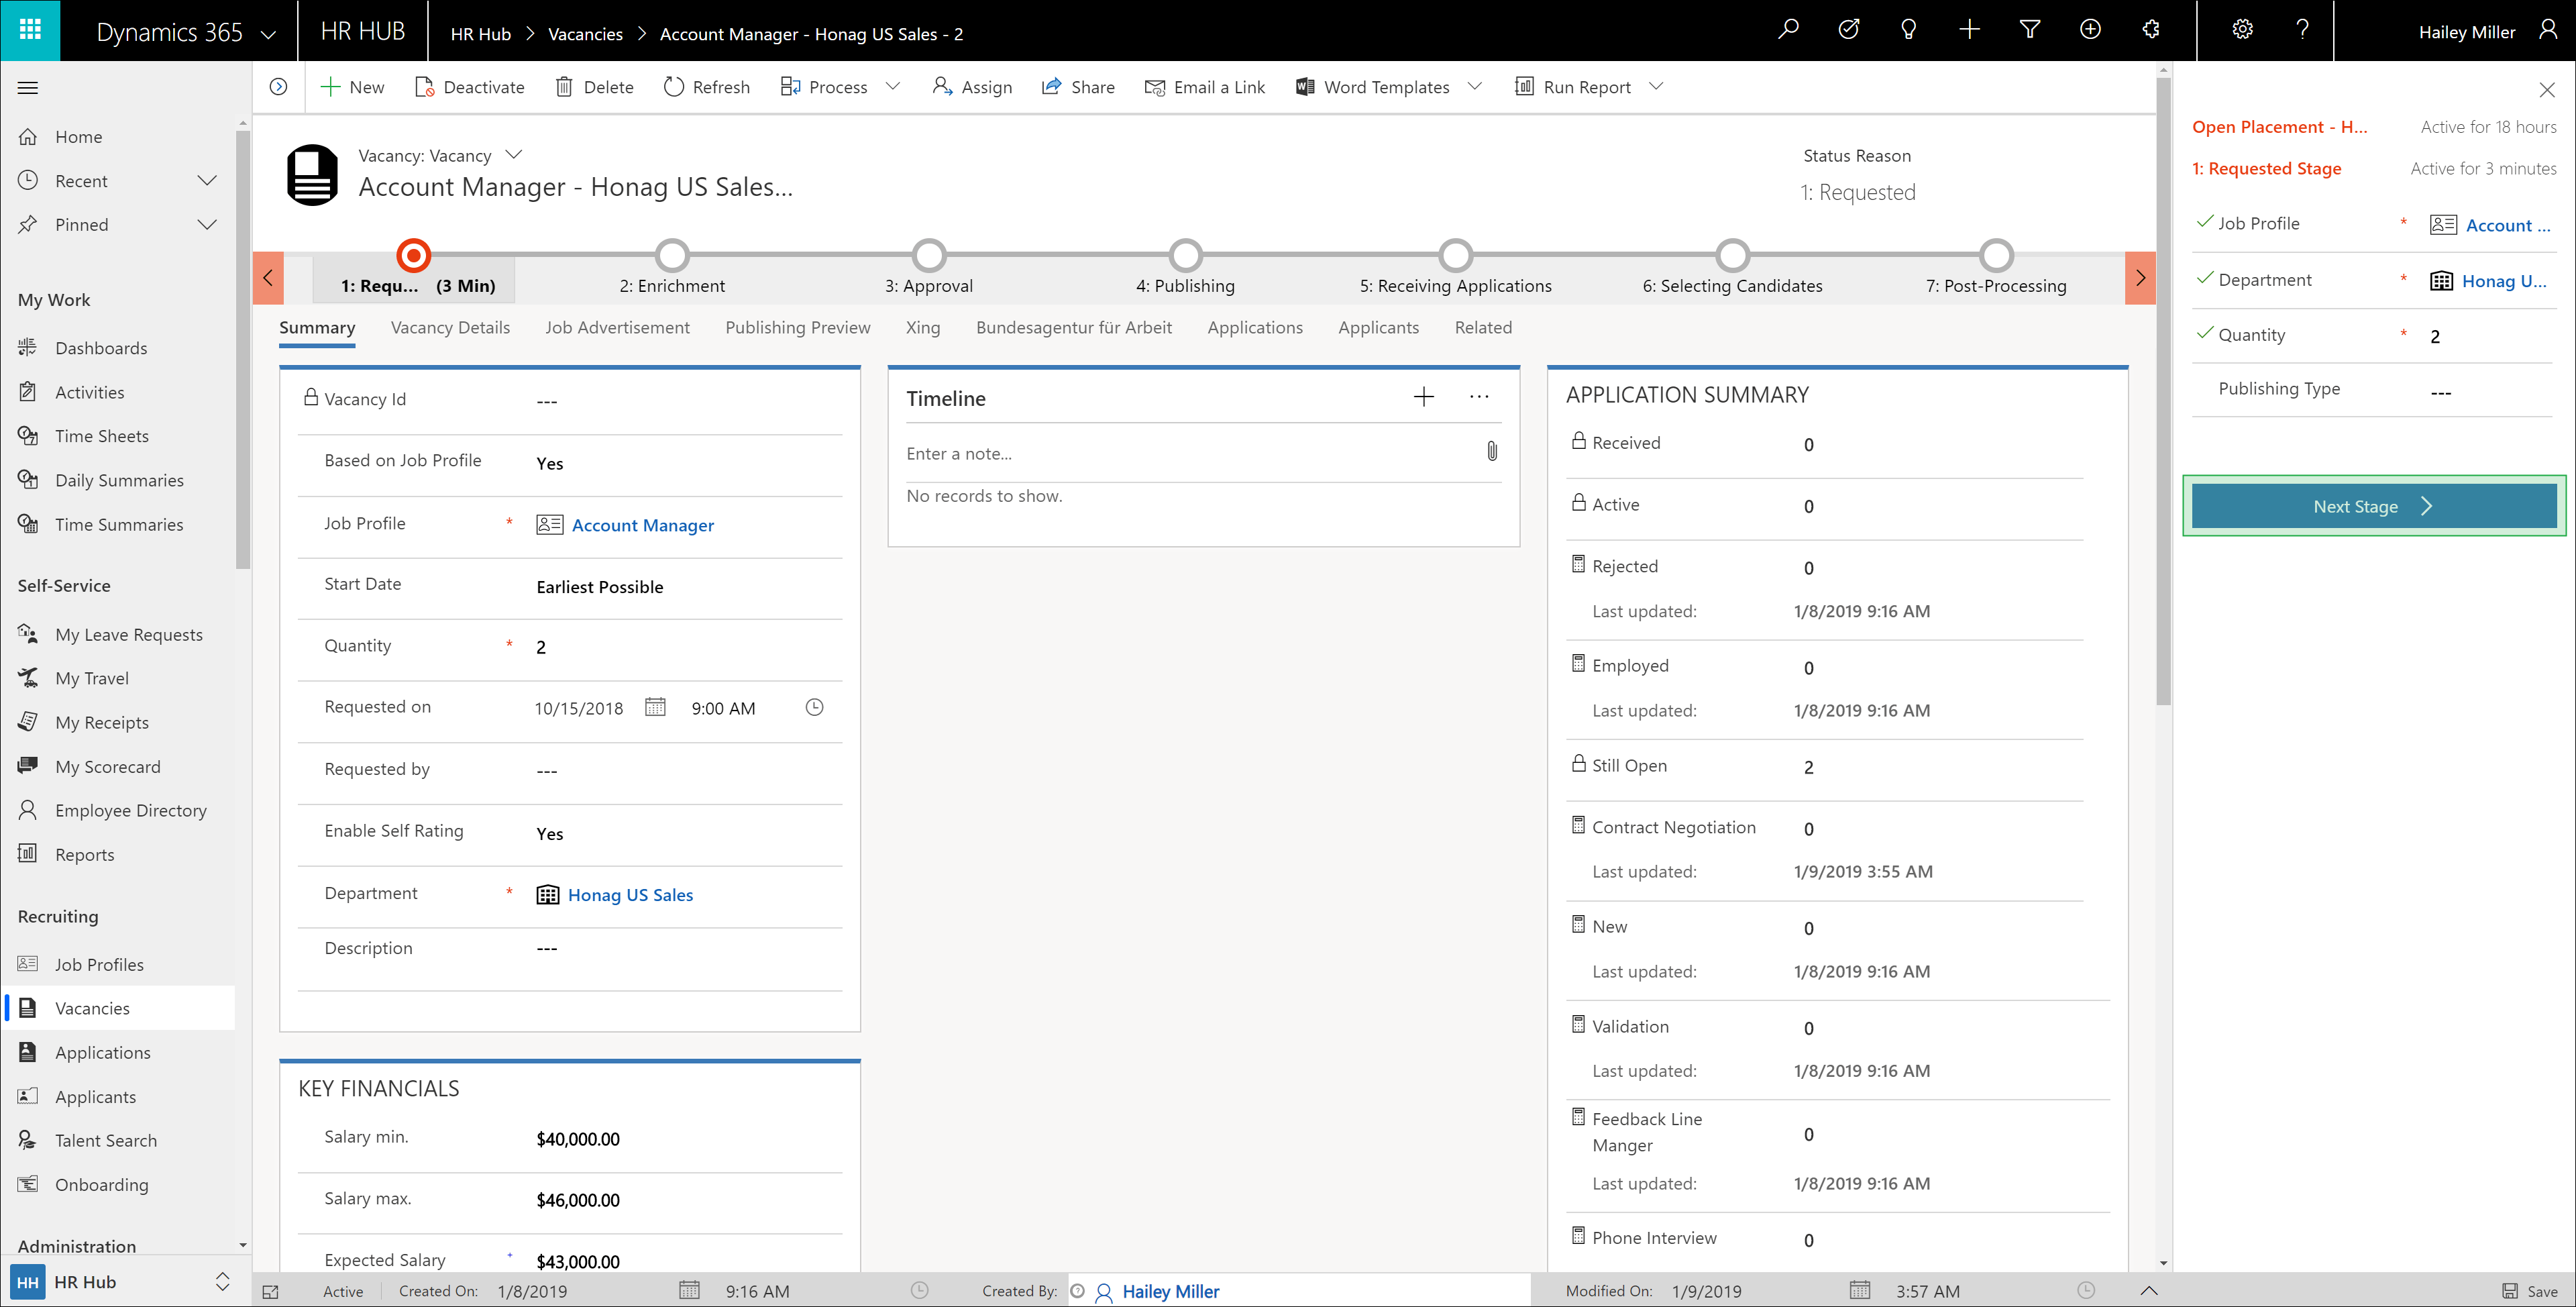
Many details, like Key Financials, Job Advertisement or Vacancy Details are carried over from the Job Profile.
By selecting the Department, the manager is automatically filled.
Back to top | Back to table of contents
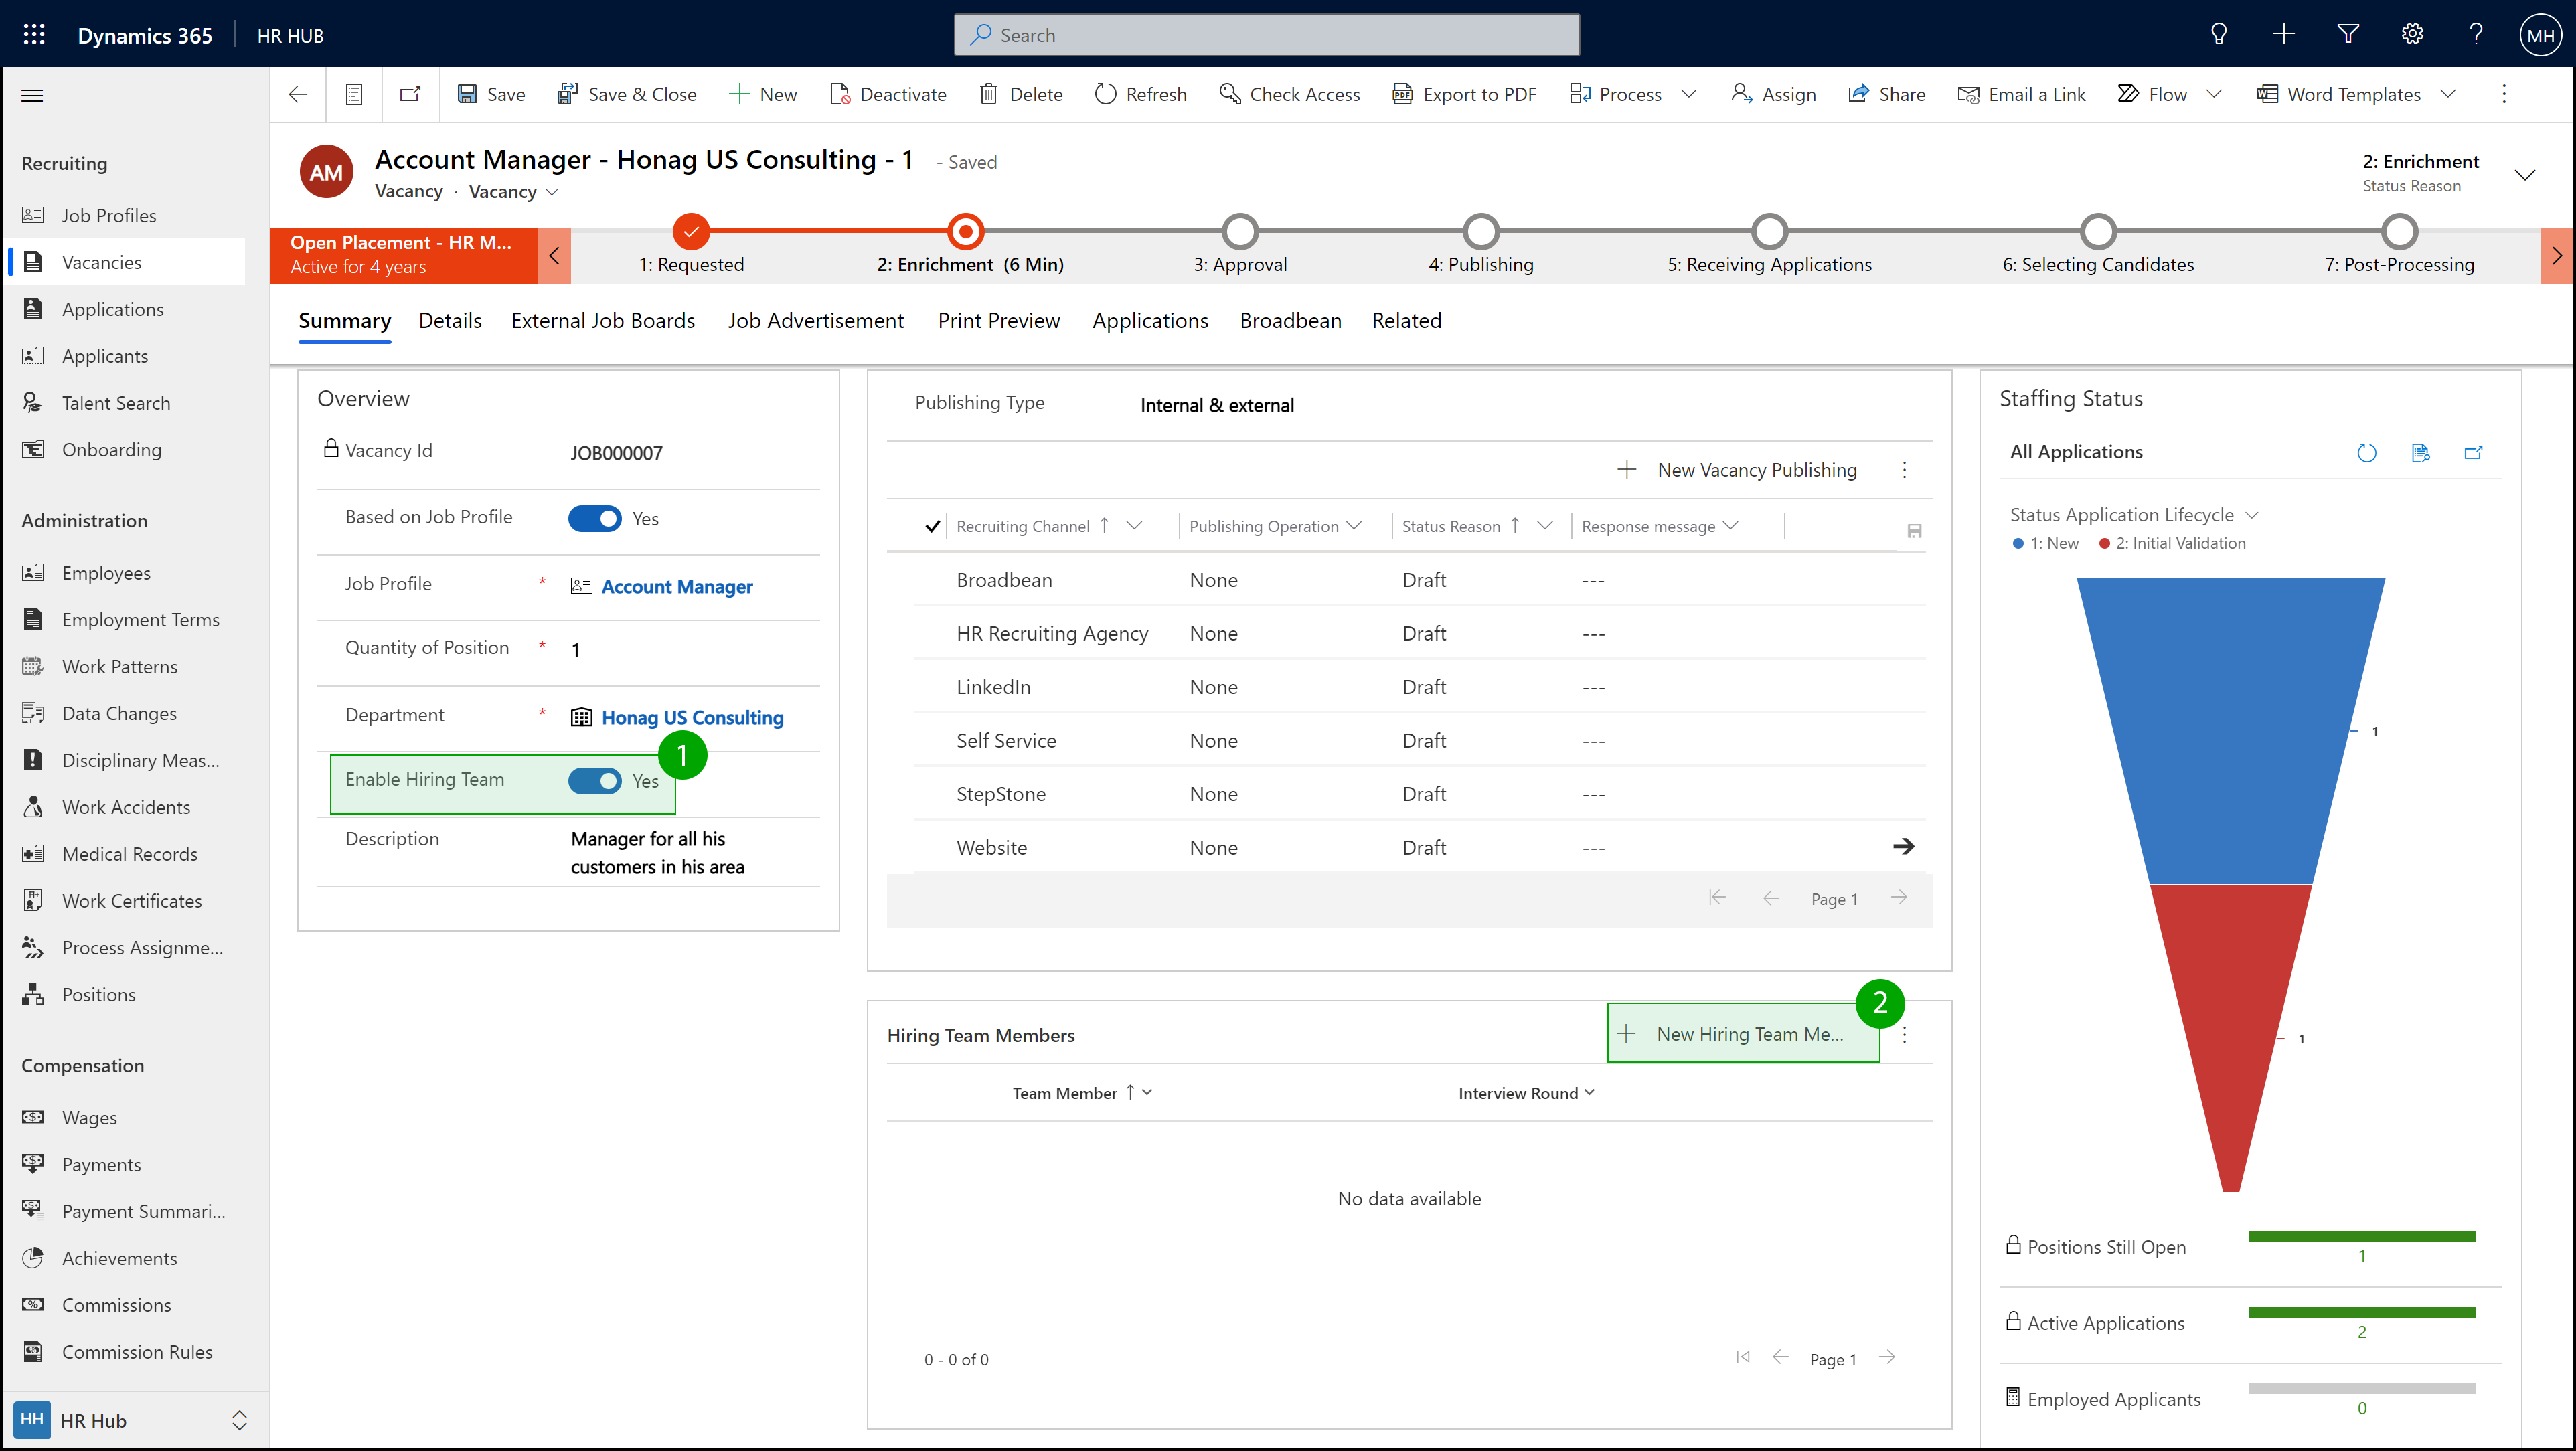
Phase 2: Enrichment
Tab: Summary
Hier sehen Sie alle wichtigen Mindestanforderungen für einen Stellenantrag. Auch wenn alle Details für das Stellenangebot aus der Job Profile you can still make changes at this stage if necessary. For example, you can specify here whether the applications received for this vacancy should be evaluated by an hiring team that you specify.
To do this, set the Enable Hiring Team option to "Yes".
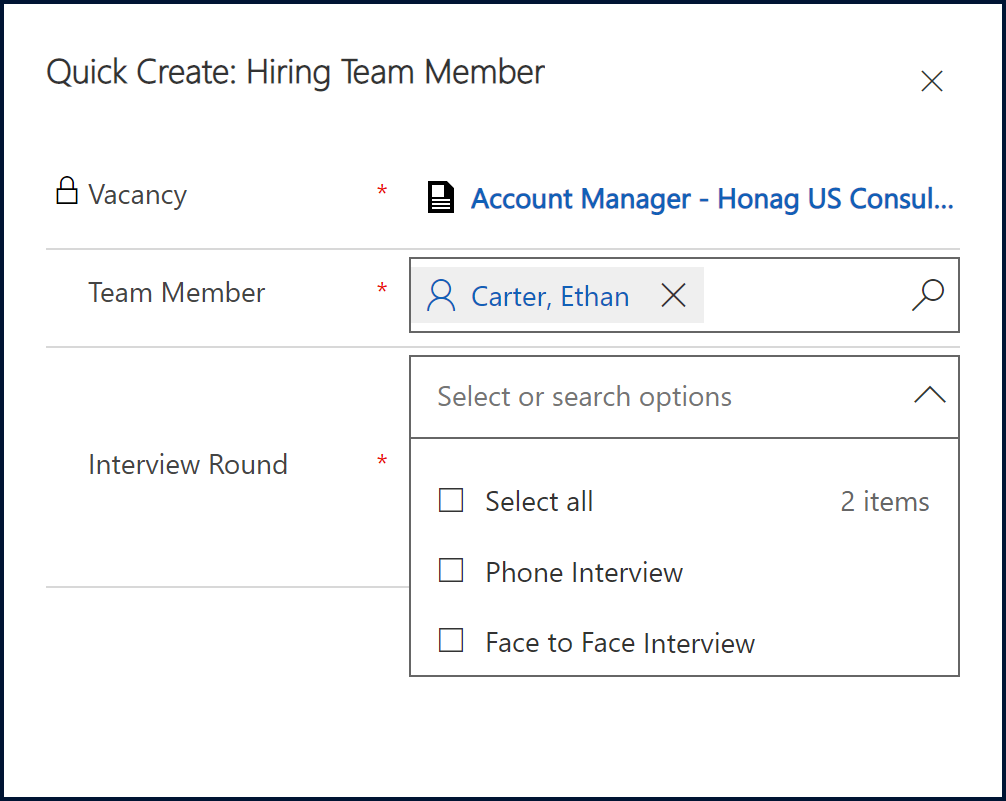
In the middle of the tab Summary a table will appear where you can add employees who should evaluate the incoming applications for this vacancy by clicking + New Hiring Team Member.
A quick create form opens on the right-hand side of the screen, in which the relevant vacancy is already pre-filled and you can select or search for the relevant employee in the Team Member field in the list of active employees in your company.
In the field Interview Round, you can select from the drop-down menu in which interview round in the application process you would like to receive a subsequent evaluation of the applicant from this team member.
Both the Team Member and the Interview Round field are required fields and must be filled by you in order to proceed with adding members.
Once you have selected all the fields, you can click Save and Close at the bottom of the quick create mask to finish entering members.
Or select Save and Rebuild using the downward pointing arrow behind the save button. A blank quick create form for adding more team members will open and you can start the process again.
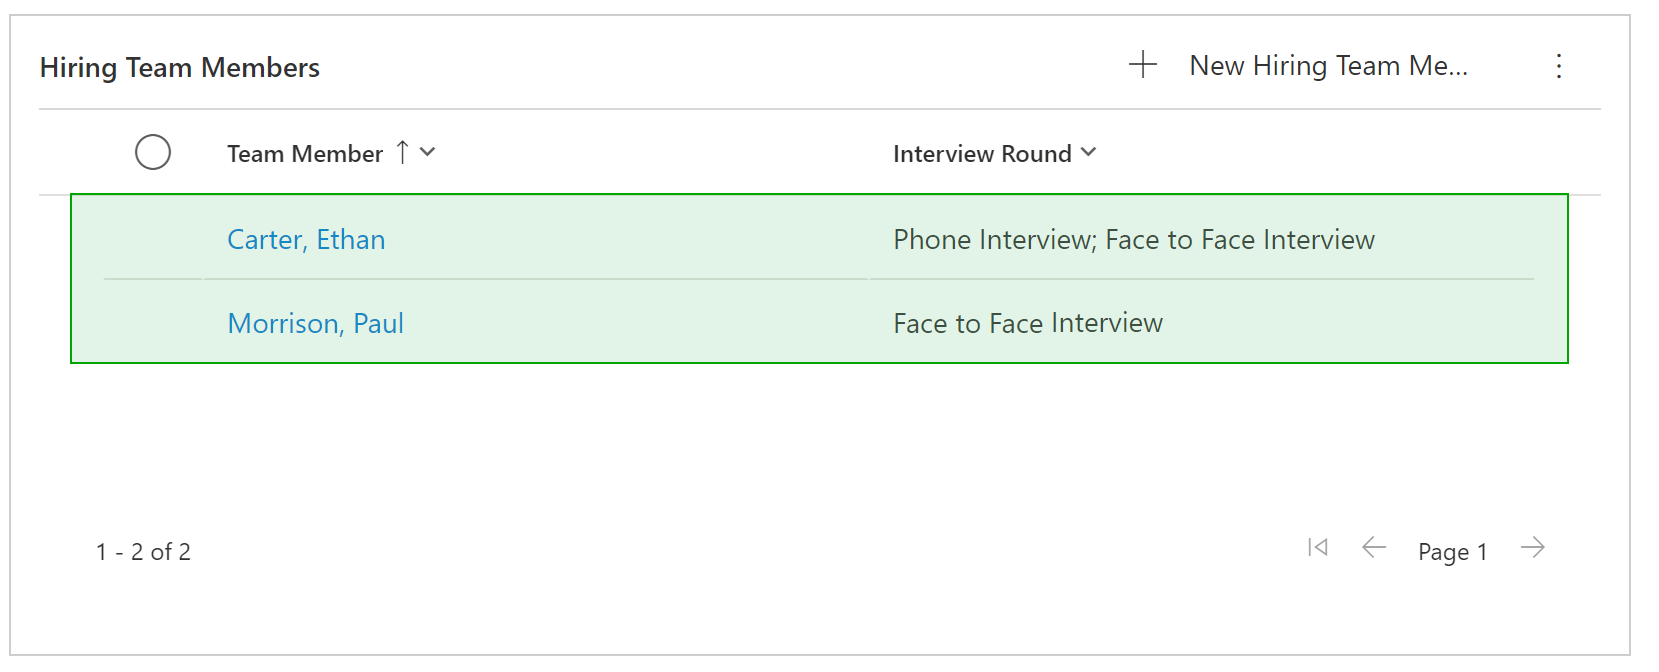
After saving the information from the quick create form, the members will appear in the table on the "Summary" tab.
The system also automatically creates the corresponding feedback forms for the hiring team members and interview rounds for each application received for this vacancy. These can be viewed in the corresponding application as well as via the main navigation bar under "Hiring Team Feedbacks" as a collective list.
The evaluation process will continue in the incoming applications for this vacancy. Read here how to continue.
Tab: Details
In diesem Tab können Sie weitere Informationen, wie die Kontaktdaten des zuständigen Recruiters, Details zur Bewerbung oder zum Vertrag, sowie finanzielle Eckdaten zum Stellenangebot hinterlegen.
Notes for Recruiting Portal:
- Self-Rating
- Multiple locations
- Contact data Recruiting
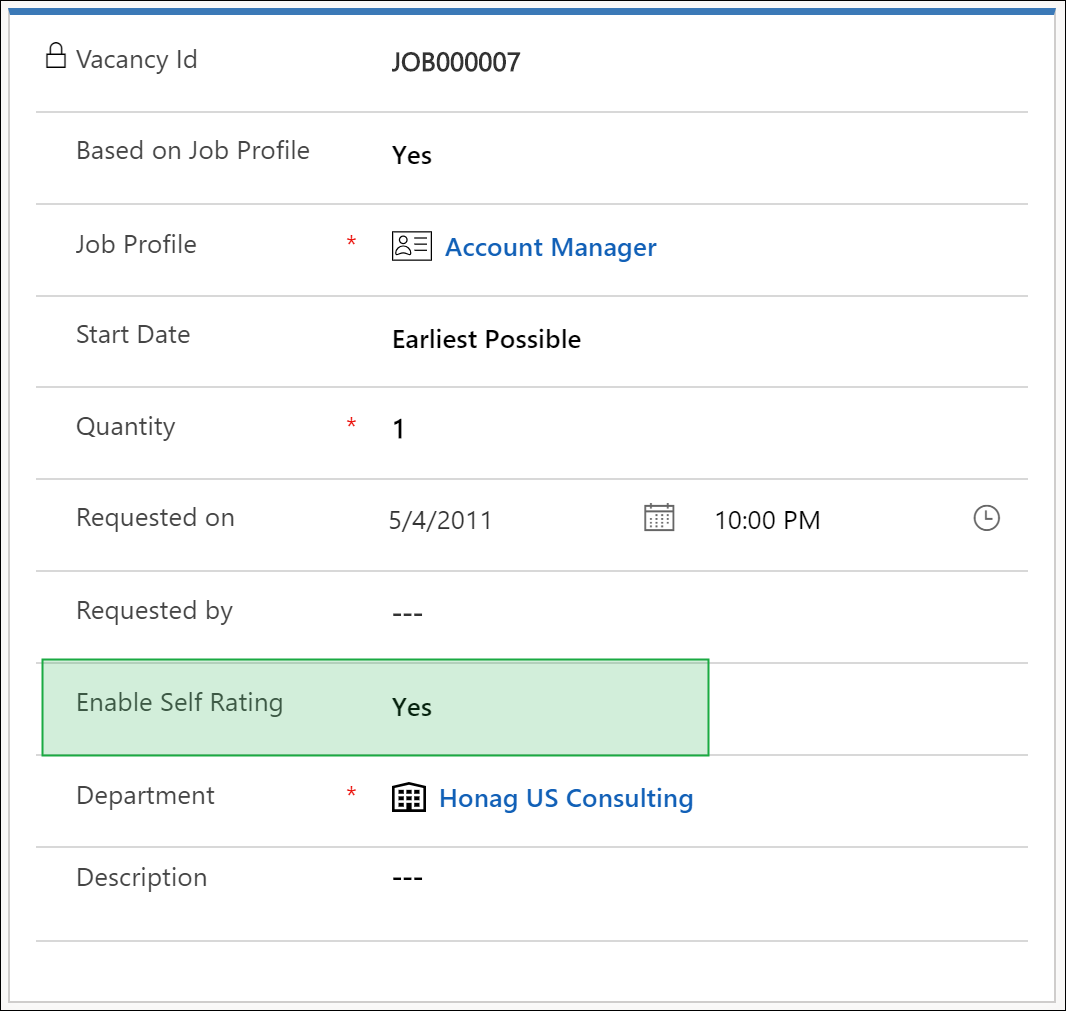
In the "Job Details" section, you find the Enable Self Rating. This determines whether an applicant can submit a self-rating of the required skills when applying via the Recruiting Portal.
The basis for this is the skills you have defined in the job profile.
This self-rating is later imported when the application is received and can be evaluated to select the candidate.
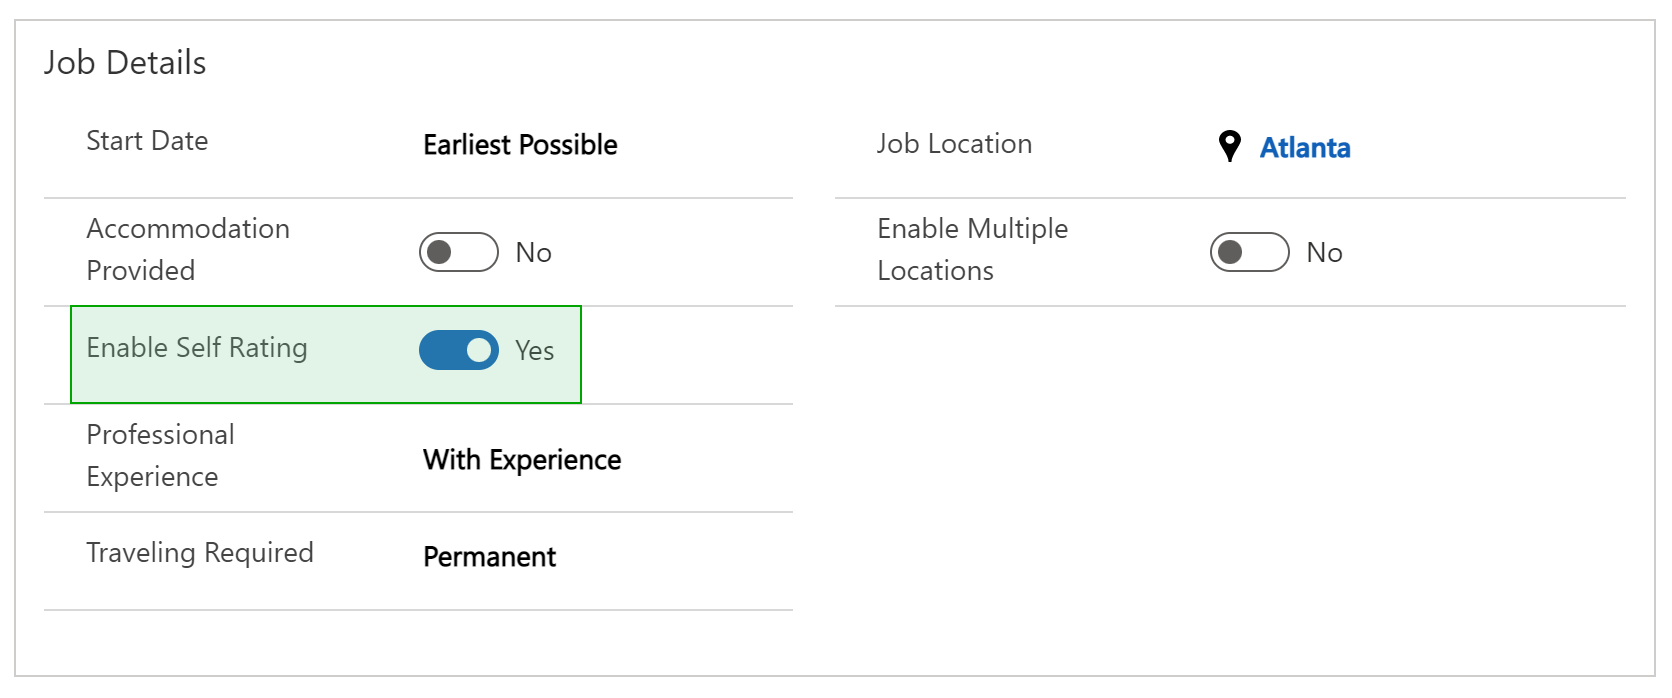
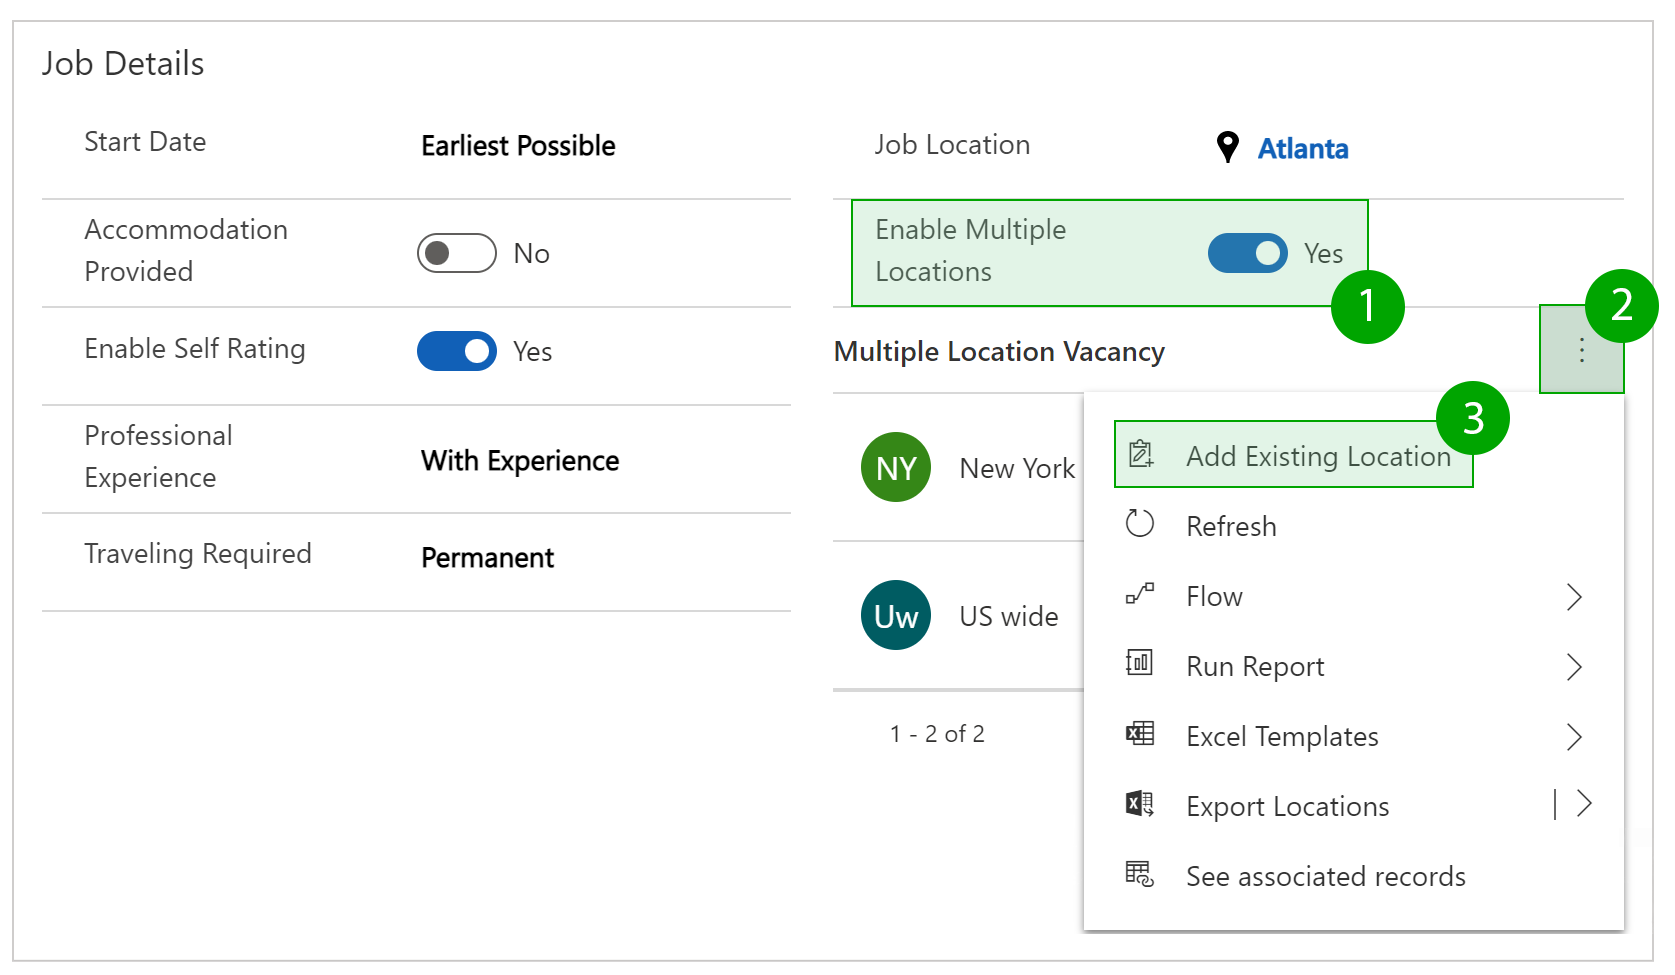
Also in this section you find the option to specify multiple locations in the vacancy. To do this, set the Enable Multiple Locations field to "Yes".
A table "Multiple Location Vacancy" appears below the field.
To add a new location, click on the three dots in the title of the table and select "Add Existing Location".
A lookup mask appears on the right side of the screen where you can select a location by entering it in the search field or select directly from the displayed list of locations.
If your location does not yet show a search result, check the correct spelling. If the record does not yet exist in your system, you can add the new location by clicking on + New Record and "Locations".
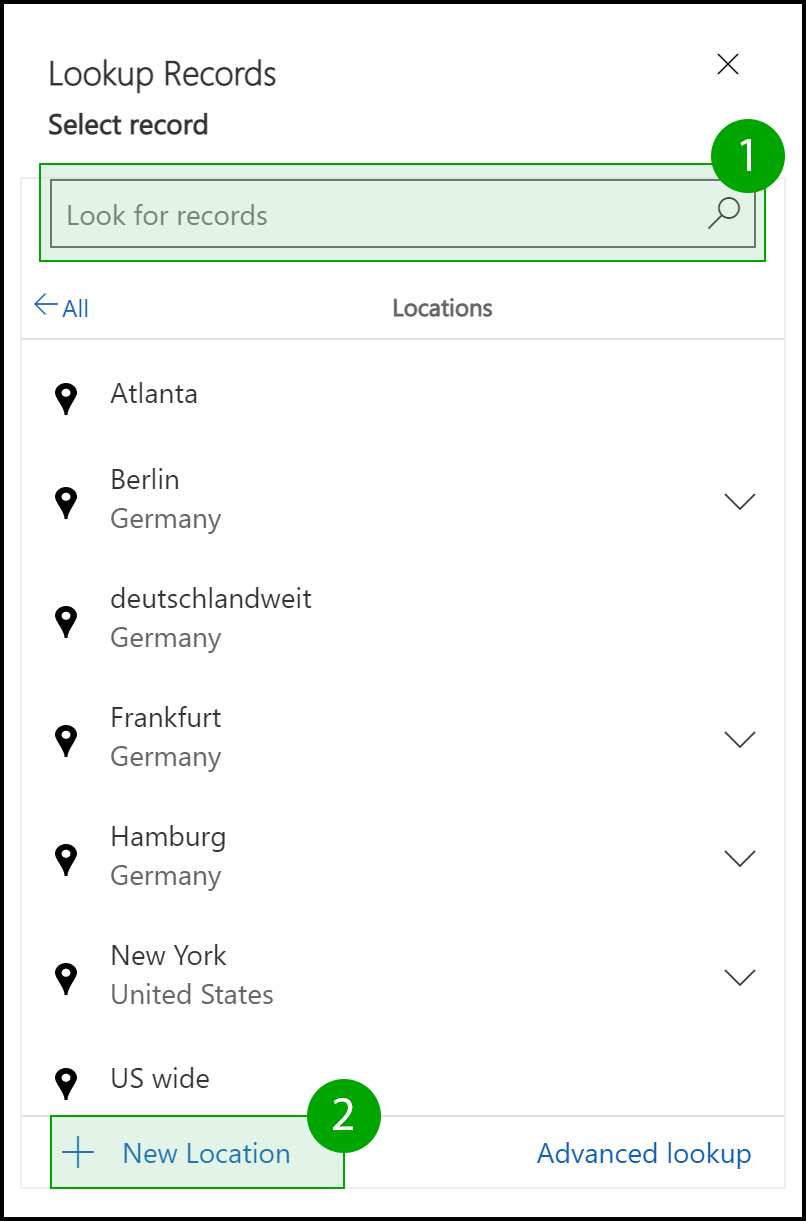
You will then briefly leave the vacancy page and be directed to the "Settings" area. In the "New Location" form, enter the Name of the location and, if necessary, add further address details.
If you want to post the vacancy for various locations within a country and do not want to list all locations individually, then create a "Location" with the Name "US wide", for example.
Save your entries and go back to the vacancy. Now you can add the new location to the table as described above.
Once you have published the vacancy with the various locations on your Recruiting Portal, the information from the Job Location field will appear in the list of vacancies in the column of the same name. Applicants can use the filter function on the left to filter the vacancies by selecting multiple locations from a predefined list. Only the vacancies that include the selected location will then be shown to the applicant.
You will see the list of locations you have specified for a vacancy when you open the vacancy on the Recruiting Portal.
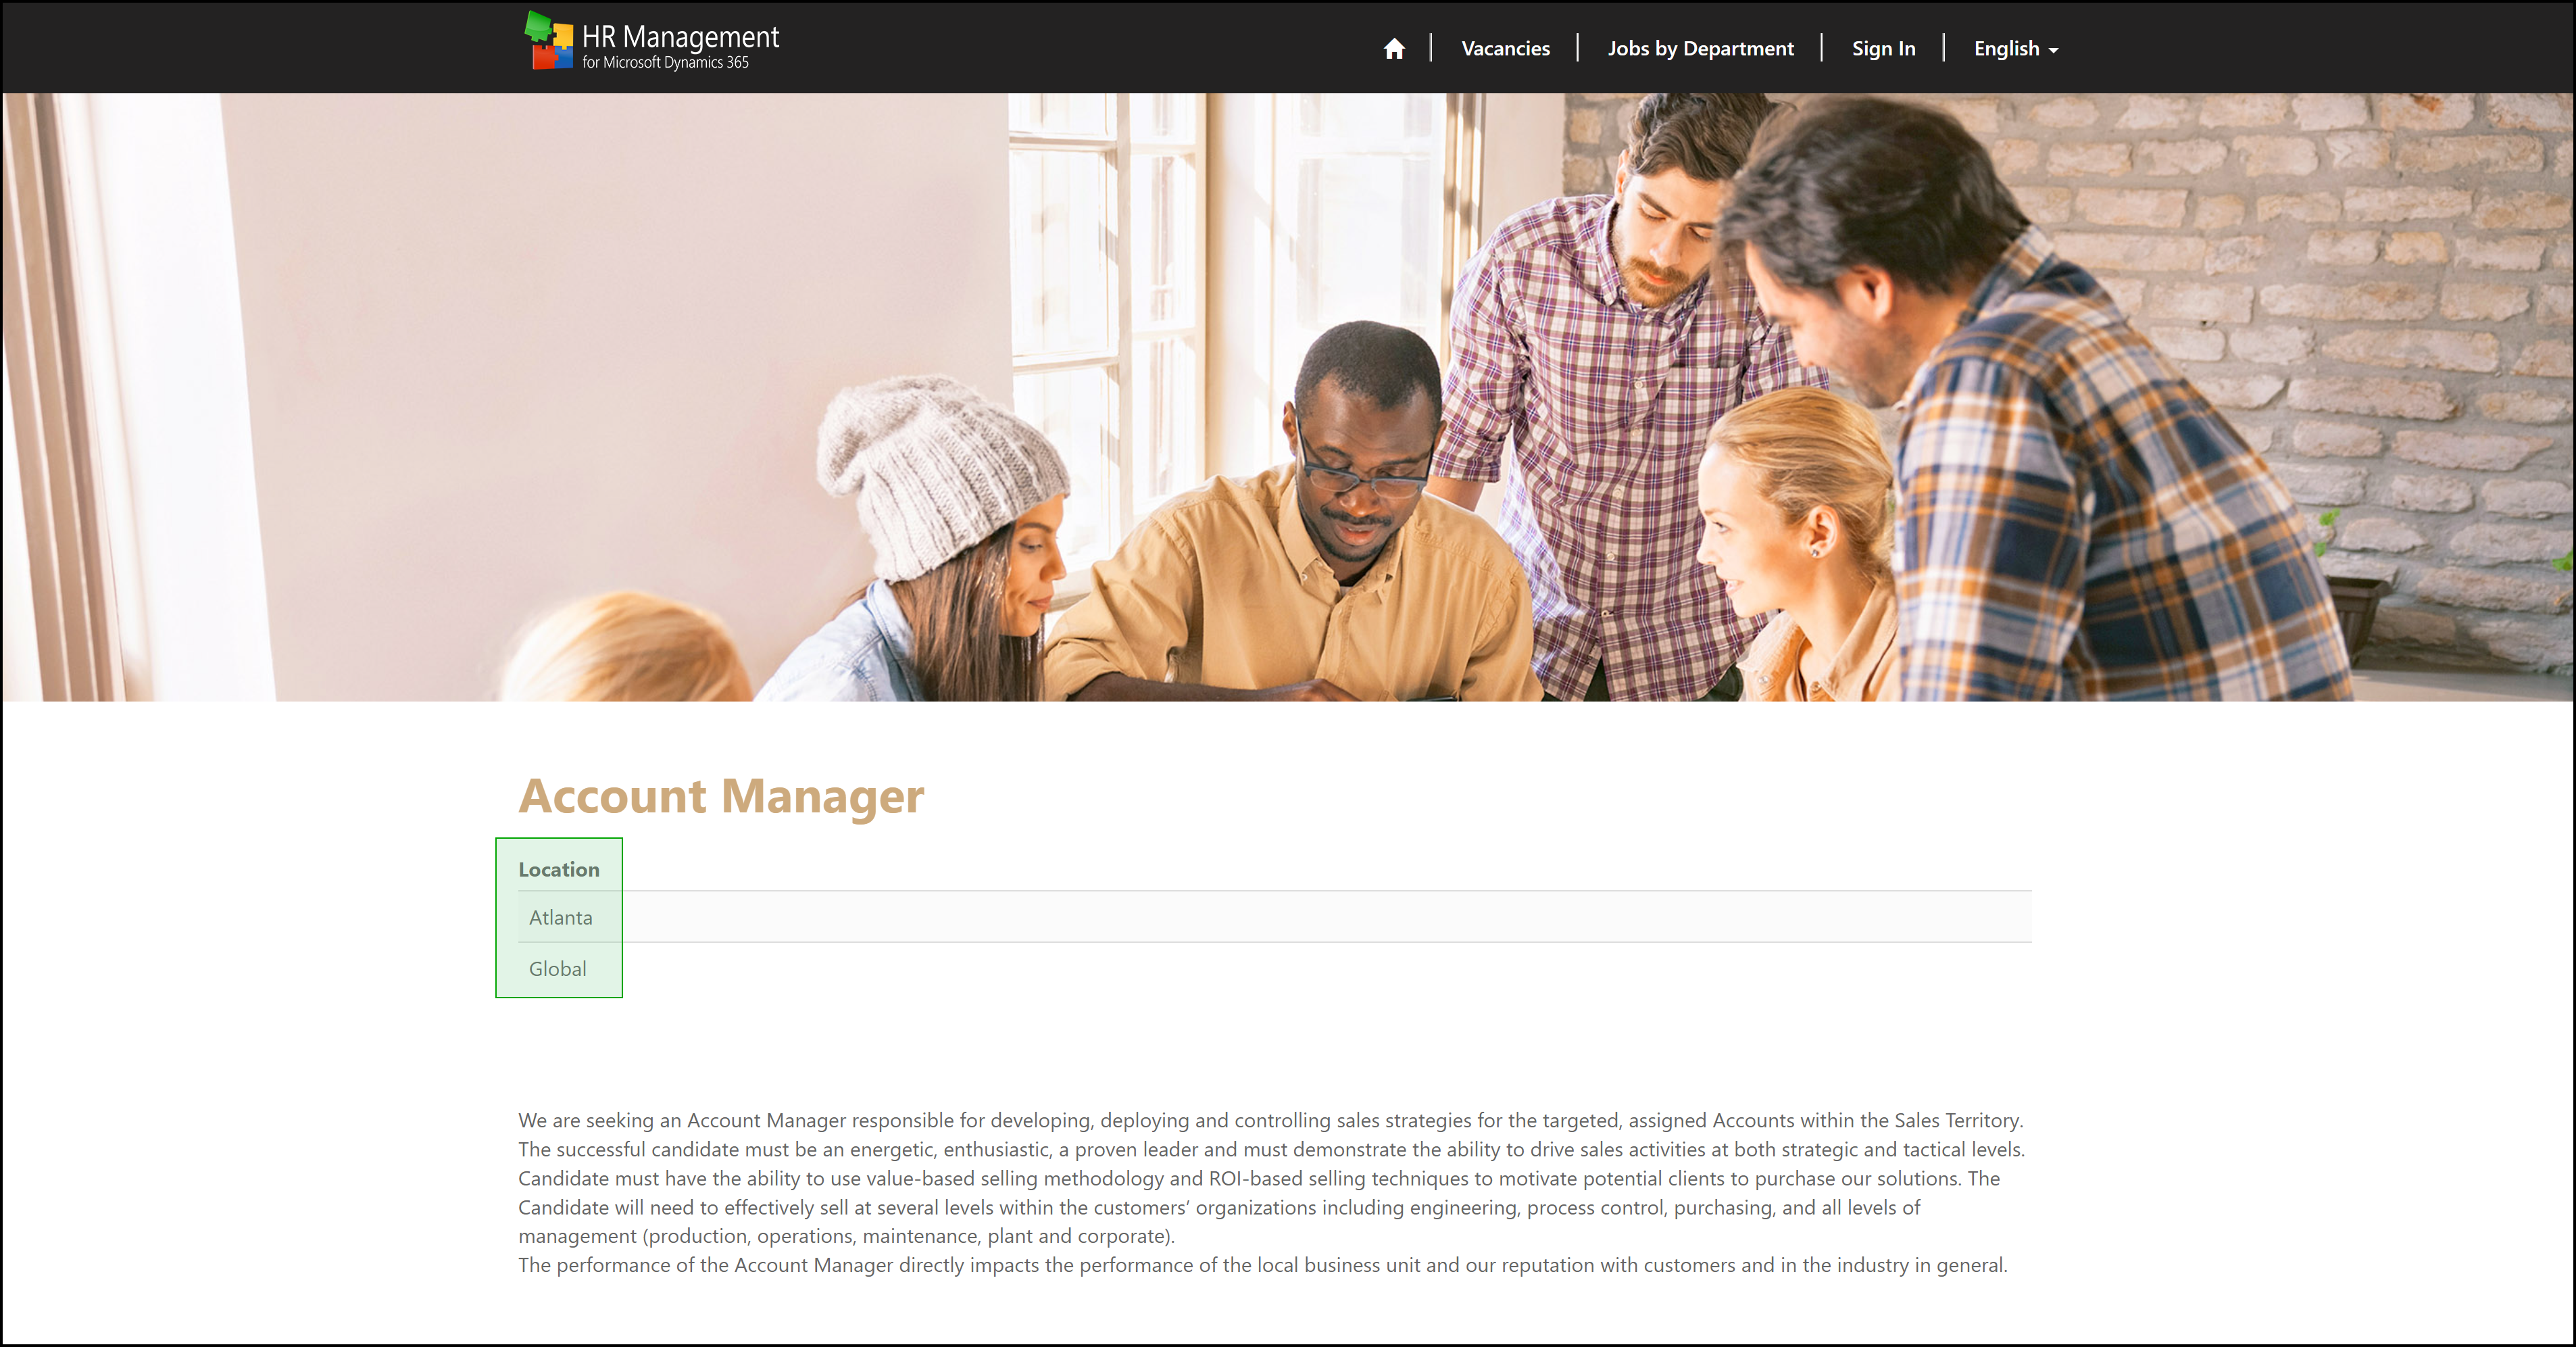
If an applicant wants to apply for a vacancy with multiple locations, he or she can select a desired location from the given list in the application process.
In the "Recruiting Contact Details" section, you can store the contact information of the responsible recruiter for this vacancy. To do this, search for and select the appropriate active employee in the Prefill From Employee field and save the record.
The system will then automatically populate the First Name, Last Name, and Business Phone fields with the information from the specified employee's digital personnel file. In addition, the stored picture of the employee is displayed at the end of the published vacancy in the Recruiting Portal.

Tab: Job Advertisement
In this section you can customize the advertisement which you designed in the Job Profile.
Note: For internal vacancies, the Text only fields need to be filled!
Note for Recruiting Portal:
If you would like to store an individual header image for a vacancy, which will be displayed above the vacancy text in the Recruiting Portal, select an image in the Portal Header Image field and save your selection. If you do not find a suitable image in your database and you would like to create a new image, please follow the instructions here.

Immediately after the saving process is completed, the vacancy image is updated in the system with the selected Portal Header Image. The image is also displayed in the header of the vacancy on the Recruiting Portal and the title appears in the stored color code. These settings will remain visible to the applicant on subsequent pages of the application process for this job posting.
Important: As soon as the header image for the Recruiting Portal has been updated, the Portal Header Image will also be adopted as the header image in all linked vacancies.
Tab: Publishing Preview
In this section you can see a preview of your job advertisement.
Note for Recruiting Portal:
You can change the view to Vacancy Portal Form to see a preview for the recruiting portal.
This preview is generated using the HTML Form of the job advertisements.
Tab: Vacancy Details
In this section you can enter further details for your vacancy
Optional Section: Bundesagentur für Arbeit (German Labor Agency)
More information can be found here: Bundesagentur für Arbeit (German Labor Agency)
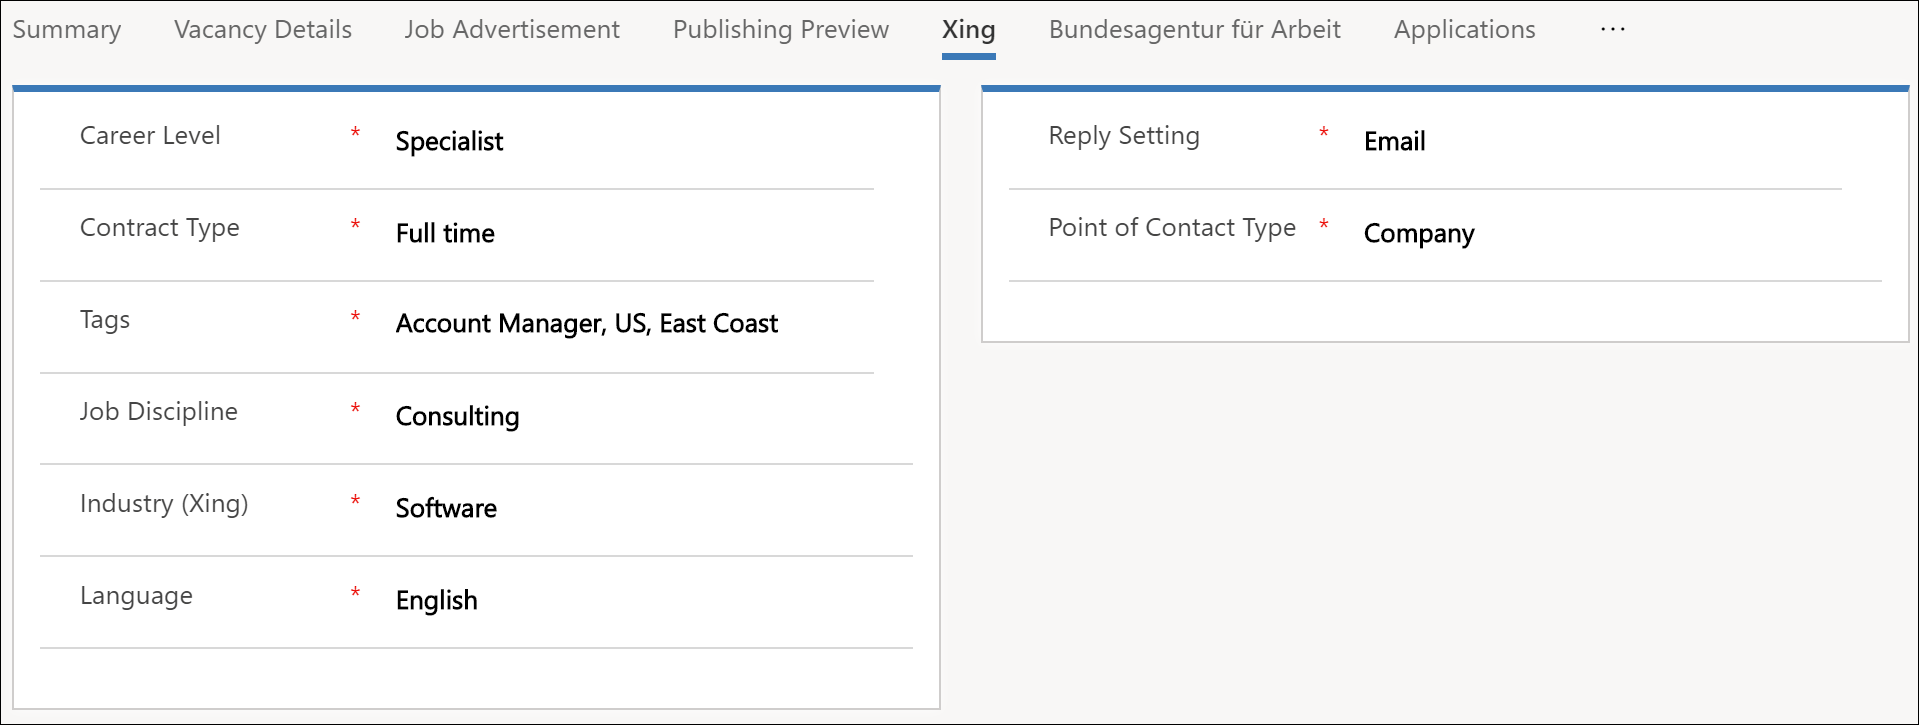
Optional Section: Xing
More information can be found here: XING Integration
After entering the information, set the Enrichment finished to Yes and click on Next Phase
Back to top | Back to table of contents
Phase 3: Approval
You can now share the vacancy with the person responsible for the approval.
When the manager clicks on the link, he will go directly to vacancy. After all the details have been checked and found to be correct, he enters his name in the field Approved by and confirms by clicking on Next phase
Note:
Only the active user can be entered in the field approved by. Approvals on behalf of others is not possible!
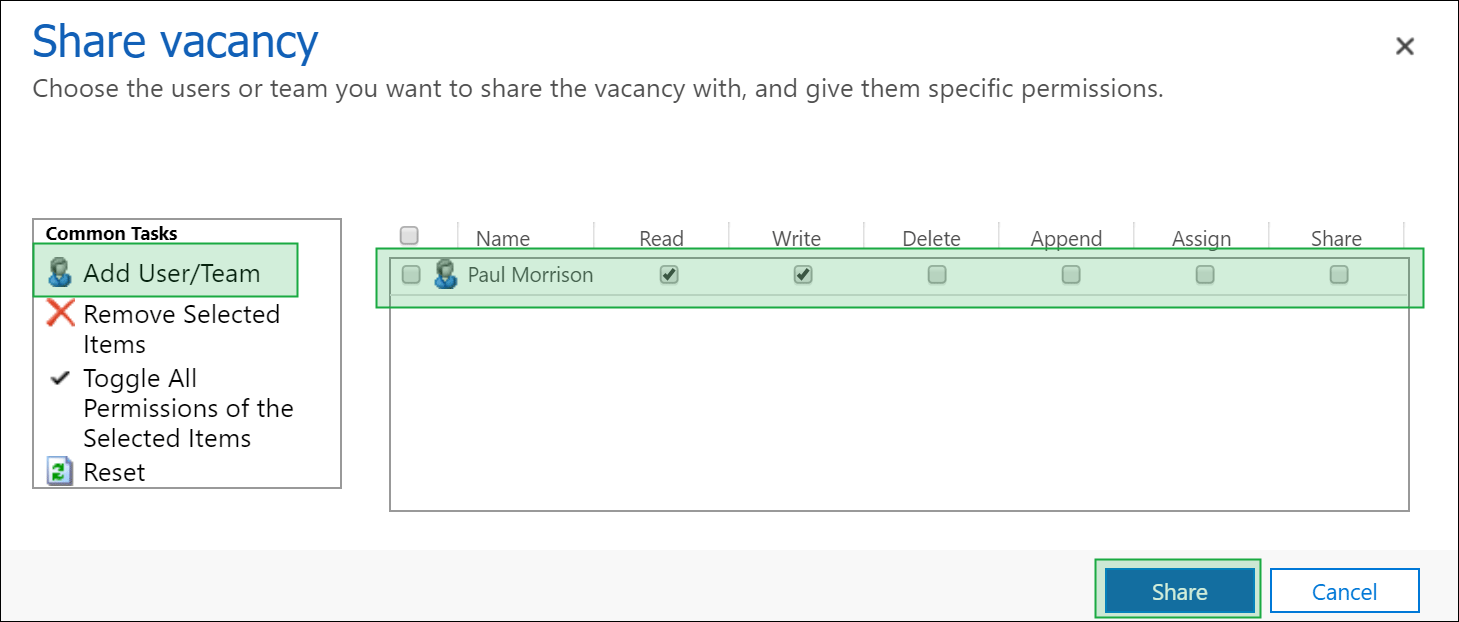
If you want another person to check the position, you can use the Share option .
To do this, select Share in the menu bar and open a dialog.
Now select the person with whom you want to share the record and assign the corresponding rights. Click on Share and the selected person will be informed by e-mail.
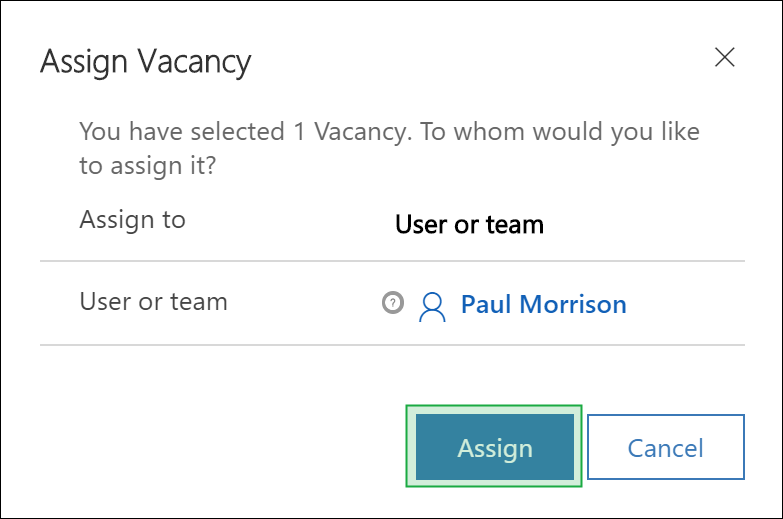
In the event that you not only want to share the record, but want to hand over the responsibility for it entirely, select Assign in the menu bar.
Click Assign To and the entry changes from Me to User or Team .
Now select the user and click on Assign. This assigns all rights to the selected user/team.
Back to top | Back to table of contents
Phase 4: Publishing
Recruiting Portal
Fill out the mandatory fields for publishing in the recruiting portal.
You can activate Validate for Applicant Portal in the overview to mark mandatory fields with red asterisks. This option will also show mandatory fields outside this section that you may not have filled yet.
The sector Publishing in the section Summary displays the Recruiting Channels that you have set to Use for publication in the basic settings.
Click on Edit, set the publishing process to Start and click Save

If everything went right, the status changes from Draft to Published.
Note for Recruiting Portal:
The option Enable Self-Rating determines whether an applicant can submit a self-rating of the required skills when applying via the recruiting portal.
This self-rating will then be imported and can be evaluated to select the candidate.
Just as easy as publishing is removing the ad. Once you choose Stop Publishing, this information is sent to the recruiting portal and the job ad is hidden.
Further information can be found here: Recruiting Portal
Back to top | Back to table of contents
Bundesagentur für Arbeit (BfA)
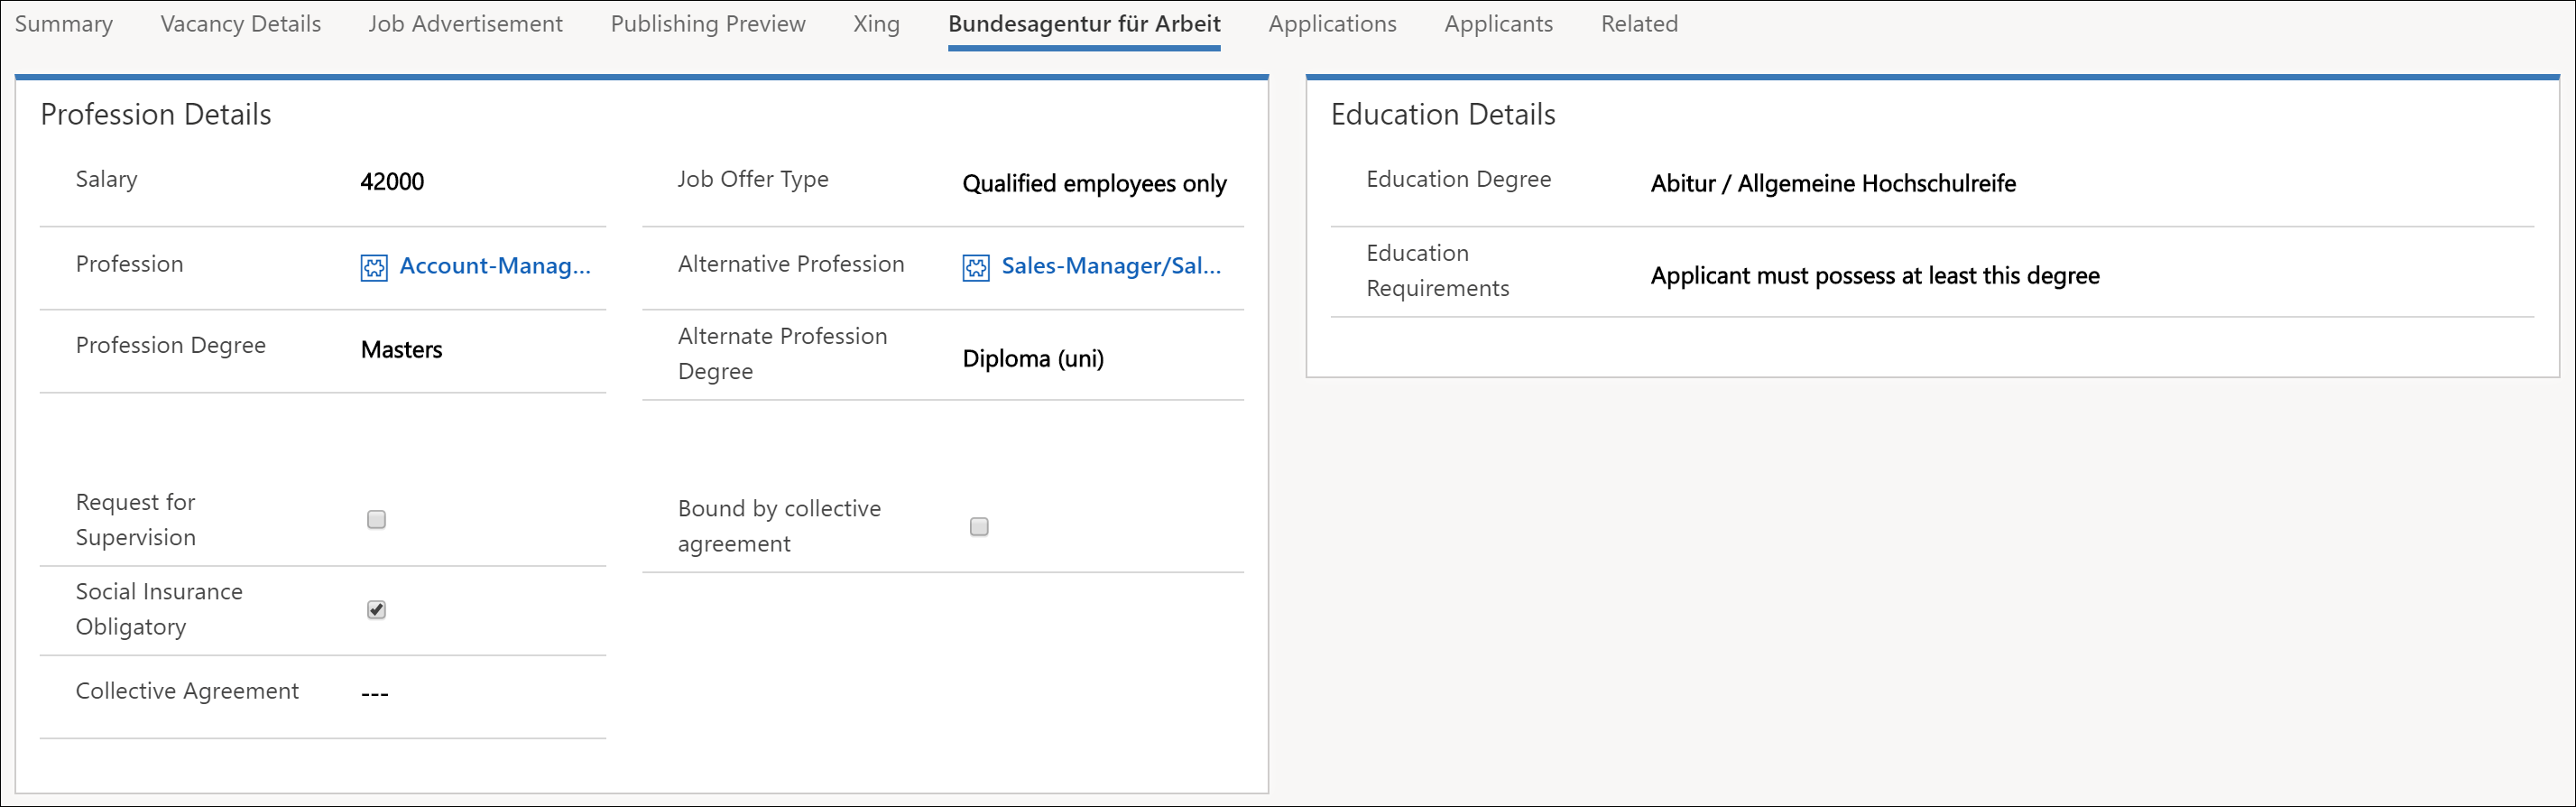
In the section Bundesagentur für Arbeit you can enter all the information required for publishing to the JOBBÖRSE.
You can activate Validate for Labor Office (BfA) in the overview to mark mandatory field with red asterisks. This option will also show mandatory fields outside this section that you may not have filled yet.
Note:
The names for profession, education degree and job offer type are defined by the labor office. Therefore, these names must not be changed
The sector Publishing in the section Summary displays the Recruiting Channels that you have set to Use for publication in the basic settings.
Click on Edit, set the publishing process to Start and click Save
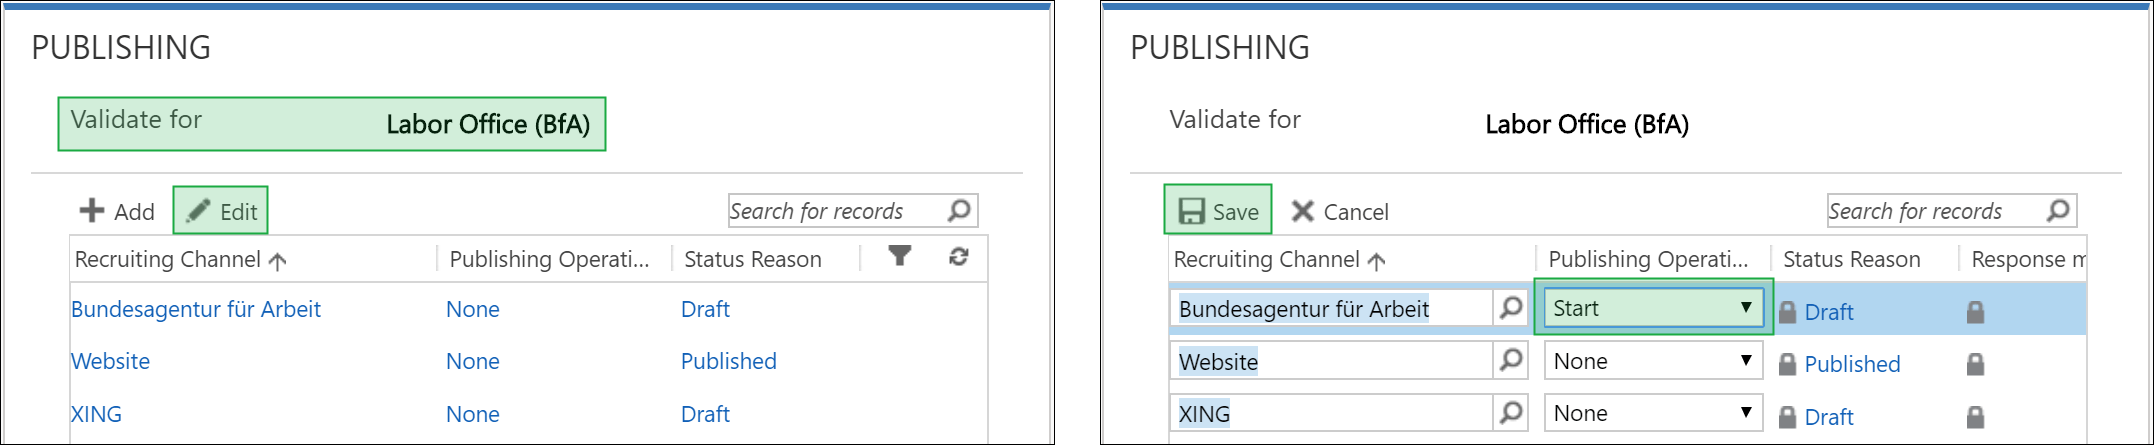
If everything went right, the status changes from Draft to Published.
If the status changes to Failed, open the recruiting channel record by double-clicking it. You will see a detailed error message. If you can't find a solution to the shown error, please contact your success manager.
More information can be found here: Bundesagentur für Arbeit (German Labor Agency)
Back to top | Back to table of contents
Fill out all fields in the section XING.
You can activate Validate for XING in the overview to mark mandatory field with red asterisks. This option will also show mandatory fields outside this section that you may not have filled yet.
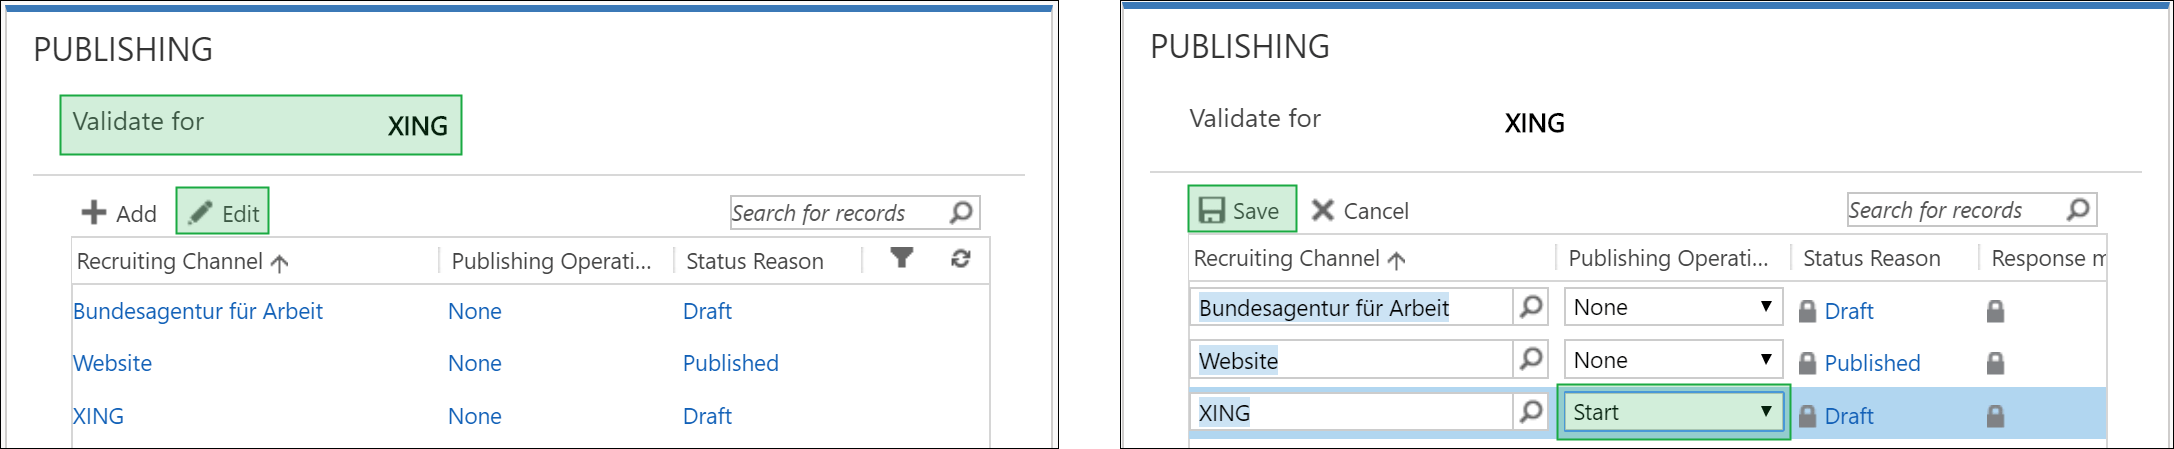
The sector Publishing in the section Summary displays the Recruiting Channels that you have set to Use for publication in the basic settings.
Click on Edit, set the publishing process to Start and click Save
Open the record and see the section Publishing Submission for the URL of the published vacancy. You can now open the link and check the vacancy.
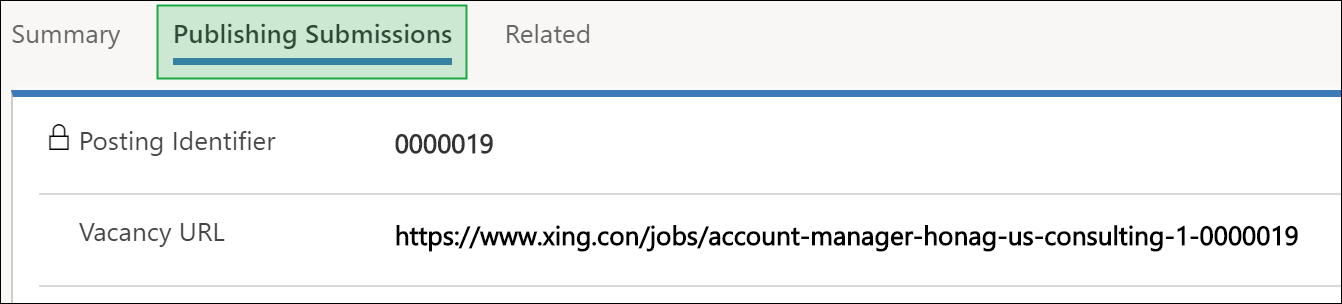
If everything is correct you can close the window and set the status in Dynamics HR Management to Published (1).
If an error occurs, you will get a detailed Response Message (2)
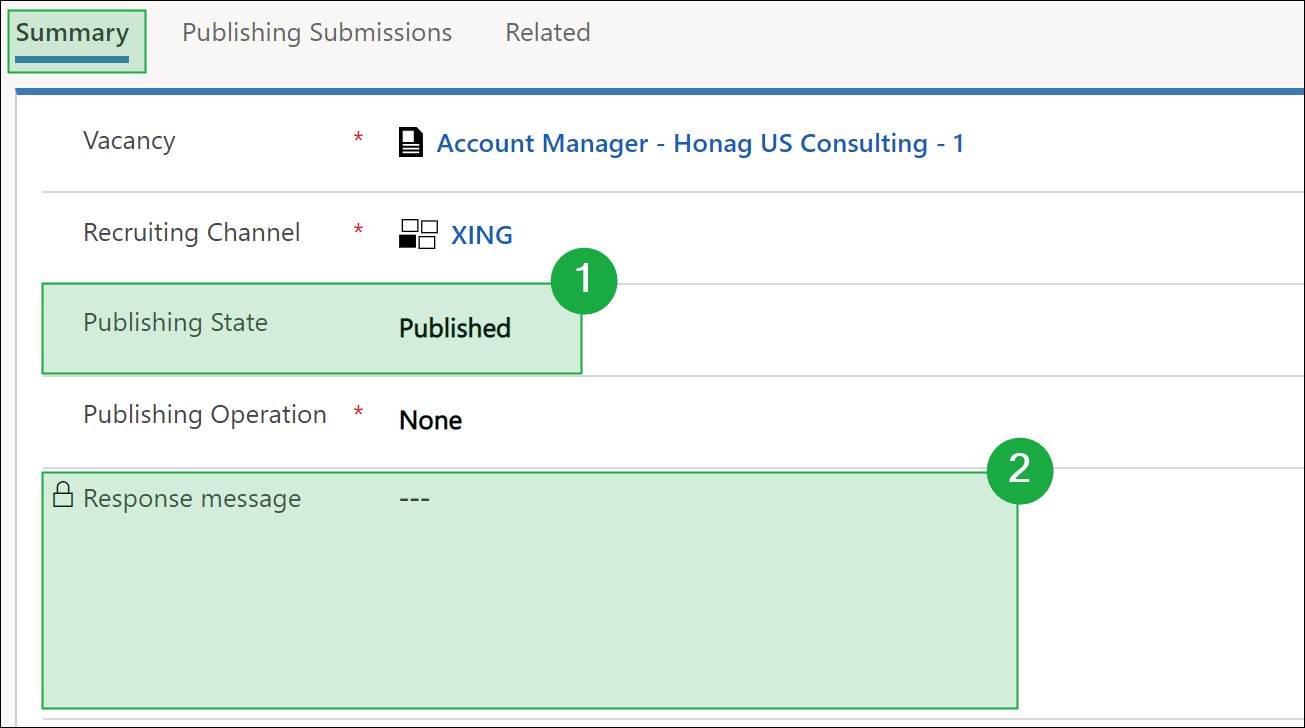
If you can't find a solution to the shown error, please contact your success manager.
Finally you can Save & Close
Back to top | Back to table of contents
Phase 5: Receiving Applications
In this phase, you will receive applications. These can arrive in different ways and are automatically taken over into the system in most cases. Likewise, applicants and applications are created automatically.
Dynamics HR Management creates Applicants and Applications separately and links them. The reason for this is that one Applicant can apply for several positions at the same time or the HR manager considers another position more suitable and would like to determine the suitability there.
This separation makes it easier for the HR manager to keep track of who is applying for which vacancy and allows a separate determination of suitability for the different jobs.
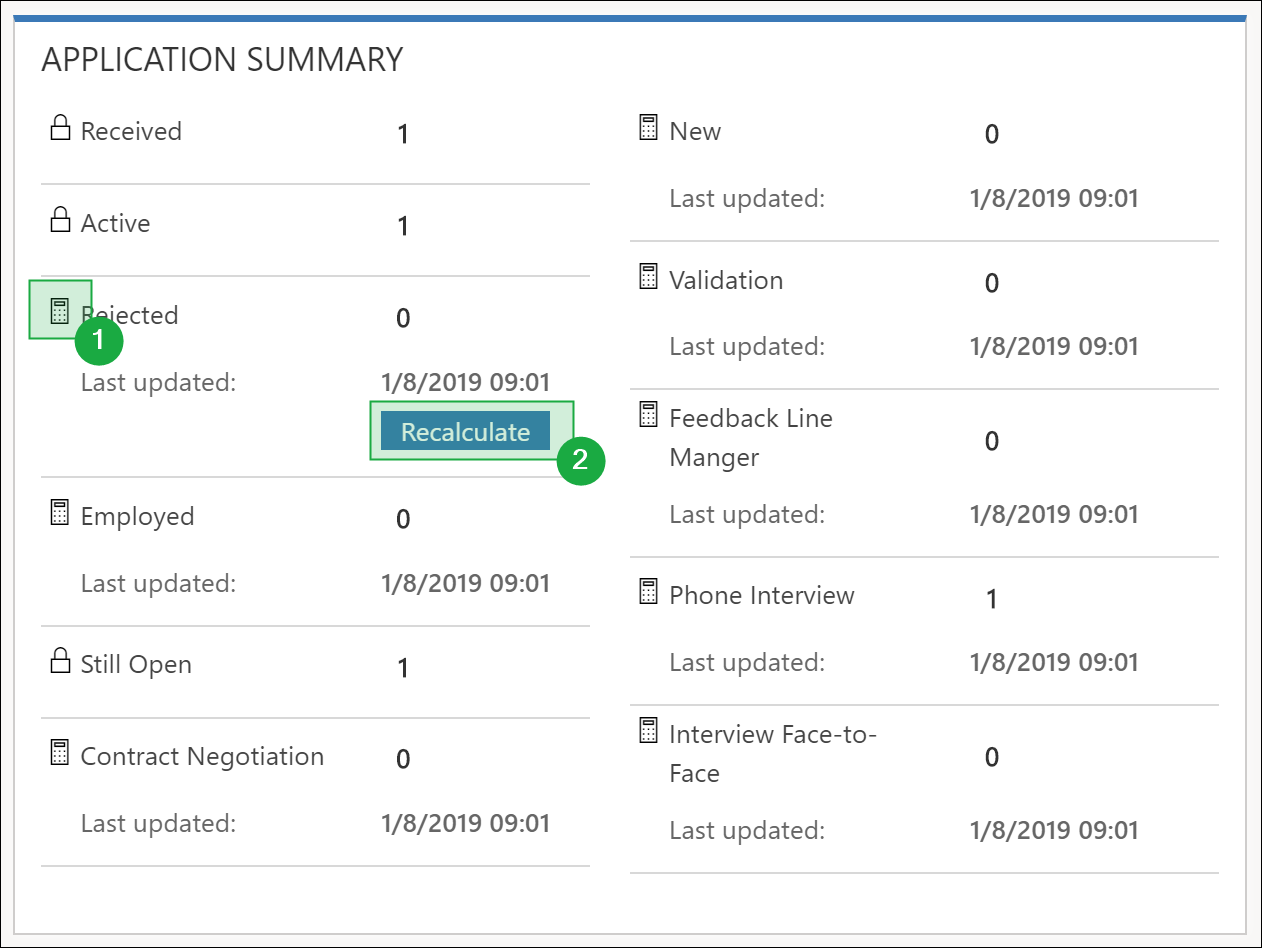
In the section Summary, you will find an overview of all received Applications and their current status. The data for this is taken directly from the Applications and are always synchronized. To update the fields manually, move the mouse over the field and click on the arrow circle symbol .
Back to top | Back to table of contents
Phase 6: Selecting Candidates
In this phase, you process the received Applications and try to find the best candidate for the position. There are many options and a structured process available for this, in the course of which you receive a lot of support through automation.
More details can be found here: Applications
Back to top | Back to table of contents
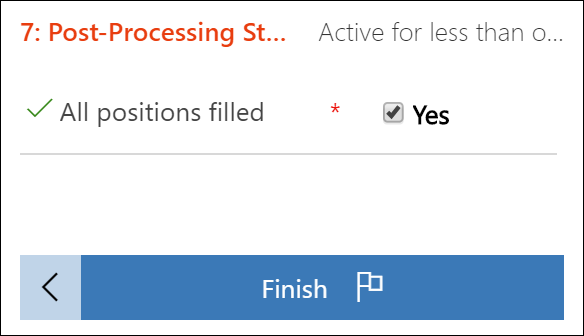
Phase 7: Post-Processing
In this phase, you can review the application overview in the section Summary. After successfully filling out all positions, you can set the corresponding field to Yes and complete the process by clicking Finish